Posts Tagged With: Woodland TIEF

Stampin’ Up! Woodland Nature Sings for the Amy’s Inkin’ Krew Blog Hop!


Good mornin’, y’all – welcome to another edition of Amy’s Inkin’ Krew team blog hop!  Each month we make projects centered around a theme – and this month our theme is Merry Christmas or Happy Holidays!  We can interpret that any way we want – so…be sure to check and see everyone’s projects – we’ve got a bunch of talented ladies hopping with us this month!

I don’t really do “Happy Holidays” so…it was all about Christmas for me.  So, I pulled out a sweet little set from the Annual Catalog called Nature Sings and added a little embossing with the Woodland TIEF.  Take a look-see:

Continue reading

Categories: Christmas, Sneak peek | Tags: , , , | 20 Comments

Stampin’ Up! Pick a Woodland Pumpkin for the Stamp Ink Paper #121

Mornin’, y’all!  It’s a Tuesday in October, so I’m bringing you a project from this week’s Stamp Ink Paper challenge!  I do hope that you’ll take inspiration from the challenge and use it to make a project of your own!

This week’s Stamp Ink Paper #121 challenge was a Tic-Tac-Toe (one of my favorites!).  I worked this one several different ways – down the left side…across the middle – I got my money’s worth out of it!

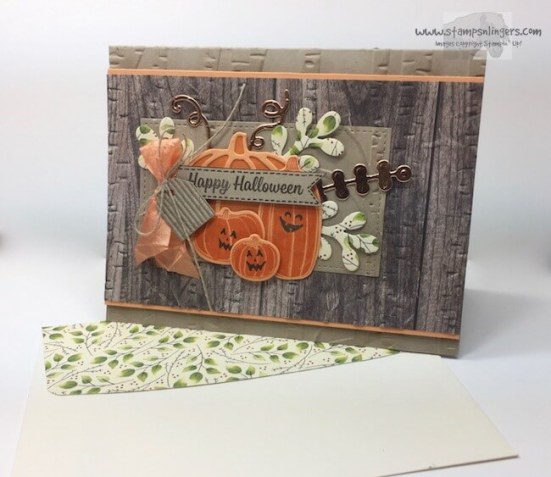
I went with my current favorite set – the Pick A Pumpkin bundle with the Patterned Pumpkins Thinlits.   For the “Embossing” I used the wonderful Woodland TIEF.  Take a look-see:

My layout was inspired by the sketch from the MFT Sketch Challenge this week.

I started by cutting a piece of the Wood Textures DSP stack and laying it over the front of a Crumb Cake card base.  Then I ran the pieces thru the Big Shot, inside my Woodland TIEF.  On the card base, I brushed the trees with an almost-dry Stampin’ Sponge and Crumb Cake ink, then used my Crumb Cake Stampin’ Write Marker to highlight the embossing on the trees.  On the DSP, I used the Early Espresso Marker on the trees.  Then I matted the DSP on a piece of Peekaboo Peach card stock.

The middle panel is another piece of Crumb Cake, that I cut into a rectangle with a square Stitched Shapes Framelit.  I laid the framelit on the card stock and ran it about half-way thru the Big Shot.  Then I turned it around, lined up the “stitches” and ran it back thru the other way.  Thus…rectangle from a square! 🙂

Next, I embossed it with the Woodland TIEF – I made sure that its embossing would match the embossing on the card front.  I used my Crumb Cake Stampin’ Write Marker to highlight the tree embossing, then I adhered it with some Liquid Glue and started making pumpkins!

I cut a large pumpkin with the Patterned Pumpkin Thinlits from Peekaboo Peach card stock and adhered it to a piece of Pumpkin Pie with Liquid Glue, then I fussy cut around it.  The smaller pumpkins, all from Pick a Pumpkin, are stamped in Pumpkin Pie on Peekaboo Peach, then cut with their matching dies from Patterned Pumpkin.  I gave them all faces in Tuxedo Black Memento Ink.

I cut a leaf and a couple pumpkin vine tendrils from Copper Foil and a few leaves from some Painted Autumn DSP, too.  Then I built the collage – using Liquid Glue.  The very last pumpkin – the smallest one – I popped on with a Stampin’ Dimensional.

The sentiment is from the Spooky Cat stamp set – stamped in Early Espresso on a strip of Crumb Cake.  I bannerized the end with my Paper Snips, added some faux stitches with my Early Espresso Stampin’ Write Marker – and popped it on with Stampin’ Dimensionals.  For my little embellishment, I ran a piece of Linen Thread thru the little hole in a Corrugated Elements tag, wrapped it around a short length of Peekaboo Peach 5/8″ Crinkled Seam Binding and tied a bow.  Then I adhered it with a Glue Dot and the card front was done!

On the inside, I ran one edge of a Very Vanilla panel thru the Big Shot in the Woodland TIEF and highlighted the trees with my Crumb Cake Marker.  I also lightly brushed them with Crumb Cake using a Stampin’ Sponge.  I stamped another Pumpkin Pie-on-Peekaboo Peach Pick a Pumpkin pumpkin and cut him out with his matching Patterned Pumpkin die.  Then I adhered him over the trees with Liquid Glue and added a tiny Linen Thread bow.

I Fast Fuse’d the panel to a Peekaboo Peach mat and into the Crumb Cake card base, popped the card front on with Stampin’ Dimensionals and the card was done.

My Very Vanilla Medium Envelope got another Pick a Pumpkin pumpkin on the front…

…and some more of the Painted Autumn DSP on the envelope flap.


Et Voila!  Y’all told me to keep doing collage cards, so I took your words to heart!  Thank you!!  If you haven’t picked up the Pick a Pumpkin stamp set and its bundled Patterned Pumpkin Thinlits – you’re missing out!  Get them now!

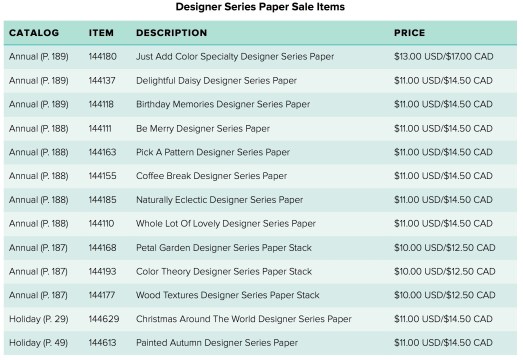
And – getcha some Designer Paper!! This is such a perfect perfect time to stock up on your favorite gorgeous papers – including the Painted Autumn DSP!!

TTFN

Mary   


HOST CODE FOR 16 OCT – 31 OCT: 4HQU3GVF

Use this host code when you order and receive a free gift from me! But, if your order is over $150, please don’t use this code (you’ll miss out on your own Stampin’ Rewards if you use it) but you’ll still get the free gift. The free gift is your choice of any item valued up to $10.00 from the 2017-2018 Annual Catalog or the 2017 Holiday Catalog! And – you can even select one of the Host-exclusive sets! See my Rewards page for more details.


Designer Series Paper Sale…

 All Month Long!

Let’s admit it: we all just love gorgeous Designer Series Paper!  By popular demand, we are bringing back an incredible offer on Designer Series Paper. We’ll be able to buy three packages of select Designer Series Paper and get one FREE during October! This sale includes Designer Series Paper from both the annual and holiday catalogs. And we’re even including select Specialty and Designer Series Paper Stacks on sale!

So take advantage of this excellent opportunity and gather up lots of pretty paper!  Take a look-see at what’ll be up for grabs!!  Click the picture to open a handy – and colorful! – flyer!


MERRY PATTERNS HOST PROMOTION STILL AVAILABLE

Host a workshop or place an individual order totaling $300 or more (before shipping and tax) by the end of October, and you’ll earn this cool new stamp set for free!  Click the picture to open up a printable flyer!

Version 2
Get all the details on my Stampin’ Up! Promotions page right….here!


Coming Soon…Stampin’ Blends!

We don’t know yet when the Stampin’ Blends will be released for customers but…if you’ve ever thought about joining Stampin’ Up, right now is a super time…you, too, can get your hands on these new markers early during the preorder which is only from 1 Oct – 15 Oct.  Yes – you can choose Stampin’ Blends to fill your Starter Kit!  Pssst – mine are here already! 🙂

Stampin’ Blends Features

  • Add just the right amount of color where you need it with the brush tip or fine-point.
  • Each color (except Ivory and Bronze) has a light and dark shade marker, available individually or in a combo pack.
  • Stampin’ Up! has done in-house testing for evaporation and life testing and they are really happy with the results.
  • Press fit seal prevents air from entering the barrel and causing evaporation.
  • The nestable lids are easy to keep track of and have a tight fit for long-lasting color.

PRODUCTS USED IN TODAY’S PROJECT:  


CARD CUTS USED IN TODAY’S PROJECT:

Crumb Cake Card Stock: 5 1/2″ x 8 1/2″ (card front, scored and folded at 4 1/4″); 2 1/8″ x 3 3/4″ Stitched Shape rectangle (panel on front); 1/2″ x 2 1/2″ (sentiment banner)

Peekaboo Peach Card Stock: 3 5/8″ x 5 1/2″ (mat for card front); 4″ x 5 1/4″ (mat inner liner); Patterned Pumpkin die cuts

Very Vanilla Card Stock: 3 7/8″ x 5 1/8″ (inner liner)

Pumpkin Pie Card Stock:  behind the Patterned Pumpkin die cut

Copper Foil:  Patterned Pumpkin die cut leaves and tendrils

Wood Textures DSP:  3 1/2″ x 5 1/2″ (card front)  

Painted Autumn DSP:  Patterned Pumpkins die cut leaves; envelope flap

If you need any stamping supplies, I’d be very happy to be your Demonstrator. Just click on the Order Stampin’ Up! Online Now button on the right side of the screen to go directly to my online store or drop me an email if you have any questions. Happy Stamping!


Shop the Clearance Rack here. Earn FREE Stampin’ Up! Products – Join my Punkin Head Peppermint Rewards – My online customer thank you program!


Finn-Fan Fix  (you’ll have to settle for re-runs until I get back home to take fresh photos!!)

This one just makes me chuckle every time I see it! 🙂

TTFN

M  

Categories: Halloween, Special Promotions | Tags: , , , | 14 Comments

Stampin’ Up! Owl-oween Seasons for the Happy Inkin’ Thursday Blog Hop


Happy Thursday, y’all – and welcome to the Happy Inkin’ Thursday Blog Hop! We’ve got a full roster playing with today’s spooky color challenge, so be sure to check ’em all out when you get done here!  

I suppose this color scheme didn’t scream Halloween – but it certainly spoke it in quite decisive tones – at least to me!

And, because I’m a tad on the lazy side….I also grabbed a sketch to help me out.  I used this one from the MFT Wednesday Sketch Challenge!

So – when I combined the two inspirations , and added some Spooky Cat stamp set images and a bit of Spooky Night DSP – here’s what I came up with.  Take a look-see:

Yep – not a cat to be seen! 🙂

I started with two different designs in the Spooky Night DSP and matted the first to a Pumpkin Pie panel for the card front.  Bucking convention and boldly mixing stripes and spots, I matted the second one as well – and then ran it thru the Big Shot in my Woodland TIEF.

Squint yer eyes – you’ll be able to see it!

Then I used Liquid Glue to adhere that embossed panel to the card front.

I cut two Very Vanilla circles with my Stitched Shapes Framelit die and matted them both on Pumpkin Pie scalloped circles that I’d made with the Layering Circles Framelits.  On one of them, I stamped the owl-sentiment image from the Spooky Cat stamp set.  I stamped the sentiment portion (with the eyes!!) in Cajun Craze – then I used the second little image that adds the beak and feet (talons!!) in Pumpkin Pie.  It seemed right to add Black Rhinestone Jewels for his eyes…

Then I adhered both circles to the card front with Liquid Glue.

On a piece of scrap Very Vanilla card stock, I stamped the larger owl image in Tuxedo Black Memento Ink.  He’s a rare Pumpkin-Pie-Breasted Owl, so I colored his chest feathers with my Pumpkin Pie Stampin’ Write Marker.  And, since it’s a well-known fact that the rare Pumpkin-Pie-Breasted Owl has Cajun Craze feathers around his large eyes – I added that with my Cajun Craze Marker.  He got a couple of Black Rhinestone Jewels for eyes, too!  I fussy cut him and then used a stylus to round his body up a bit, so he’d look imposing on his branch!

I used the Seasonal Layers Thinlits to cut out six of the branches in Basic Black card stock, and stacked three of them up with Liquid Glue to create two thick branches.

I adhered the bottom branch with Liquid Glue – allowing it to spill off both edges.  On the top branch, I adhered it in two steps.  First I glued the full branch portion and the top “twig”.  Then I put a couple of Dimensionals behind the body of my Owl and popped him over the top twig.  With a little more Liquid Glue, I adhered the top twig over his tail so it would look like he was “in” the tree!

I added a couple three silver star Metallic Enamel Shapes and the card front was done.

On the inside, I stamped the Spooky Cat owl again – another rare Pumpkin-Pie-Breasted Owl – in the corner of a Very Vanilla panel.  With the Colorful Seasons stamp set, I added a couple of branches in Tuxedo Black Memento Ink.

I popped on a single silver star Metallic Enamel Shape, Fast Fuse’d the panel to a Pumpkin Pie mat and into my Cajun Craze card base.  Then I popped the card front on with Stampin’ Dimensionals and the card was done!

My Very Vanilla Medium Envelope got another Spooky Cat owl (you know what kind!) and Colorful Seasons branch on the front…

…and another piece of Spooky Night DSP on the envelope flap.

Et Voila!  I do think these cute owl images ought to get at least a mention in the name of this stamp set….don’t you? Spooky Cat.  Huh?  No cat anywhere! Regardless – it’s a great stamp set – with lots of possibilities for your Halloween fun!  Hope you like!

Now that you’ve seen my project, please take a little time to visit all the Happy Inkin’ Thursday Blog Hoppers today!

If you click on the Next Blog button, you’ll go right to Jari Francis’ page. And you can just click on the names below to go direct to all the blogs!

Amy Koenders

Shelagh Freemantle

Mary Deatherage – YOU ARE HERE!

Jari Francis

Kristi Gray

Jaimie Babarczy

Have fun on the Hop!

TTFN

Mary


HOST CODE FOR 16 SEPT – 30 SEPT: DH2SEZBR

Use this host code when you order and receive a free gift from me!  But, if your order is over $150, please don’t use this code (you’ll miss out on your own Stampin’ Rewards if you use it) but you’ll still get the free gift. The free gift is your choice of any item valued up to $10.00 in the 2017-2018 Annual Catalog or 2017 Holiday Catalog. And – you can even select one of the Host-exclusive sets! See my Rewards page for more details.


STAMPIN’ UP! PRODUCTS USED IN TODAY’S PROJECT:  


CARD CUTS USED IN TODAY’S PROJECT:

Cajun Craze Card Stock: 4 1/4″ x 11″ (card base, score and fold at 5 1/2″)

Pumpkin Pie Card Stock: 4″ x 5 1/4″ (mats for card front and for inner liner); 4″ x 4 1/4″ (mat for middle DSP panel); 2″ scallop circle (x 2 – mats for Very Vanilla circles)

Very Vanilla Card Stock: 1 7/8″ Stitched Shapes Circles (x 2 – circles on front); 3 7/8″ x 5 1/8″ (inner liner)

Basic Black Card Stock:  Seasonal Layers branches 

Spooky Night DSP: 3 7/8″ x 5 1/8″ (card front); 3 7/8″ x 4 1/8″ (middle DSP panel); envelope flap

If you need any stamping supplies, I’d be very happy to be your Demonstrator. Just click on the Order Stampin’ Up! Online Now button on the right side of the screen to go directly to my online store or drop me an email if you have any questions. Happy Stamping!


Shop the Clearance Rack here. Earn FREE Stampin’ Up! Products – Join my Punkin Head Peppermint Rewards – My online customer thank you program!


No FFF’s on Blog Hop Days!   

Categories: Halloween | Tags: , , , , | 18 Comments

Stampin’ Up! Star of Light Votive Easel

Good morning, y’all!  It’s Friday and when you read this I’ll be on my way or at the World Card Making Day event hosted by Brian King and Pam Morris!  With any luck, Kelly and I will have had a smooth trip up to Atlanta and we’ll be gettin’ crafty! 🙂

So – I do have a picture of Finn for you today.  Well, I actually have two.  After today, there won’t be any for a day or two until I can get back home to take them!  Fair warning….you’ll be stuck with just me and a card!

This morning (Thursday morning, that is), after our usual run, we adjourned to the chairs on the porch of the barn.  I to my e-mail and Finn to his….sand squirting.  That’s what I call his time in the sandy spot at the end of the barn.  He twirls and crouches and jumps and…well, squirts like he’s been shot from a water pistol!  I took a video but I have yet to figure out how to post a video here.  The funniest part of the video is the end, where he “squirts” right to me at about a hundred miles per hour and leapt (never even tapped the brake or thought it through!) slam into my lap.  And slam is right.  He’s a chunk!  So he then sat there for about 5 minutes.  And then got down and into the next-door chair for a micro-snooze.  Just a-sittin’ on the porch with his mom! While she tried to recover the breath that he knocked out of her! 🙂

finn-in-the-lounger
Here’s the second pic – I don’t think it needs any ‘splainin’…

finn-with-ball-and-stick
Play hard and carry your ball and a big stick!  And if the stick is almost too big for you to carry?  All the better! 🙂

So, on to card making stuff, since that’s really why you come by.  Today I made a second 3-d project to take to the swap.  This is another easel card, meant for a little battery-operated votive.  I used the Star of Light stamp set and the Starlight Thinlits die set.  And couched it in Wisteria Wonder and Silver.  Take a look-see:

star-of-light-votive-easel-10-stamps-n-lingers

I used the same dimensions and card cut sizes that I used for my Detailed Greetings From Santa votive easel I did a couple weeks back.  You can check that one out here, if you like!

I started with a piece of Wisteria Wonder card stock, cut to 4 1/2″ x 12″ and I scored and folded it at 4 1/4″ and 8 1/2″.  To add a little texture to the front, I ran what would be the front panel thru the Big Shot in the Woodland TIEF.  I considered adding some highlights with a white gel pen, but decided against it.

I pulled out the pretty detailed star die from the Starlight Thinlits set and cut the star from the middle of the front panel.  I also cut one from a piece of Silver Foil while I was at it.

star-of-light-votive-easel-8-stamps-n-lingers
I cut a second piece of Wisteria Wonder to 4 1/2″ x 4 1/2″.  I ran that piece thru the Big Shot to cut the large “open” star image from the Starlight Thinlits.  I used the already-cut front panel to make sure that everything would line up.  The point of this piece is to tidy up the back of the front panel, so it all looks pretty when you open up the card!

star-of-light-votive-easel-2-stamps-n-lingers
I used some Multi-Purpose Liquid Glue to adhere a piece of Vellum card stock behind the star on the front panel.  Then I added the second, smaller Wisteria Wonder panel over the top of the Vellum, using more Liquid Glue.

Finally, I took the Silver Foil die cut and used eensy-weensy little tiny droplets of glue from my Fine-Tip Glue Pen to adhere it into the opening on the card front.  To help the glue adhere, I laid my largest acrylic block over the panel and weighted it down a bit.  And worked on my sentiment.

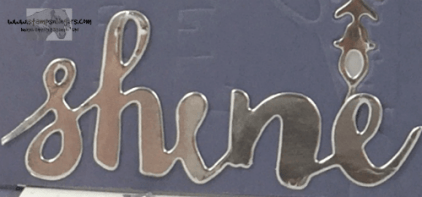
Do y’all know where the sentiment “shine” came from?

Any guesses?

Take a minute to look thru the catalog…thumb thru your thinlits and framelits….

Figure it out?

Yep – the Sunshine Wishes Thinlits!  I cut the word “Sunshine” out and then carefully snipped off “Sun” and trimmed up the little tail on the first “s” to make it look like it was meant to be that way!
star-of-light-votive-easel-11-stamps-n-lingers
I adhered that to the front panel with Multi-Purpose Liquid Glue and it was time to move inside!

For the smaller, end panel, I stamped two sentiments from the Star of Light stamp set in Wisteria Wonder on a Whisper White panel, making sure the smaller one was down far enough that it would show when the easel is open.

Then I used the swirly-stars image and inked it in Smoky Slate, then stamped-it-off-once before stamping it on the panel.  I did that a couple of times, then SNAILd the panel to a Silver Foil mat and onto the card base.

The middle panel got another of the Star of Light sentiments in Wisteria Wonder and more swirly stamped-off-once Smoky Slate stars.  It’s also matted on Silver.

star-of-light-votive-easel-1-stamps-n-lingers
The final piece of the card was to add the easel “stops”.  For this one, I used Silver Metallic Enamel stars – I stacked two stars up on each side to ensure it would “catch” the easel.  I added some more stars, too.  Cuz I like ’em! 🙂

star-of-light-votive-easel-12-stamps-n-lingers
I added some Star of Light swirly’s and Silver stars to the front of a Whisper White Medium Envelope (I decided to use this size envelope versus making a square envelope)…

star-of-light-votive-easel-5-stamps-n-lingers
…and another swirly to the envelope flap.

star-of-light-votive-easel-9-stamps-n-lingers
And all that was left to do was dim the lights, turn on the little votive and enjoy the show!

star-of-light-votive-easel-3-stamps-n-lingersstar-of-light-votive-easel-4-stamps-n-lingers
Et Voila!  These little easel cards are so easy to make, and adding a glow-y feature to the front is just another couple of steps!  I think this Star of Light bundle really lends itself well to this kind of card, don’t you?  Hope you like – and will give it a shot!  And hope whoever gets this tomorrow – yes, it’s going! – will enjoy it thru the Christmas season!

Scroll on down for the card cuts and all the goodies you need to make this one for yourself!


HOST CODE FOR 1 NOV – 15 NOV: K9PECAM3

Use this host code when you order and receive a free gift from me! But, if your order is over $150, please don’t use this code (you’ll miss out on your own Stampin’ Rewards if you use it) but you’ll still get the free gift – your choice of any item valued up to $8.00 in the 2015-16 Annual Catalog or the 2016 Holiday Catalog.


Ordering Special Going on Through 7 Nov!

Double Peppermints
Since Stampin’ Up! is so generously offering a great 25% off on selected stamp sets, as well as letting us order the Stitched Shapes Framleits early, I’m offering DOUBLE Peppermint Rewards Points for this first week of the sale!

Between now and 7 Nov 16, for all orders over $50 (before shipping and tax) you’ll earn DOUBLE Peppermint Rewards points.

For more information on the benefits of collecting Peppermint Rewards Points, check out my Punkin’ Head Customer Rewards program right here!

Don’t forget to add the Host Code below if your order is under $150 to get your free thank you gift (orders over $150 will get the free gift, too, but you’ll want to use your own Host Code!).  Let me know if you have any questions.  

Let’s get ready for the Holidays – Happy Shopping!!


Stitched Shapes Framelits Die Set and Matching Stamp Set Sale


shareableimage_2_na
These are new Circles, Ovals and Squares Framelits – 12 dies in all – that cut your shapes while simultaneously creating a hand-stitched look for your card-making projects! These will be “officially released” in the 2017-2018 annual catalog, but we get to buy them right now!

On top of that, SU! has a great 25% sale off coordinating stamp sets from 1 – 30 November! Click here to open up a PDF with the list of stamp sets that are on sale.  Or – you can go right to them in my Online Store….here! 🙂

And there’s more great news…although the 25% off stamps sets sale ends 30 November, you’ll still be able to get the Stitched Shapes Framelits after that date! Cool, huh? 🙂

Details:

  • Stitched Shapes Framelits available beginning today! (will continue to be available through the 2017-18 Annual Catalog!)
  • 1 – 30 November 2016: select stamp sets 25% off
  • Promotion Deadline (25% off select stamp sets): 30 November 2016, by 11:50 PM (MT)

FYI, here are the measurements for the full cutout pieces for the Stitched Shapes Framelits Dies:

  • Circles:
    1-3/8”
    1-7/8”
    2-3/8”
    2-7/8”
  • Squares:
    1-3/16”
    1-5/8”
    2-1/8”
    2-5/8”
  • Ovals:
    1-3/4” x 13/16”
    2-1/4” x 1-5/16”
    2-3/4” x 1-13/16”
    3-1/4” x 2-5/16”

The stitched embossing is approximately 1/16” from the edge of the cutout. So the dimensions are approximately 1/8” smaller than the cutouts.


You’ve got a few more days to take advantage of the Double Peppermints Ordering Special, so…

I’ll be back tomorrow with another card – and….foreshadowing!…next Monday afternoon I’ll be able to share some of the new goodies coming in the 2017 Occasions Catalog!  Fun fun!

TTFN

Mary


STAMPIN’ UP! PRODUCTS USED IN THIS PROJECT:      


CARD CUTS USED IN THIS PROJECT:
Wisteria Wonder Card Stock: 4 1/4″ x 12″ (card base, scored and fold at 4 1/4″ and 8 1/2″); 4 1/4″ square (second panel to die cut and sandwich the Vellum Card Stock)

Vellum Card Stock: 3 1/2″ square ( this doesn’t have to be exact – just needs to be sized to fit between the two Wisteria Wonder panels and completely encompass the star)

Whisper White Card Stock: 3 7/8″ square (middle sentiment panel); 3 1/8″ x 3 7/8″ (end sentiment panel)

Silver Foil: 4″ square (mat for middle sentiment panel); 3 1/4″ x 4″ (mat for end sentiment panel); Starlight die cut; Sunshine Wishes die cut

If you need any stamping supplies, I’d be very happy to be your Demonstrator. Just click on the Order Stampin’ Up! Online Now button on the right side of the screen to go directly to my online store or drop me an email if you have any questions. Happy Stamping!


Shop the Clearance Rack here. Earn FREE Stampin’ Up! Products – Join my Punkin Head Peppermint Rewards – My online customer thank you program!

Categories: Christmas | Tags: , , , , , | 14 Comments

Stampin’ Up! Thoughtful Branches Autumn Leaves!

UPDATE:  Hey y’all – I was honored to discover that this card had been selected as a CTS Favorite!  Thanks to all the good folk at CAS(E) This Sketch for liking it enough to select it from among all the wonderful projects submitted!  Please take a second to click here and go check out all the winners and great cards! 🙂


It’s the Fiiinaaal Countdown….do you hear the music?  Song from the 80’s….kind of about nuclear war, so…okay.  Not all that cheery – but it’s got a great beat and tune!

Our final countdown is to an event seriously not as bad as nuclear war (doesn’t really narrow it down that much, does it??), but it’s definitely kind of awful!  I’m speaking, of course, of the imminent end of availability of Thoughtful Branches and the Beautiful Branches Thinlits.  If everything goes as originally stated – and I’ve seen nothing to the contrary – then come Wednesday night, you’ll no longer be able to order this wonderful and versatile set.  So…if you don’t have it yet…well.  Gotta do it! 😉

Thoughtful Branches Bundle

Thoughtful Branches Photopolymer Set – Item 143539 – $27
Beautiful Branches Thinlits – Item 143538 – $31
Thoughtful Branches Bundle – Item 144328 – $52

I used this set again today for my card.  This time I used the leaves – the stamp image and the matching die – with the Baby Wipe technique – and one of the several excellent sentiments.  Look what I got when I added some Copper and the Woodlands TIEF.  Take a look-see:

Falling Thoughtful Branches Autumn Leaves 4 - Stamps-N-Lingers
Continue reading

Categories: Thank You Cards | Tags: , , , | 10 Comments

Stampin’ Up! Sneak Peek – Jar of Haunts Happy Halloween!

Good morning, y’all – it’s Tuesday and I have a confession to make.  This may come as a shocker.

I sometimes overthink my cards.

Yes – it’s true.  I especially do this when I’ve spent the day doing all sorts of things that have nothing to do with making cards.  Today – well, Monday – I moved furniture around in my living room.  And laundered the dog-bed-turned-cat-bed.  And vacuumed.  And set up another table to make a photo-booth area.  And talked on the phone with work.  And with Wayne.  Reset the clocks on the cat feeders.  Scrubbed spots on the carpet.

The end result of all this spinning was that I started thinking about a card for today – Tuesday – at 5:30.  That’s pretty late for me.  The lateness just makes me hurry and make mistakes.  And – overthink every little piece. 😉

I did have a sketch to work from, so that helped.  And I did know I wanted to do a non-Christmas card.  I figured Fall or Halloween.  So I pulled out the new Jar of Haunts stamp set – which coordinates so nicely with the Everyday Jars Framelits!

Jar of Cheer and Haunts - Stamps-N-Lingers
There are two stamp sets in the new 2016 Holiday Catalog that work wth Everyday Jars – cool, huh? 🙂

So – I used Jar of Haunts and some Halloween Nights DSP, and this is what I came up with.  Take a look-see:

Jar of Haunts Happy Halloween 4 - Stamps-N-Lingers
Continue reading

Categories: Halloween | Tags: , , , , | 12 Comments

Stampin’ Up! Thoughtful Branches Birthday Blossoms!

Happy HAWWMP day, y’all!

I don’t know about y’all, but it’s so ridiculously hot and humid here….I think I’ve been sweating glowing-like-a-nuclear-reactor all day.  

The vet called early this morning (Tuesday) asking if he could come early.  Of course, I said yes, right?  I mean…I’m gonna say no?? 😉  

So, at 1030, I went and opened the gate and then moved some vehicles around at the barn so he could back in.  Then I got a soda and sat on the porch waiting for him.  11 – 12 he’d said.

In case you’re not aware, the individual voted most-likely-to-never-show-up-on-time is really not the cable guy.  It’s the horse vet.

Usually not his fault – calls take more time than he thought (us horse owners like to yak at the vet when we finally get him cornered – asking all those little questions that have been swirling in our heads), emergencies crop up.  We get it.  Us horse owners, that is.  We know that waiting is just part of it.  We even have an acronym.  WOV.  Waiting On Vet.

Not really – I just made that up.  But we should have an acronym for it!

He finally pulled in at 1pm.  And then it all went very well from there.  As predicted – the promise of peppermints brought everyone to the barn.

But OH. MY.  GOODNESS.  It was so hot – even with all the stall fans and the big aisle fan on.  I was dripping “glow” all over!  Yuk.

In between all that, I was on a long telecom for work – one of those meetings where they think you can hear anything they’re saying. But you really really can’t.

What I’m trying to say is – I’ve been a little distracted today, and that really crimped my creative juices.  Or it was the heat and the glowing.  IDK.

But when I finally got it going, I ended up combining a few stamp sets – Thoughtful Branches and Birthday Blossoms – with a few Thinlit sets – Beautiful Branches and Hearth & Home – and a couple of embossing folders – Petal Burst and Woodland.  See whatcha think – take a look-see:

Thoughtful Branches Birthday Blossoms 4 - Stamps-N-Lingers
Continue reading

Categories: Happy Birthday | Tags: , , , , , , | 6 Comments

Stampin’ Up! Thoughtful Branches and Greatest Greetings!

Good Monday morn to y’all.  Here we are again, embarking on another work week.

Sunday went a little sideways on me – got this card done, and then a family semi-emergency offered the perfect excuse to not do any closet cleaning out.  And that little event kept me busy the rest of the day.

But, before that happened, I took the opportunity to sit down and make a card to share, using the available-now-thru-the-end-of-the-month-and-only-while-supplies-last Thoughtful Branches stamp set.  You know those little dashes between the words mean you have to read them real fast without taking a breath, right?  Did you do that?  If you didn’t, you should go back and try it again.  I’ll wait.

Better now?  It makes so much more sense when you read it that way, doesn’t it?? 😉

Anywho – Thoughtful Branches stamp set and Beautiful Branches Thinlits (didn’t use the Thinlits on this card, just the stamp set!) – if you love this bundle (and who doesn’t!?), best get it right quick-like.  It just won’t be around forever!

I added some Petals & Paisley DSP, the Woodland TIEF and a quick sentiment from Greatest Greetings.  Take a look-see:

Thoughtful Branches Great Greetings 4 - Stamps-N-Lingers
Continue reading

Categories: Congratulations | Tags: , , , | 8 Comments

Stampin’ Up! Beautiful Thoughtful Branches In Our Hearts

Well, I didn’t go see any movies on Saturday. 🙁  It occured to me – finally! – that I’ll be needing to pack all my stuff up at the end of this week!  Yikes!  Feels like I just unpacked it.  Probably cuz I did – three weeks is that a-little-too-long-to-not-bring-the-stuff-a-little-too-short-to-get-completely-settled amount of time to be on a trip.  But I suppose whether it’s 3 weeks or 7 weeks, I’ll always find myself at the weekend before I need to pack everything up, huh? 😉

So…that means that I need to be getting a little ahead on cards for next weekend, or risk not having a card to share!  Which means this weekend is the right time to be doing that.

Now – if you were me, and you needed to build a few cards ahead, would you:

  1. Make several quick and easy cards, or
  2. Make 3 cards with lots of fussy cutting

Hmmm?  No – don’t tell me your answer – I know you smart folks would opt for #1.

I, on the other hand, did #2.

As a result, I spent almost all of Saturday making cards.

Three cards.

Maybe today I’ll do things just a little bit smarter!  And maybe decide to take a minute and go see that movie…

Let me ask – are you guys getting excited for the Thoughtful Branches Bundle to be available? I sure hope so – cuz I know it’s a good one.  My card today is another example of what you can do with this great bundle.  Take a look-see:

Beautiful Thoughtful Branches Hearts 1 - Stamps-N-Lingers
Continue reading

Categories: Encouragement, For You, Thinking Of You | Tags: , , , | 25 Comments

Stampin’ Up! Wonderland Blessing for the Happy Stampers Blog Hop

HappyStampersBlogPostBanner-2

Happy Christmas Eve!  I know that you’re all busy doing your final get-ready-for-tomorrow things – cooking, wrapping, and some-assembly-required-ing!  Thanks for taking the time to see what we’ve created for you –  I hope that you’ll enjoy my project and then head to everyone’s blog and see what they’ve shared!!

I went pure, straight up this-is-the-night-the-Holy-Child-was-born with my card today.  I pulled some Woodland TIEF, a couple of Lovely as a Tree pines, and the Holy Family themselves from the lovely All Ye Faithful stamp set.  Take a look-see:


Woodland Blessing 6 - Stamps-N-Lingers

Continue reading

Categories: Christmas | Tags: , , , , , , , , , , , , , , , , , , , , , , | 12 Comments

Powered by WordPress.com.