Good Sunday morning, y’all! Hope your weekend is going well! I’ve been packing up freezer meal gifts and maybe – possibly?? – ordering a couple more goodies for my “adopted” kids and “grandkids”! And – you know, enjoying looking at the tree lights!!
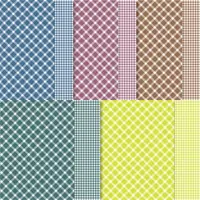
My card today is really a thank you card – it’s got a bit of a holiday flair, but…could be used all year round! It’s super quick and easy – which means…you can make a bunch of them – in any of the Glorious Gingham 6″ x 6″ DSP colors! – quick as a bunya! I added a Cottage Wreaths wreath and sentiment – and a cool die cut bow from the coordinating Country Wreaths dies – and these Very Vanilla Notecards were done! Take a look-see:

The layout was inspired by this week’s Global Design Project CASE The Designer challenge.

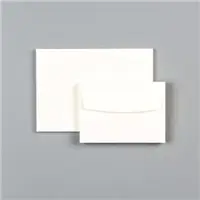
To begin, I adhered a 3″ x 5″ piece of Glorious Gingham DSP to the front of one of the Very Vanilla Notecards using Liquid Glue.

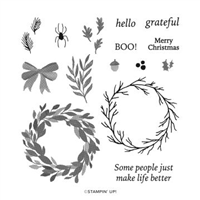
On a 2 1/2″ x 5″ piece of Very Vanilla, I stamped the twig wreath image from Cottage Wreaths in Crumb Cake ink.
Around the image, I stamped the little Cottage Wreaths two-pine-bough image multiple times in Mossy Meadow. I let the images overlap to add a fullness to the wreath!

In the middle of the wreath, I stamped the Cottage Wreaths sentiment in Berry Burst ink.
Then I adhered the panel to the notecard front with Liquid Glue.

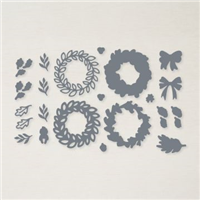
I used the adorable little bow die from the coordinating Country Wreaths die set to cut out a Berry Burst bow, which I adhered to the card front with a piece of Stampin’ Dimensional.
I added three small champagne Adhesive-backed Sparkle Gems around the wreath and a large clear gem in the middle of the bow – and the card front was done!

On the inside, I stamped the second Country Wreaths sentiment in Berry Burst and then added the pine boughs in Mossy Meadow.

And – y’all – that was it for the card! 🙂
For the envelope (that you get with the pack of Notecards) – I stamped the Country Wreaths pine boughs in Mossy Meadow on the front…

…and added more of the Glorious Gingham 6″ x 6″ DSP on the envelope flap.

Et Voila! How easy was that!? There are so many times we need a pretty thank you note card – and this could be a very wonderful one for you to have on hand! With all the colors in the Glorious Gingham DSP pack – you can make a whole set!

I made four each of the five colors in Glorious Gingham – Berry Burst, Pretty Peacock, Pecan Pie, Lemon Lime Twist and Blueberry Bushel. If you make these – and I hope you will! – just coordinate the ink used for the sentiment and the cardstock for the die-cut bow to the color of the DSP. Leave everything else the same!
Then – tie up 5 – or more! – cards with some pretty twine – and you’ve got a sweet little gift. Think…stocking stuffer…hostess gift…baby/bridal shower gift. Lots and lots of possibilities!


The Cottage Wreaths stamp set – and coordinating Country Wreaths dies – make quick work of it – and the Glorious Gingham DSP is a perfect starting point! AND – they’re nice and flat so…regular postage, y’all! 🙂

If you’d like to recreate this project, all the products and card cuts you’ll need are down below! And – this is the card that I made for my Saturday Nite YouTube Video yesterday! If you’d like to see that – for the first time or again! – here ’tis!
I’ve also created a printable PDF with written instructions and a list of the products used to create this project. You can download, print and/or save it by clicking this image:

Missed any tutorials? You can check out my past projects right here!
TTFN
M

Connect with me! https://campsite.bio/stampsnlingers
HOST CODE FOR 16 DEC – 31 DEC: P6BV3FBA
Use this host code when you order $50 or greater and receive a free gift (AND the Monthly Card Tutorial) from me! If your order is over $150, please do not use this code, but you’ll still get the free gift. The free gift is your choice of any item valued up to $10.00 in any active Catalog! That includes some of the Host Exclusive stamp sets! See my Customer Rewards page for full details.
Note: Make sure that you can see my name on the final checkout page listed as your Demonstrator when you order so that you know that you’re ordering with me and you’ll get my rewards!
You’ll also be getting a link to my ZOOM The Craftroom (an exclusive TWICE-A-WEEK online event for my customers) and the monthly Online Tutorial. The December Tutorial features the beautiful Textured Floral Bundle!


HOST CLUB OPENINGS FOR JANUARY 2024!
Just in time for the launch of the new January – April 2024 Mini Catalog AND Sale-A-Bration 2024!

Online Host Clubs are a GREAT way to build up your Stampin’ Up! tool chest a little at a time – and gather up the new goodies that you’ve got your eye on! AND – I do all the host “duties” for you – but YOU get the host benefits! 😎
If you’re intrigued – then….read on!
Here’s how it works!
Clubs consist of three folks – who are part of the club for 6 months. During that period – you’ll get to be the host TWICE – getting all the benefits, but…doing no extra work!
You sign up for two consecutive 3-month “terms” and commit to:
– A $50.00 minimum order each month
– Placing your order by the 20th of each month
– Using the Host code for each month that I send to you in an email at the beginning of each month
This is how the schedule might look (if “Judy”, “Cynthia” and “MaryAnne” signed up! 😎) As you can see, each member gets to host TWICE during the six months!!

Here’s the deets!
– You’ll have AT LEAST a $150.00 Workshop order during EACH of your host months! Which means you’ll have at least $15.00 of Stampin’ Rewards dollars to spend on the exclusive Host Stamp Sets, or any other current Stampin’ Up! product during your host months. Stampin’ Rewards are Stampin’ Up!-speak for “free money”!
– During Sale-A-Bration (Jan – Feb) – you’ll ALSO automatically earn at LEAST ONE Free Sale-A-Bration item (and maybe even more than one!).
– You’ll earn DOUBLE PEPPERMINTS on your Host Club Orders. Each $50 order earns 4 reward points, a $75 order earns you 6 reward points, etc. You’ll earn at least 24 reward points during your membership, meaning you’ll automatically earn at least ONE $40 Peppermint rewards gift! (Remember – when you gather up 16 Peppermints, you get to select a free reward gift valued up to $40!). You can get more info about my Punkin’ Heads Customer Rewards Program right here.
– You’ll receive a FREE monthly tutorial with 4-5 projects and access to all previous tutorials for the duration of the club. Right now, there are around EIGHTY tutorials available only to Online Host Club members. That’s over FOUR HUNDRED not-seen-on-our-blogs projects for you to use as inspiration (and they ALL have all the card cuts and instructions!)
– Access to my Two Weekly Zoom The Craftroom online Zoom Parties – where you can come craft and chat with me and other customers!
– FREE catalogs during your membership term
– FREE shipping in your TWO Host Months
– A FREE STAMP SET of your choice valued up to $25 at the end of each “term”, any current set (excluding host sets)! That’s TWO free stamp sets in six months!
– At the end of the full 6 months, you’ll get first dibs at signing up for the next 6 month term!
So – if you’re looking to build up your stash a little bit at a time – all while earning free product and Double Peppermints – without doing any extra work then…. It’s hard to find a downside, y’all!
Let me know quick as a bunya if you have questions or if you want one of the spots I have open!
GIFT CERTIFICATES MAKE GREAT CHRISTMAS PRESENTS!!
And – They Don’t Even Require Shipping!

Did you know…I offer gift certificates for Stampin’ Up! merchandise?? They’re redeemable through me and can be for any amount so they’re always the perfect size and color!
I can send the gift certificates electronically via email with same day service!
OR – I can print your gift certificate – and ship it for free to you or directly to your recipient! I’ll give you tracking information for the shipment.
If you’re interested in purchasing a gift certificate, please visit my gift certificate store here. I accept all major credit cards and Paypal for payment!

If you don’t see a gift certificate listed for the specific amount that you’d like, please email me at Stamps-N-Lingers@comcast.net
Get the Stampin’ Up! Products Used in this Project:


Card Cuts Used in This Project:
Very Vanilla Notecards & Envelopes
Berry Burst Cardstock (or matching cardstock): Country Wreaths die cut bow
Very Vanilla Cardstock: 2 1/2″ x 5″ (front panel)
Glorious Gingham 6″ x 6″ DSP: 3″ x 5″ (behind front panel); 2″ x 5 1/2″ (envelope flap)
If you need any stamping supplies, I’d be very happy to be your Demonstrator. Just click on the Order Stampin’ Up! Online Now button on the right side of the screen to go directly to my online store or drop me an email if you have any questions. Happy Stamping!
Shop the Clearance Rack here. Earn FREE Stampin’ Up! Products – Join my Punkin Head Peppermint Rewards – My online customer thank you program!
Finn Fan Fix 
Still trying.
Not sure if it’s a learning curve thing? Maybe a short term memory thing? 🤷♀️

Maybe it’s just…Hope springs Eternal! 😎
TTFN
M


 #20 Demonstrator in Sales in the US 2023-2024
 #13 Demonstrator in Leadership in the US 2023-2024
 #21 Demonstrator in Team Building in the US 2023-2024


 KarensCardCorner
 Stamp with Amy K
 Stampin With Shirley G
 Tarabeth Stamps
 TL's Bright Spot
Such a sweet idea! Love the clean design and the colors are perfect. Poor Finn…maybe one day you’ll forget and let him take it with him! 😉
It could happen. Forgetting is something I’m doing more and more! Thanks so much, Amy! 🙂