Good morning – and happy Friday! These short weeks are awesome, aren’t they!? Even us retirees like heading into the weekend! And I even still get the blues on Sunday afternoon – what’s up with that?!
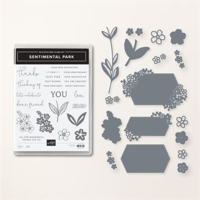
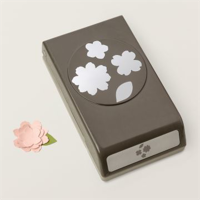
My card today is a fun one using a cool coloring technique and the pretty Sentimental Park bundle, with an assist from the Petal Park Builder Punch. Take a look-see:

The color palette for this one is from The Paper Players challenge this week!

I started by adhering a piece of Orchid Oasis paper from the 2022-2024 In Color 6″ x 6″ DSP to the front of an Orchid Oasis card base.
The next layer is a piece of Basic White on which I stamped the Sentimental Park sentiment in Orchid Oasis ink. Then I matted it on Highland Heather cardstock and adhered it to the card front with Liquid Glue.

I stamped the leaves and stems image from the Sentimental Park stamp set in Parakeet Party three times on a piece of Basic White cardstock. Then, I fussy cut them. THEN I remembered that the Sentimental Park die set has a die that will cut that image right out. Sheesh! Don’t be like me. Use the die. 🤦♀️🤦♀️🤦♀️
I adhered the three images to the front of the card – using Liquid Glue for the outside stems and Stampin’ Dimensionals for the middle stem.

Now comes the fun part! I saw a cool thing on Splitcoast Stampers, demonstrated by Cindy Coutts, and I wanted to give it a go. You can how to do it on my video – the link is down below. Here’s the steps – and you’ll want your Stamparatus to help you layer the pieces for this part of the project!
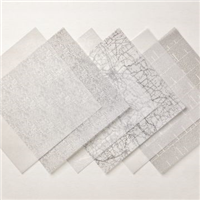
– Cut a piece of Basic White cardstock, a piece of Adhesive Sheet, and a piece of Vellum Layering Designs (I used the design with the black script writing on it). All the pieces should be the same size.
– Place the Adhesive Sheet in the corner of the Stamparatus – with the sticky side up and the cover removed.
– Lay the Basic White panel over the top of the Adhesive Sheet to adhere them together.
– Remove the cover from the Adhesive Sheet and return it to the corner of the Stamparatus.
– Layer the piece of Vellum over the top to adhere them together.
This was all to create a “reinforced” piece of Vellum Layering Designs – for the next step!

I used my Light Orchid Oasis and Dark Highland Heather Stampin’ Blends to color all over the Vellum – creating random swaths of color. Like I said – check out the video!
Once the paper was covered, I spritzed it LIBERALLY with rubbing alcohol using a Stampin’ Spritzer. As the color began to run, I tipped and tilted the paper to run the colors together. I also used my Heat Tool to help move the ink and dry the paper.
When it was all dry, I used the Petal Park Builder Punch to cut out three sets of the three flowers.

I made stacked flowers – a large, a medium and a small punched flower – using Liquid Glue. Then I adhered them to their stems with Liquid Glue or Stampin’ Dimensionals
I added a white Opaque Adhesive-backed Gem to the center of each flower and a few Parakeet Party 2022-2024 In Color Matte Dot here and there on the card front. Finally, I tied a little bow from Orchid Oasis Baker’s Twine from the 2022-2024 In Color Baker’s Twine and adhered it to the middle flower with a scrunched up Glue Dot – and the card front was done!

On the inside, I stamped two sentiments from Sentimental Park – one in Orchid Oasis and the second in Highland Heather – on a piece of Basic White cardstock. In the corner, I stamped the leaves/stem in Parakeet Party. I added the two-step flower – the outline in Orchid Oasis and the fill in stamped-off-once Highland Heather. I added a white Opaque Adhesive-backed Gem to the center of the flower.

I used Liquid Glue to adhere the panel to a Highland Heather mat and into the Orchid Oasis card base and the card was done!
My Basic White Medium Envelope got the Sentimental Park flower on the front…

…and more of the 2022-2024 In Color 6″ x 6″ DSP on the envelope flap.

Et Voila! I think this is such a fun coloring technique – Cindy called it the Misted Marker Vellum technique – don’t you!? Your results will be different every time – my sample flowers are just a little different from the ones that I made in the video!

You could use this technique and then cut whatever shapes you like – using a die set or, like I’ve done, something like the Petal Park Builder Punch! And the stems and sentiments from the coordinating Sentimental Park bundle are so sweet with the vellum flowers!

I hope you like!
If you’d like to recreate this card, all the products and card cuts are listed below! And – this is the card I made yesterday on my YouTube live video. If you’d like to take a look – for the first time or again! – here’s the link!
I’ve also created a printable PDF with written instructions and a list of the products used to create this project. You can download, print and/or save it by clicking this image:

Missed any tutorials? You can check out my past projects right here!
TTFN
M

Connect with me! https://campsite.bio/stampsnlingers
HOST CODE FOR 16 JAN – 31 JAN: 9HSSTWEC
Use this host code when you order $50 or greater and receive a free gift (AND the Monthly Card Tutorial) from me! If your order is over $150, please do not use this code, but you’ll still get the free gift. The free gift is your choice of any item valued up to $10.00 in any active Catalog! That includes some of the Host Exclusive stamp sets! See my Customer Rewards page for full details.
Note: Make sure that you can see my name on the final checkout page listed as your Demonstrator when you order so that you know that you’re ordering with me and you’ll get my rewards!
You’ll also be getting a link to my ZOOM The Craftroom (an exclusive TWICE-A-WEEK online event for my customers) and the monthly Online Tutorial. The Janury Tutorial features the brand new Country Bouquet Bundle!


Sale-a-Bration 2023 Going on Now!

Sale-a-Bration is the coolest time of year at Stampin’ UP! Check out all the goodness – we’ve got reasons to SHOP – reasons to HOST – and…HUGE reasons to JOIN!!
Get all the deets on my Stampin’ Up! Promotions page – or…find out why NOW is the BEST time to join the team!
Here’s a hint…

Get the Stampin’ Up! Products Used in this Project:

Price: $12.00


Card Cuts Used in This Project:
Orchid Oasis Cardstock: 5 1/2″ x 8 1/2″ (card base, scored and folded at 4 1/4″)
Highland Heather Cardstock: 3 1/4″ x 4 1/2″ (mat for front panel); 4″ x 5 1/4″ (mat for inner liner)
Vellum Layering Designs: Marker-colored for Petal Park Builder punched flowers
Basic White Cardstock: 3 1/8″ x 4 3/8″ (front panel); Stamped and die cut leaves/stems (x3); Backer for Vellum Layering Designs; 3 7/8″ x 5 1/8″ (inner liner)
2022-2024 In Color 6″ x 6″ DSP: 4 1/4″ x 5 1/2″ (front card panel); 2 1/4″ x 6″ (envelope flap)
If you need any stamping supplies, I’d be very happy to be your Demonstrator. Just click on the Order Stampin’ Up! Online Now button on the right side of the screen to go directly to my online store or drop me an email if you have any questions. Happy Stamping!
Shop the Clearance Rack here. Earn FREE Stampin’ Up! Products – Join my Punkin Head Peppermint Rewards – My online customer thank you program!
Finn Fan Fix 
On Wednesday, we took Finn over to Camp Mimi for his Assessment test. Which just meant a day of Day Care so they could see how his temperament is and whether he’ll get along with a large group of other dogs.
No – they wouldn’t let us CLEP the test!
So – off we went on a foggy morning!
First impressions were nice – pretty grounds…

and…a bone-shaped pool!

He went off for his day of fun and…we went about our business.
Looking for him at every turn, but…still.
When we went to get him…we were proud parents!

Well – of COURSE he passed with flying colors! So…we’ve got a boarding reservation for our trip in May. And a go-home grooming to remediate the knots and tangles I am SURE will be in evidence after almost two weeks of daily swimming! 😳😳😳
Dad took him to the car…

…and he passed out! He..was…tuckered.

We got home and he was able to eat. And walk – emphasis on WALK! – around with us after we fed. But then…he was OUT!

I had to say his name LOUDLY to wake him up enough to go to bed! One pooped pup!
In the morning, I opened his gate when I got up and…nuthin’. Didn’t even twitch.
So – I had my coffee, watched a little tv, worked on a card then went back to the bedroom to change to my workout clothes. He STILL had not moved.
Y’all – I seriously thought maybe we’d KILLED him! I poked him a little and he finally – FINALLY! – stretched and yawned.
And went right back to sleep! 😂
Got done on the treadmill and still no dog!
Found him at 845.

He’d made it 20 feet before being overcome with the need for more sleep.
I have those kinds of mornings a LOT!
TTFN
M
P.S. After I wrote this, I remembered that Camp Mimi has a FB page and that they post photos! https://www.facebook.com/CampMimi
I now know WHY he was such a pooped pup! Also – I’m really REALLY happy they gave him a rinse! 😳😳😳


 Inky Bee Stampers
 KarensCardCorner
 Stamp with Amy K
 Stamp With Nel
 Stampin With Shirley G
 Tarabeth Stamps
 TL's Bright Spot
Such a pretty card! Love the vellum flowers, perfect colors too! Oh boy…Finn looks like he had an awesome time at camp! And what’s a little mud mom??? Working dogs are supposed to get dirty. 😉
I’m a FARM DOG, Mom! Sheesh! He was happy as a pig in slop, wasn’t he?!? LOL! Thanks, Amy! 🙂
Mary, I enjoy your videos a lot! I watched this video last night. This morning I am delighted that you shared Finn’s time at Camp Mimi … oh my goodness, what an adventure Finn had. Now you can put your minds to “rest” that Finn will be well cared for while you are away. 🐾💙🐾
Yes! It’s good to know that I won’t need to be worried when we need to go somewhere that he can’t go! Thanks so much, Suzanne! 🙂
Hi Mary,
First of all, it was great fun to watch that technique making the flowers…..!! Turned out super pretty……might be more involved than I’d bother with…..but still…..super pretty.
Then FINN…..loved seeing his good report card….and all the things in his day. It looks like they let the ‘kids’ get super dirty…..I’m glad they cleaned him up a bit too!! No wonder he was dead tired….lol….might take a few days to recover.
Yes – he played hard enough for THREE days worth! And the pics show he has a wonderful time! Thanks so much, Faith! 🙂
Mary, I love all those pretty flowers and that plaid background is great! You certainly made my colors shine at The Paper Players this week!
Thanks very much, Claire! 🙂
What an interesting technique Mary – such a clever way to create unique blooms and I love the combination of blended colour and vellum detail. Thanks for sharing with us at The Paper Players this week!
Thank you, Joanne! 🙂
And a good time was had by all…😊
Indeed! 🙂
Of course he passed with flying colors. I bet you’re glad they gave him a rinse. Could you imagine him getting in your truck with all that dirt. 😂😂😂
No kidding – THAT would have been a mess, for sure! 🙂