Good morning and Happy Sunday! Hope your weekend is going well. Ours is…going! 🤷♀️🤷♀️
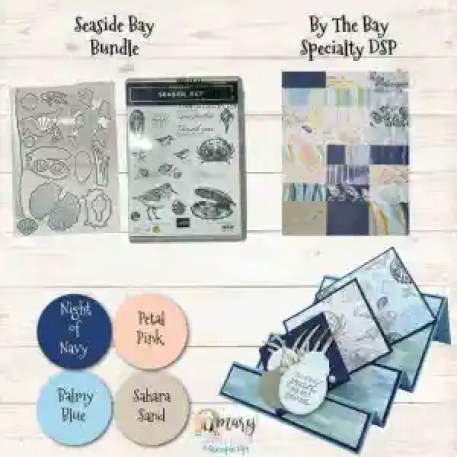
One of the new suites coming on 5 Jan 2023 – in the Jan – Apr 2023 Mini Catalog – is called By The Bay – and it’s one that caused a breakout of ooohing and ahhhing by pretty much the entire room at our OnStage event in Jacksonville! So – it’s been “burning a hole” in my pocket, as it were. Today – I pulled it out! Well – technically YESTERDAY, but…you know what I mean! I used the Seaside Bay bundle and By The Bay Specialty DSP to make a very cool Triple Diamond Step Fun Fold. Take a look-see:
I was given a lead on this card by my friend and downline Rosie Kean – who hooked me up with Sam at her MixedUpCraft blog site. I used her general plan – modifying the card to fit in a regular A2 card!
I started by using my Simply Scored Scoring Tool to score a 4 1/4″ x 11″ piece of Balmy Blue cardstock (I used Pool Party in the video – let’s pretend it was on purpose, okay??) at 3″, 6″, 7 1/2″, 9″ and 10″ on the long side. I folded and burnished each score line – starting with a “mountain” at the 3″ score and alternating mountain-valley….all the way to the final score line! Boom – Triple Step card!
I matted three rectangles of new By The Bay Specialty DSP on Night of Navy mats – and then used Liquid Glue to adhere them to the three step panels.
Then I matted 3 squares – of three different designs from the DSP pack – on Night of Navy (for the diamonds).
I used Liquid Glue to adhere the largest diamond to the back panel – and the middle diamond to the second panel – aligning the edges.
Using the Seaside Bay dies I cut:
– One Sahara Sand oyster – this is the two-ended oyster (I cut it in half). Use a Sponge Dauber to add Sahara Sand ink to the “shell”.
– Four grasses – two large and two small – from a piece of the By The Bay Specialty DSP – I chose a design with Petal Pink/Balmy Blue/Gold Foil swirls.
– Two Basic White shells. I used a barely-inked Sponge Dauber to color one with Petal Pink and one with Balmy Blue inks.
I stamped the sentiment from Seaside Bay in Balmy Blue on a piece of Basic White and cut it out with the next-to-smallest Stylish Shapes circle die.
Using Liquid Glue – I adhered the grasses and shells to the smallest matted diamond – making sure to not let anything extend below the bottom of the panel. Then I popped the sentiment over the top with Stampin’ Dimensionals.
I adhered the final diamond to the bottom (smallest) step panel with Liquid Glue, added a few new Flat Adhesive-backed Pearls and the card front was done!
For the back panel, I stamped a second sentiment from Seaside Bay in Balmy Blue on a Basic White panel. Across the bottom I stamped the sand/shells image and the plain sand image from the set in Sahara Sand. Then I adhered another of the Flat Adhesive-backed Pearls.
I used Liquid Glue to adhere the panel to a Night of Navy mat and onto the back of the card – and the card was done!
My Basic White Medium Envelope got the Seaside Bay sand/shells and sand in Sahara Sand on the front…
…and more of the By The Bay Specialty DSP on the envelope flap.
Et Voila! Is it any wonder that this By The Bay Suite elicited such excitement and anticipation amongst my fellow Demonstrators?? We ALSO realized we were going to get to ORDER it right then – a double perk for us Demonstrators who attended OnStage (other demos got to start ordering on 1 December!) – so it was doubly exciting! I love the gorgeous By The Bay Specialty DSP and the amazing images and DIES in the Seaside Bay bundle are…wunnermus! This super easy – and SUPER cool! – Diamond Triple Step Fun Fold is the perfect way to showcase it ALL!
I hope you like!
If you’d like to recreate this card, all the products and card cuts are listed below! And – this is the card I made yesterday on my YouTube live! If you’d like to watch it – for the first time or again! – here’s the link on YouTube!
I’ve also created a printable PDF with written instructions and a list of the products used to create this project. You can download, print and/or save it by clicking this image:
Missed any tutorials? You can check out my past projects right here!
TTFN
Connect with me! https://campsite.bio/stampsnlingers
HOST CODE FOR 1 DEC – 15 DEC: AZNMRGQT
Use this host code when you order $50 or greater and receive a free gift (AND the Monthly Card Tutorial) from me! If your order is over $150, please do not use this code, but you’ll still get the free gift. The free gift is your choice of any item valued up to $10.00 in any active Catalog! That includes some of the Host Exclusive stamp sets! See my Customer Rewards page for full details.
Note: Make sure that you can see my name on the final checkout page listed as your Demonstrator when you order so that you know that you’re ordering with me and you’ll get my rewards!
You’ll also be getting a link to my ZOOM The Craftroom (an exclusive TWICE-A-WEEK online event for my customers) and the monthly Online Tutorial. The December Tutorial features the Sweetest Cherries Bundle!
The July–December 2022 Mini Catalog will be retiring soon! It’s always bittersweet to see a classic Stampin’ Up! catalog take a trip to retirement. Stock up on your favorite products before they’re gone for good!
Save up to 60% on essential craft supplies now thru 4 Jan 2023 – and ONLY WHILE SUPPLIES LAST…so order early as retiring items are already selling out!
Last Chance Sale Details:
- Not all products on the Retiring List are on sale.
- All products are available while supplies last, and there are no purchase limits.
- Discounted items can be added to a Starter Kit and redeemed as a 50% off item or with Stampin’ Rewards.
- Stamp Sets are not guaranteed during this promotion and are while supplies last.
- Sale Starts: 1 December 2022 at 12:00 AM (MT)
- Sale Ends: 4 January 2023 at 11:59 PM (MT)
You can find the retiring list PDF right here.
If you prefer to download the list in an Excel format, you can find that right here.
You can find the list of items that will be available through at least April 2023 here.
If you prefer to download that carryover list in Excel format, you can find that here.
AND –
CLEARANCE RACK UPDATE
Stampin’ Up! has added NEW ITEMS to our Clearance Rack, including the dies that were offered during the Perfect Partners Promotion! Whoo-hoo!!
With discounts up to 60% off, you can get the die sets that coordinate with still-available stamp sets at a great price!
This is an amazing chance to pick up the Perfect Partners dies and Clearance Rack products (available while supplies last!!) – and…
…don’t forget the coordinating stamps!
Here’s a link to my Online Store and the Last Chance Sale! Happy shopping & Saving! 😎😎😎
Get the Stampin’ Up! Products Used in this Project: You’ll also want the By The Bay Suite when it’s available in January 2023!
Card Cuts Used in This Project:
Balmy Blue Cardstock: 4 1/4″ x 11″ (card base, scored and folded at 3″, 6″ 7 1/2″, 9″ and 10″)
Night of Navy Cardstock: Diamonds: 3″ x 3″, 2 1/2″ x 2 1/2″ and 2″ x 2″; Mats: 2 7/8″ x 4 1/8″ (x2 – for largest panel on front and back), 1 3/8″ x 4 1/8″ (mat for center step) and 7/8″ x 4 1/8″ (mat for smallest step)
Sahara Sand Cardstock: Seaside Bay die cut oyster (cut in half)
Basic White Cardstock: Next-to-Smallest Stylish Shapes circle die cut (sentiment); Seaside Bay die cut shells (x2); 2 3/4″ x 4″ (back panel)
By The Bay Specialty DSP: Diamonds (2 7/8″ x 2 7/8″, 2 3/8″ x 2 3/8″ and 1 7/8″ x 1 7/8″); Steps: 2 3/4″ x 4″, 1 1/4″ x 4″ (center step) and 3/4″ x 4″ (smallest step); 2 1/4″ x 6″ (envelope flap)
If you need any stamping supplies, I’d be very happy to be your Demonstrator. Just click on the Order Stampin’ Up! Online Now button on the right side of the screen to go directly to my online store or drop me an email if you have any questions. Happy Stamping!
Shop the Clearance Rack here. Earn FREE Stampin’ Up! Products – Join my Punkin Head Peppermint Rewards – My online customer thank you program!
Finn Fan Fix 









 Inky Bee Stampers
 KarensCardCorner
 Stamp with Amy K
 Stamp With Nel
 Stampin With Shirley G
 Tarabeth Stamps
 TL's Bright Spot
Such a pretty card! Love the fancy fold design, perfect way to show off that cool paper! Yeah, busted leaning a little too close to the bowl. 😉
Truly busted. Those cameras are such a pain! 🙂 Thanks, Amy! 🙂
…in the act! Or…close enough for Judge Judy..
Yep – red pawed! 🙂
Thanks for sharing! I so loved presenting this suite in Jacksonville & your project is amazing!! 😎🐬💗
Thank you so much, Melissa – I saw your presentation. Great job!! 🙂
WOW. This card is a work of art. Thank you for sharing!
Thank you so much, Patti! 🙂
LOVE your card! Just finished making it – your pdf was great and made it sooooo easy! Such a pretty card! Thank you for sharing!0
Yeah! Glad the PDF made it easy to put it together – and that you enjoyed it! Thanks so much! 🙂
Great DSP! Great card! And Fin puts a smile on my face too!
Thank you so much, Kylie – and…that’s his #1 job – make me (and all y’all!) – smile!! 🙂