Good morning! Happy Tuesday and happy….NEW SALE-A-BRATION Goodies Day!
Yep – you heard me right! Starting today – when you place your orders over $50 – you’ll have a NEW set of freebies to pick from – in addition to the ones you’ve been picking up so far! Read down below for the list – I think you’re going to be excited! – and… start building your stash!
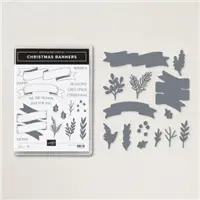
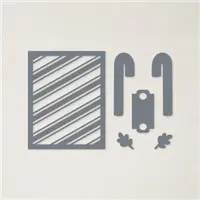
Now – my card today is another Christmas card (I know – I know!) and it uses the sweet Candy Canes Dies and the coordinating Christmas Banners Bundle. Yes – these all work together really nicely! Take a look-see:

I started by cutting two Basic White cardstock panels using the large stripe die in the Candy Cane Die set. Then I adhered them to a Basic White mat with Liquid Glue. I adhered the first one “upside down” and the second one “right side up” to create the crosshatching that you can see!
The die set has two candy cane dies that perfectly cut images in the Sweetest Christmas DSP – and I cut out two of them!

Using the dies in the Christmas Banner die set – bundled with the Christmas Banners stamp set, I cut a couple of Garden Green pine boughs and a few Pool Party leaves. I also cut a couple of white leaves from the Real Red & White 6″ x 6″ Glimmer Paper.
I stamped two leaves from Christmas Banners in Garden Green on a piece of Basic White and cut them out with their matching Christmas Banner die.

On a piece of Basic White, I stamped the Christmas Banners banner image in Garden Green and the sentiment in Sweet Sorbet – then cut it out with the die in the Christmas Banner die.
I started my collage with the two candy canes – but first I did a quick layout to determine where they would sit on the card front – and where the sentiment would sit over the top of them. Using my Paper Snips – I cut the ends off of the two candy canes. Then I adhered the TOPS of the candy canes to the card front with Liquid Glue.

I added the leaves and boughs with more Liquid Glue and popped the sentiment over the top of the collage.
Using Liquid Glue – I tucked the ends of the candy canes back under the sentiment banner – that made the canes appear LONGER than they actually are!

I did a quick little video on how to make this one if you’d like to see it – and you can see what I mean with this step! Click right here!
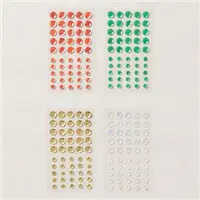
I added some Sweet Sorbet Sequins from the Adhesive Backed Seasonal Sequins and the card front was done!

On the inside, I stamped two of the sentiment words from Christmas Banners in Sweet Sorbet on a Basic White panel. In the corner, I stamped the pine bough from the set in Garden Green. I added a green Seasonal Sequin next to the sentiment – yes, I know it’s a different green, but…I like it!

I used Liquid Glue to adhere the panel to a Basic White mat and into my Pool Party card base, popped the card front on with Stampin’ Dimensionals and the card was done.
My Basic White Medium Envelope got the Christmas Banners pine bough on the front…

…and some Sweetest Christmas DSP to the envelope flap.

Et Voila! I think this is such a SWEET Suite, don’t you? Yes – the Sweetest Christmas Suite has the Sweet Candy Canes bundle (with the Candy Canes Dies) and the Christmas Banners Bundle – PLUS the Sweetest Christmas DSP! Think of all the gorgeous Christmas projects you could make with the whole suite! WOW!

I hope you like!
If you’d like to recreate this card, all the products and card cuts you’ll need are down below! Remember – there’s also a Short Video on it – if you’d like to see it – click here! 🙂
And…I’ve also created a printable PDF with written instructions and a list of the products used to create this project. You can download, print and/or save it by clicking this image:

Missed any tutorials? You can check out my past projects right here!
TTFN
M

Connect with me! https://campsite.bio/stampsnlingers
HOST CODE FOR 1 AUG – 15 AUG: ARQXYZGV
Use this host code when you order $50 or greater and receive a free gift (AND the Monthly Card Tutorial) from me! If your order is over $150, please do not use this code, but you’ll still get the free gift. The free gift is your choice of any item valued up to $10.00 in any active Catalog! That includes some of the Host Exclusive stamp sets! See my Customer Rewards page for full details.
Note: Make sure that you can see my name on the final checkout page listed as your Demonstrator when you order so that you know that you’re ordering with me and you’ll get my rewards!
You’ll also be getting a link to my ZOOM The Craftroom (an exclusive TWICE-A-WEEK online event for my customers) and the monthly Online Tutorial. The August Tutorial features the Cottage Wreaths Bundle!


I’ve got a new goody to help you out! Some of you know that I create labels for my Stamp Cases, Die Magnets, Embossing Folders and Punches! They help me immensely to keep my stash organized!
Now – you can get them for yourself! Head over to my Stamps-N-Lingers Retired & Digital Products Shop page and click the Current Catalog Labels box to go to the available products. You’ll get the documents right away and be all set to print your labels at home!
Right now, there’s a set for the current Mini Catalog and Sale-a-Bration. I’ll be adding labels for the 2022-2023 Annual Catalog soon, so be watching for those! 🙂
CHECK OUT THE NEW SALE-A-BRATION FREEBIES!
Starting today, when you make purchases over $50 and $100 – there’s a new set of wunnermus goodies – all from the current 2022-2023 Annual Catalog or the Jul – Dec 2022 Mini Catalog – for you to select your freebies from!
Click the image to open a PDF so that you can make your list!

SALES TAX HOLIDAYS COMING UP!

For those of you living in Alabama, Arkansas, Florida, Illinois, Massachusetts, Mississippi, Missouri, New Mexico, Ohio, Puerto Rico, South Carolina, Tennessee, Texas, Virginia and West Virginia…GOOD NEWS!! You’ve got sales tax holidays coming up in the next few weeks! EVERYONE– TAKE A QUICK LOOK! – This next weekend is a BIG ONE! LOTS of states will be “in play”!
Remember, SOME items in our Stampin’ Up! Catalogs qualify for the sales tax holidays! The list of sales tax holidays by state and items in that state that qualify are listed below (click on the image to open up a full-size printable document):

Just a caveat: you must place your order with Stampin’ Up! DURING the tax holiday period in order to receive these items tax-free (which is midnight on the first day to midnight on the last day of the tax holiday). Also, keep in mind this is a STATE sales tax holiday; the state statute may not apply to county, city, and special jurisdiction taxes.
If you live in one of those states, whoo-hoo for you! Have fun shopping tax free during your holiday!

Sale-A-Bration means you’ll be earning free fun things when you place orders over $50 (before shipping & tax) from 1 Jul – 31 Aug!!
As is the case with ALL our Stampin’ Up! Sale-a-Brations, the July – August Sale-a-bration event has a SHOP, HOST and JOIN promotion! You can get all the deets right here on my Stampin’ Up! promotions page!
Get the Stampin’ Up! Products Used in this Project:

Price: $12.00


Card Cuts Used in This Project:
Pool Party Cardstock: 4 1/4″ x 11″ (card base, scored and folded at 5 1/2″); Christmas Banner die cut leaves (x3)
Basic White Cardstock: 4 1/8″ x 5 3/8″ (mats for card front and for inner liner); 4″ x 5 1/4″ (x2 – Candy Canes die cut card front panels); 4″ x 5 1/4″ (inner liner); Christmas Banner die cut banner (sentiment); Christmas Banner stamped and die cut leaves (x2)
Garden Green Cardstock: Christmas Banner die cut boughs (x2)
Real Red & White Glimmer Paper (in white); Christmas Banner die cut leaves (x2)
Sweetest Christmas DSP: Candy Canes die cut canes; 2 1/2″ x 6″ (envelope)
If you need any stamping supplies, I’d be very happy to be your Demonstrator. Just click on the Order Stampin’ Up! Online Now button on the right side of the screen to go directly to my online store or drop me an email if you have any questions. Happy Stamping!
Shop the Clearance Rack here. Earn FREE Stampin’ Up! Products – Join my Punkin Head Peppermint Rewards – My online customer thank you program!
Finn Fan Fix

The life of a dog involves much deep and introspective thought.

And keen powers of observation.

TTFN
M


 Inky Bee Stampers
 KarensCardCorner
 Stamp with Amy K
 Stamp With Nel
 Stampin With Shirley G
 Tarabeth Stamps
 TL's Bright Spot
Such a pretty card! Love the criss-cross layering and the fun candy cane images! Yeah…Finn is either deep in thought or waiting for a scrap of that pizza crust to fall. 😉
One never knows with him! He’s his own Man! Thanks, Amy! 🙂
Beautiful card!
Thank you! 🙂
I love the background die crossed like that and all the layering with the candy canes. I feel behind on my Christmas cards! TFS. Finn really looks deep in thought.i I bet he’s wondering when this heat will let up!
Him and me BOTH! Yikes! Thanks so much, Susan! 🙂