Good morning and Happy Sunday, y’all! I hope you’re having a great weekend!
My card today is a sneaky peek at the new Painterly Pears Suite – coming soon (think…1 July soon!) as a new Online Exclusive product! We got to see this suite in action when we were at Disney – and…I’ve been itching to dive into it ever since! I pretty much used…ALL the pieces and parts of the suite – the Perfectly Pears bundle, the Painterly Pears DSP, new Mossy Meadow & Gold 1/4″ Ribbon and the Low Profile Sparkle Dots. Go big or go home, right?! Take a look-see:

I started by matting a Secret Sea piece of the gorgeous Painterly Pears DSP on a Strawberry Slush mat for the card front.
For the banner – I used the third-from-smallest Party Banners die to cut out a Basic White banner. Then I stamped it all over with Strawberry Slush splatters – using the stamp in the new Perfectly Pears set.

I used Paper Snips to cut the banner in half and set both halves in place on the card front – leaving a gap between the two halves.
I used the hashmark die in the Perfectly Pears die set to cut out two Basic White hashmarks. I adhered one of them to the card front – under the right side of the top half of the banner.
Then I adhered both halves of the banner to the card front with Liquid Glue – remembering to leave the gap! – and then adhered the second hashmark die cut to the bottom half of the banner.

Using Stampin’ Seal+, I adhered a loop-d-loop figure 8 bow of new Mossy Meadow & Gold 1/4″ Ribbon to the card front, covering most of the gap between the banner halves.
I used the Perfectly Pears dies to cut out two pears, two twig/leaf combos and three Petal Pink flowers right from the Painterly Pears DSP – I wish SU would do this with ALL our DSPs, don’t you?!!
I used a little Liquid Glue to adhere the twig/leaf combos to the top of the die cut pears. While they were drying – I adhered one of the die cut flowers to the top right corner of the banner with Liquid Glue.

I adhered the two pears with Stampin’ Dimensionals – and then slid one of the remaining flower die cuts underneath, adhering it with Liquid Glue.
On a piece of Basic White cardstock, I stamped the Perfectly Pears sentiment in Strawberry Slush and cut it out with the label die in the Perfectly Pears die set (handy!!). I adhered it with Liquid Glue.

I adhered the last die cut flowers with Stampin’ Dimensionals, added some of the new Low Profile Sparkle Dots and the card front was done.
On the inside, I stamped the two-pear image from Perfectly Pears on a Basic White panel in Mossy Meadow ink. I inked the fill image with Darling Duckling ink – added a SMIDGE of Old Olive with a Sponge Dauber and stamped the pears. Using a Blender Pen, I pulled some ink into the leaves – and added a little more Old Olive to give some shading.

I used Liquid Glue to adhere the panel to the inside of the Secret Sea card base, popped the card front on with Stampin’ Dimensionals and the card was done.
My Basic White Medium Envelope got the Perfectly Pears pears on the front…

…and more of the Painterly Pears DSP on the envelope flap.

Et Voila! I was SOOO right to be wanting to play with this new Suite, wasn’t I?! It’s just amazing. From the Painterly Pears DSP – with the die-cut-out-able images – to the coordinating Perfectly Pears bundle – with the two-step images and sweet sentiments – Stampin’ Up! has knocked it out of the park with this one. I KNOW you can hardly WAIT to get it all for yourself – just a couple three more weeks until 1 July!!

I hope you like!
If you’d like to recreate this project, all the products and card cuts you’ll need are down below! And – this is the card I made on yesterday’s Saturday Nite Live YouTube Video. If you’d like to see it, for the first time or again – here ’tis!
I’ve also created a printable PDF with written instructions and a list of the products used to create this project. You can download, print and/or save it by clicking this image:

Missed any tutorials? You can check out my past projects right here!
TTFN
M

Connect with me! https://campsite.bio/stampsnlingers
No Host Code Needed!
Earn 10% of your retail amount on all orders of $20 or greater! And you’ll be earning Punkin’ Head Peppermints – one peppermint for each $25 you spend thru my Online Store! When you gather up 16 Peppermint Points – you’ll be able to select a $40 gift right from me!
You’ll also be getting a link to my ZOOM The Craftroom (an exclusive TWICE-A-WEEK online event for my customers) and the monthly Online Tutorial – featuring the Inspiring Imperfections Bundle for June orders.
See my Customer Rewards page for full details.


SWEET BLENDS ORDERING SPECIAL THRU 9 JUN 2025

Here’s the deets!
1. All orders of $50 or greater (before shipping and taxes) placed through my online store between today (3 June) and the end of the day on 9 June 2024 will get to select ONE PACK of Stampin’ Blends – in any color! That includes the Bronze & Ivory Pack, the skin tone packs (like Medium, Medium Deep, Deep, etc), any of the Classic Color Family packs or any In Color Pack! That’s alotta choices!
2. And – you’ll ALSO earn Peppermints, too! Peppermints are what I call the points in my Punkin Head Customer Rewards Program – a thank you to my customers! If you’d like to learn more about my Customer Rewards – Click here.
3. And – you’ll get the new Inspiring Imperfections Bundle Tutorial – be sure to add this bundle to your order so you’ll be all ready! And – that just HAPPENS to be part of the Kintsugi Inpsirations SUITE – which means…it’s going to work with the Suite Sale! Boom!
4. You’ll get the links for the June Zoom The Craftroom sessions! Yep – I’m back!
Head on over to my Online Store to get started!
BUY ONE GET ONE 50% OFF SUITE SALE
3 June – 30 June

Thru the end of June, all available Suites and Suite PRODUCTS from the 2025–2026 Annual Catalog and Online Exclusives are Buy One, Get One at 50% off! So…if you’ve had your eye on a new suite from the annual catalog or you really like the look of a stamp set from an Online Exclusives suite, you don’t have to choose—you can get both! Both is WAY better than one or the other, right?!
Here’s the deets:
Sales Period: 5–30 June 2025
– All available suites and suite products from the 2025–2026 Annual Catalog and Online Exclusives are Buy One, Get One at 50% off.
– See and shop all qualifying suites in the online store.
– Here’s a quick video on…what’s up for grabs!

Now – you may have questions? I have answers! You can them at my Stampin’ UP! Promotions Page!
LAST CHANCE PRODUCTS UPDATED!

There’s a lot of great goodies in the Last Chance Products section of the Online Store! Be sure to scroll through all of the pages so that you don’t miss anything. There are new items sprinkled throughout the list.
You can find the Last Chance Products list right here in the online store.
Don’t forget that Last Chance Products are only available while supplies last, so order early for the best selection!
Get the Stampin’ Up! Products Used in this Project: You’ll also need the Painterly Pears Suite of goodies when they’re available!


Card Cuts Used in This Project:
Secret Sea Cardstock: 4 1/4″ x 11″ (card base, scored and folded at 5 1/2″)
Strawberry Slush Cardstock: 4″ x 5 1/4″ (mat for card front)
Basic White Cardstock: Third from smallest die cutParty Banners – third from smallest die cut (cut in half – behind collage); Perfect Pears die cut hashmarks (x2); Perfect Pears die cut label (sentiment); 4″ x 5 1/4″ (inner liner)
Painterly Pears DSP: 3 7/8″ x 5 1/8″ (card front); Perfect Pears die cut pears, leaves and flowers: 2 1/4″ x 6″ (envelope flap)
If you need any stamping supplies, I’d be very happy to be your Demonstrator. Just click on the Order Stampin’ Up! Online Now button on the right side of the screen to go directly to my online store or drop me an email if you have any questions. Happy Stamping!
Shop the Clearance Rack here. Earn FREE Stampin’ Up! Products – Join my Punkin Head Peppermint Rewards – My online customer thank you program!
Finn Fan Fix 
He’s even handsome with his tongue hanging out the side of his mouth!

Don’t judge. Tongues are notoriously hard to keep within the confines of your teefs.
It’s science.
TTFN
M


 #20 Demonstrator in Sales in the US 2023-2024
 #13 Demonstrator in Leadership in the US 2023-2024
 #21 Demonstrator in Team Building in the US 2023-2024


 Inky Bee Stampers
 KarensCardCorner
 Stamp with Amy K
 Stamp With Nel
 Stampin With Shirley G
 Tarabeth Stamps
 TL's Bright Spot
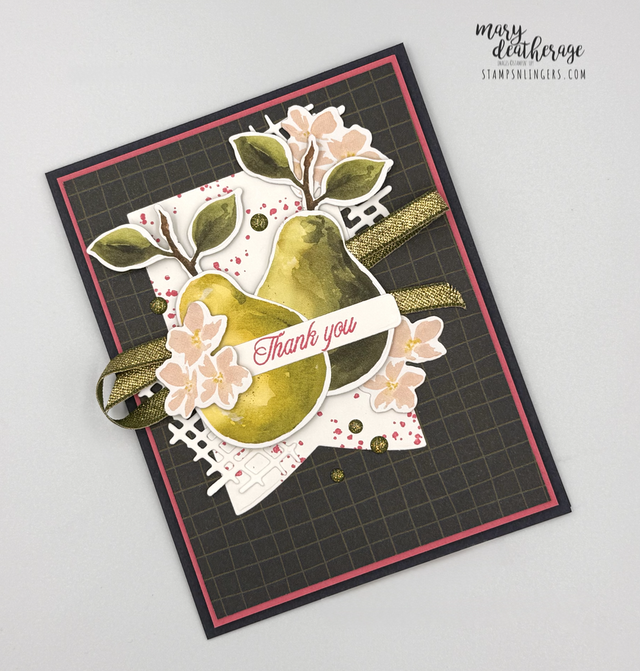
Such a pretty card! Love the pear suite, that paper is amazing! Poor Finn…it’s especially hard to keep the tongue in when it’s hot too! 🐶
Yep – gotta deploy Full Tongue for hot and humid days in GA! Thanks, Amy! 🙂
The toadstool PDF came up not the Pear one. Will there be a Pear PDF…love the card.
Hey Maureen thank you so much! I’ve fixed the PDF on the blog post – and it’s ALSO posted on the Free Tutorials page of my blog! https://stampsnlingers.com/tutorials/