Good morning and happy Friday! Hope your weekend is shaping up to be fun and/or productive and/or relaxing! Whatever your druthers, I wish it for you!
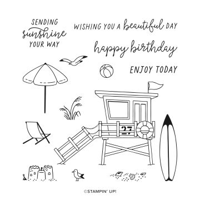
My card today reflects…where I’d like to be right now! To be clear…that’s a beach on Maui! I’m not on a beach on Maui – but…this fun double-easel Beach Day card is…close. Ish. 😎. Even the “sky” – from the Take to the Sky DSP – looks like it could be on Maui! Take a look-see:

This one came about thanks to the theme challenge from the Paper Players this week.

I started with the basics of a Double Easel.
The main card base is made with Boho Blue cardstock – 5 1/2″ x 8 1/2″, scored and folded at 4 1/4″ (to make a landscape tent-fold card).

The easel mechanism is a 5 1/4″ x 8″ piece of Lemon Lolly cardstock scored at 4″ and 6″ on the long side. Then I folded the 4″ line as a “valley” and the 6″ line as a “mountain”.
Using Liquid Glue, I adhered a cloud-strewn piece of Take to the Sky DSP to the back panel of the easel.

To make the sand dunes – I started with two pieces of Crumb Cake cardstock. I used both edge dies to cut the tops off each piece on the long side.
On each panel, I stamped the “sand & shell” image all over in Crumb Cake Ink. Then I brushed both pieces with Crumb Cake ink using a Small Blending Brush. For the “front” dune – I used darker ink on the die cut edge to help define the dune.
I used Liquid Glue to adhere the “back” dune to the front easel panel – letting it extend above the easel a little.

Next, I stamped the Beach Day sentiment on the “front” dune in Calypso Coral ink
Using Stampin’ Dimensionals across the bottom and in the middle (avoiding the top of the die cut so I could “tuck” things in) – I adhered the “front” dune – aligning the bottom edge with the bottom of the easel panel.

To make the lifeguard stand, I cut the large Beach Day die from Summer Splash cardstock and the railing, “siding” and cross-braces in Lemon Lolly. I adhered the railing with Liquid Glue. Then I added the cross-brace and siding.
Using Dimensionals on the bottom portion of the stand – I adhered the stand to the “back” dune – letting it extend above the top of the easel. I used a little Liquid Glue to adhere the stair to the “front” dune.

The rest of the decoration came next:
– I die cut two Pecan Pie palm trunks and adhered them together with Liquid Glue (to make it a little sturdier to support the palm fronds).
– I die cut two Old Olive and one Granny Apple Green palm frond and adhered them to the trunk with Liquid Glue – alternating the colors.
– I slid the trunk between the two “dunes” and adhered it with Liquid Glue.
– I die cut an Old Olive grasses and adhered it with Liquid Glue at the base of the palm.
– On Basic White, I stamped the beach chair and umbrella in Crumb Cake ink and cut them out with their coordinating dies.
– I used the Light Calypso Coral Stampin’ Blend to color the chair and umbrella.
– I used Dimensionals on the umbrella and Liquid Glue on the umbrella pole to adhere it to the card front.

– I used Dimensionals to adhere the beach chair.
– On a piece of Crumb Cake cardstock, I stamped the Beach Day sand castle in Crumb Cake and cut it out with its Beach Day die.
– I adhered the sand castle with Dimensionals.
– I used the rescue ring die to cut a Calypso Coral and a Basic White ring. Using Liquid Glue, I adhered them together, offsetting the openings in the ring to create a solid shape – which I adhered to the side of the guard stand with Liquid Glue.
– On a piece of Basic White cardstock, I stamped the seagull three times in Tuxedo Black Memento Ink and cut them out with the die in the set.
– Using small pieces of Stampin’ Dimensionals, I adhered the gulls to the back panel of the easel.

I used Liquid Glue to adhere the easel to the front of the Boho Blue card base and the card front was done.
For the inside, I stamped a second Beach Day sentiment in Calypso Coral on a piece of Basic White cardstock. In the corner, I stamped the sand, sand castle, chair and umbrella in Crumb Cake ink. I colored the chair and umbrella with the Light Calypso Coral Stampin’ Blend.

I used Liquid Glue to adhere the panel to the inside of the Boho Blue card base and the card was done.
My Basic White Medium Envelope got the sandy beach scene on the front…

…and more of the Take to the Sky DSP on the envelope flap.

Et Voila! Well – it’s not QUITE the same as being on a Maui beach but…it’s sure fun, nonetheless!! I love how all the Beach Day elements play in the sand on this double-easel fun fold card, don’t you?! And – Take to the Sky provided a totally perfect design for an afternoon at the beach!

I hope you like!
If you’d like to recreate this card, all the products and card cuts you’ll need are down below! And this is the card that I made yesterday for my Thursday After Lunch Bunch YouTube video. If you’d like to see it – for the first time or again – here ’tis!
And – thanks to some technical difficulties – this video ended up needing two parts. Here’s Part 2!
I’ve also created a printable PDF with written instructions and a list of the products used to create this project. You can download, print and/or save it by clicking this image:

Missed any tutorials? You can check out my past projects right here!
TTFN
M

Connect with me! https://campsite.bio/stampsnlingers
HOST CODE FOR 1 JULY – 15 JULY: GHWE7ZZR
Use this host code when you order $50 or greater and receive a free gift (AND the Monthly Card Tutorial) from me! If your order is over $150, please do not use this code, but you’ll still get the free gift. The free gift is your choice of any item valued up to $10.00 in any active Catalog! That includes some of the Host Exclusive stamp sets! See my Customer Rewards page for full details.
Note: Make sure that you can see my name on the final checkout page listed as your Demonstrator when you order so that you know that you’re ordering with me and you’ll get my rewards!
You’ll also be getting a link to my ZOOM The Craftroom (an exclusive TWICE-A-WEEK online event for my customers) and the monthly Online Tutorial. The July Tutorial features the wunnermus Seaside Wishes Bundle!


Bonus Days comes just once a year – and it’s a Two-Part Event! Part One – you EARN (aka – SHOP. I mean – you were going to do that anyway, right?!). And…when you shop between 3–31 July 2024 and spend $50 (before shipping & tax) you’ll earn a $5 coupon right from Stampin’ UP!! NOTE: You’re going to get your coupons in an email (see the deets below). You’ll want to make SURE you save all your coupons because you can REDEEM them (and we mean ALL of them) between 1–31 August 2024! That’s Part 2 of the Bonus Days event.
Now – There’s no limit to how many coupons you can earn! So – get busy! Cuz – the way this year is flying by – Bonus Days will be gone before you know it!
Here’s the Deets:
PART 1: EARN
3–31 July 2024 (11:59 p.m. (MT))
- Earn a $5 coupon for every $50 spent (before shipping and tax).
- All coupon codes will be emailed right after a qualifying purchase has been made. You must have a customer account with a valid email address to earn coupons when you shop. NOTE: that means…if you don’t have one already – this would be a GREAT time to set up a Customer Account at Stampin’ UP!
- If you earn multiple codes from a SINGLE order, you’ll get ONE email with MULITPLE CODES in it.
- If you earn multiple codes from MULTIPLE orders, you’ll get SP emails for each code earned.
- Orders started before the promotion begins will not count toward earning coupon codes. For example, if you add items to your cart before 3 July and wait to purchase until that date or later, then those items will not qualify towards earning coupons. You must add items to your cart and complete your purchase during the earning period.
- There’s no limit to the number of coupon codes you can earn per order or throughout the duration of the earning period. WHOO-HOO!!
- You must use a valid email address during checkout in order to receive your coupon code.
- Starter Kit orders are excluded from this offer. All other order types qualify.


Thirteen states – and Puerto Rico! – will have Back-to-School Sales Tax Holidays this year and some Stampin’ Up! items qualify for the tax break in those states! BOOM!
The states with upcoming tax holidays are: Alabama, Arkansas, Florida, Massachusetts, Mississippi, Missouri, New Mexico, Ohio, South Carolina, Tennessee, Texas, Virginia and West Virginia. So, if you live in one of those states or Puerto Rico, take a second to download the spreadsheet below and mark your calendar!
Here’s the list of states having sales tax holidays, what the dates are and what SU! supplies will qualify for tax free purchases (HINT: Stampin’ Dimensionals qualify in ALL the states! Just sayin’!) during the holiday (click on the image to download a full-size printable page):

Please note: You have to place your order with Stampin’ Up! DURING the tax holiday period in your state in order to receive these items tax-free (so – that’s from MIDNIGHT on the first day to MIDNIGHT on the last day of the tax holiday). Also, keep in mind that this is a STATE SALES TAX holiday and the state statute may not apply to county, city, and special jurisdiction taxes.
For those wondering about Georgia, Louisiana, New Jersey and Wisconsin, those states will NOT have the sales tax holiday this year.

Stampin’ Up! has added another amazeballs batch of products that you won’t find in any catalog, they’re ONLY listed in the Online Exclusives section of the online store.
Click here to head right to the Online Exclusives section of the online store to see EVERYTHING that’s available for your crafting pleasure! Pro Tip: Sort on “Newest” to see what’s…well….NEW!
Get the Stampin’ Up! Products Used in this Project:


Card Cuts Used in This Project:
Boho Blue Cardstock: 5 1/2″ x 8 1/2″ (card base, scored & folded at 4 1/4″)
Lemon Lolly Cardstock: 5 1/4″ x 8″ (easel – scored and folded at 4″ and 6″ ); Beach Day die cut lifeguard stand rail, siding and cross-bracing
Crumb Cake Cardstock: 1 3/4″ x 5 1/4″ (“back” sand dune – cut with “wave” die on top); 1 3/4″ x 5 1/4″ (“front” dune – cut with “ground” die on top); Beach Day stamped & die cut sand castle
Summer Splash Cardstock: Beach Day die cut lifeguard stand
Granny Apple Green Cardstock: Beach Day die cut palm fronds
Old Olive Cardstock: Beach Day die cut palm fronds (x2); Beach Day die cut grass
Pecan Pie Cardstock: Beach Day die cut palm trunk (x2)
Calypso Coral Cardstock: Beach Day die cut rescue ring
Basic White Cardstock: Beach Day stamped & die cut umbrella and chair; Beach Day die cut seagulls (x3); 4″ x 5 1/4″ (inner liner)
Take to the Sky DSP: 3 7/8″ x 5 1/8″ (back panel of easel); 2 1/4″ x 6″ (envelope flap)
If you need any stamping supplies, I’d be very happy to be your Demonstrator. Just click on the Order Stampin’ Up! Online Now button on the right side of the screen to go directly to my online store or drop me an email if you have any questions. Happy Stamping!
Shop the Clearance Rack here. Earn FREE Stampin’ Up! Products – Join my Punkin Head Peppermint Rewards – My online customer thank you program!
Finn Fan Fix 
This eggplant MUST be broken and I am the dog-for-the-job!

Mr. Moose’s decapitated head is just happy that HE is not the focus of Finn’s attention!

He’s a beast!
TTFN
M


 #20 Demonstrator in Sales in the US 2023-2024
 #13 Demonstrator in Leadership in the US 2023-2024
 #21 Demonstrator in Team Building in the US 2023-2024


 Inky Bee Stampers
 KarensCardCorner
 Stamp with Amy K
 Stamp With Nel
 Stampin With Shirley G
 Tarabeth Stamps
 TL's Bright Spot
Such a cute card! Love the fun fold design and the little beach scene is perfect! Poor eggplant…it won’t even know what hit it! 🙂
Thank you, ma’am! And…yeah. It’s sorta sad to watch…. LOL!
Very nice card Mary. And I love seeing Finn in almost all your posts.
Thank you, ma’am! Glad you like the card and my boy! 🙂
The Take to the Sky paper is perfect for this scene. Fantabulous card, Mary.
Thanks so much, Nel! 🙂
Mary, this is the best fun fold beach card! I love every detail! The fun life guard shack is perfect and the color combo is fabulous! Everything about this card makes me long for the beach! So happy you joined my challenge at The Paper Players this week!
Definitely makes me want to be in that beach chair, for sure! Thank you so much, Claire, for the inspiration this week! 🙂
WOW! What a beauty! It’s like being at the beach in person. Fantastic use of this fold to create a 3D scene! Thanks for playing along with us at The Paper Players.
Thanks very much, Jan – I’m glad that you like it and appreciate you coming by! 🙂