Good morning, y’all! I just realized that this is a three-day weekend (at least for some folks!). Hope that if YOU get tomorrow off, too – that you’re having a good weekend. If not – well, I hope it’s STILL a good weekend!
Admin note – today is the LAST day to take advantage of my Paper & Packaging Stock Up Sale – check down below for the deets! AND – if you’ve already placed an order but haven’t told me which of the free gifties you’d like – please please please – let me know today! Otherwise…I’ll pick something and surprise you! 🙂
Today’s card goes back to one of my unexpected favorites – the Ornamental Christmas bundle and Modern Christmas Specialty DSP. I didn’t think I was going to like this suite all that much, but…boy – I sure do! Take a look-see:

This one was another riff on the sketch challenge over at Hand Stamped Sentiments! I love that torn edge element!

I started by adhering a piece of tree-strewn paper from the Modern Christmas Specialty DSP to the front of a Basic Black card base using Liquid Glue.
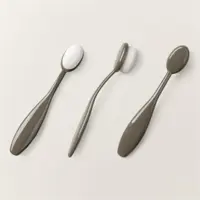
For the center panel – I used a Small Blending Brush to color a piece of Silent Snowfall Specialty DSP with Pretty in Pink ink.

I wanted the Gold Foil “mats” to have the same tear line as the Silent Snowfall panel (kind of like a fault-line card – but…not a diagonal). So – I lined up the edge of a strip of Gold Foil sheet with the edge of the Silent Snowfall paper and tore them at the same time. I did that again with a second strip of Gold Foil on other long edge of the panel.
Using Liquid Glue, I adhered the two Gold Foil strips to the Silent Snowfall panel to make a “mat”. Then I adhered the whole thing to the card front with Liquid Glue. Note: when I make panels that go edge-to-edge on a card front – I like to make them longer than I need and then trim the excess with a Paper Trimmer.

I used a couple of scrunched up Glue Dots to adhere a Large Gold Hoop to the card front. Note: you want to put these where they’ll be covered by the other elements on your card front!
I used the Ornamental Christmas dies to cut a large star from Gold Foil Sheet and one from Pretty in Pink cardstock. I adhered them together with Liquid Glue – then adhered the whole thing to the card front with Liquid Glue.

I stamped the Ornamental Christmas sentiment in Tuxedo Black Memento Ink on a piece of Basic White and adhered it to the card front with Liquid Glue.
I tied a simple bow from black twine from the Black & White & Gold Baker’s Twine and adhered it with a Glue Dot.

On a piece of Basic White cardstock, I stamped the “swag” image from the set in Pretty in Pink four or five times in a “stack”. Then I cut out the tree using the Ornamental Christmas tree die.
I adhered the tree onto the card front – over the bow – with double-stacked Stampin’ Dimensionals.

I used the dies in the set to cut out a tree base, the gold ball ornaments, the small star and four “glimmers” from Gold Foil Sheets. Then I adhered all but one “glimmer” to the tree and the card front with Liquid Glue – and the card front was done!
On the inside, I stamped the pretty tree image from Ornamental Christmas in Pretty in Pink – three times in the corner of a Basic White panel. Over them, I stamped the sentiment in Tuxedo Black Memento Ink. Then I adhered that fourth “glimmer” with a dab of Liquid Glue.

I used Liquid Glue to adhere the panel to the inside of the Basic Black card base and the card was done.
My Basic White Medium Envelope got the Pretty in Pink Ornamental Christmas trees on the front…

…and I colored some more of the Silent Snowfall Specialty DSP with a Blending Brush and Pretty in Pink ink to put on the envelope flap!

Et Voila! I think you can see why I love this Modern Christmas suite so much – the Specialty DSP sets the stage in black and white and gold! It’s all ready to add a pop of color (and pink is one of my faves for Christmas!). The Ornamental Christmas bundle is the perfectly perfect pairing!

I hope you like!
If you’d like to recreate this card, all the products and card cuts you’ll need are down below! And – this is the card I made on yesterday’s Saturday Nite Live YouTube Live! If you’d like to see it – for the first time or again! – here ’tis!
I’ve also created a printable PDF with written instructions and a list of the products used to create this project. You can download, print and/or save it by clicking this image:

Missed any tutorials? You can check out my past projects right here!
TTFN
M

Connect with me! https://campsite.bio/stampsnlingers
No Host Code Needed!
Earn 10% of your retail amount on all orders of $20 or greater! And you’ll be earning Punkin’ Head Peppermints – one peppermint for each $25 you spend thru my Online Store! When you gather up 16 Peppermint Points – you’ll be able to select a $40 gift right from me!
You’ll also be getting a link to my ZOOM The Craftroom (an exclusive TWICE-A-WEEK online event for my customers) and the monthly Online Tutorial – featuring the Delicate Pines Bundle for October orders.
See my Customer Rewards page for full details.


LAST DAY!!!
PAPER & PACKAGING STOCK UP SPECIAL
6 – 12 OCT 2025!
![]()
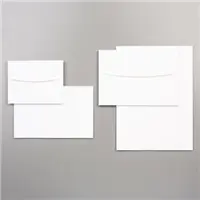
I’m offering an ordering special for Stampin’ Up! orders of $50 or greater placed through me between now and SUNDAY, 12 October! You get to choose a free pack of Stampin Up! Envelopes, Note Cards & Envelopes, Gift Boxes, Memories & More goodies, Treat Bags or Treat Boxes with your order of $50 or more this week!
Here’s the deets:
- For any order of $50 or greater (before shipping and taxes) placed through me, you’ll get to select one pack of Stampin Up! Envelopes, Note Cards & Envelopes, Gift Card Boxes, Memories & More goodies, Treat Bags or Treat boxes of your choice from me – for free!
- You’ll also earn Peppermint Rewards points AND you’ll get my October Card Class Tutorials (featuring the gorgeous Delicate Pines bundle!).
For quick reference, here are the goodies you can choose from:


How do you get your free Envelopes, Note Cards & Envelopes, Card Boxes or Treat Packaging?
All you’ve got to do is place your $50 or greater order between today and end of day on the 12th – and then email me your selection – giving me your FIRST and SECOND choice (just in case)! I’ll order everyone’s goodies on 14 Oct and then send them out to you just as quick as I can!
Here’s a link right to my Online Store so you can get started!
WANT TO JOIN US?
Well – this month may be the BEST time EVER to pull the trigger!!

Here’s the deets:
- Promotion Period: October 1–31
- New team members who purchase their starter kit from October 1 to 31 will be able to choose between these two offers:
- Option 1: Pick $125 worth of products for just $35 OR….
- Option 2: Pick $189 worth of products for just $99
- Whichever option you pick – you’ll get FREE shipping on the Kit, FREE business supplies, and a FREE Paper Pumpkin kit!

Now – I know there are LOTS of reasons to join Stampin’ UP! & lots of Demonstrators out there to join WITH!
But – obvs – I’d love to have you join with ME – and…here’s what I bring to the table!
- You’ll be a part of my Critters-N-Creatin’ Krew team!
- Free access to my online class tutorials
- Access to my ZOOM The Craftroom virtual stamping get-togethers each week!
- Monthly team meetings via video conference where we talk about the latest happenings at Stampin’ Up! and share project ideas. We’re scattered all over the United States, but we get together in person online and have lots of fun chatting!
- Whether you’d like to start a business or simply get that great discount, I’m here to support you in any way I can!
- When you join the Critters (that’s what we call ourselves!), you’re going to find tons of fun and inspiration from our team – our CNCK FB group is always sharing amazing, inspirational projects, and you’re going to get lots of ideas!
- Team giveaways and prizes! We do fun giveaways and prizes for sharing projects and for reaching sales and recruiting goals.
- Monthly team trainings and meetings for those interested in learning more about the business side of Stampin’ Up!.
- There’s no obligation to sell or share the products or hold workshops or blog or anything! Just enjoy that discount, baby!
- We also have fun challenges – just post pictures of what you’re working on – and you’re entered to win free SU product from me!
- And – not gonna lie. We’re really pretty cool!

So – be giving it a thought or three and…Click here or SCAN the QR code for Info!

Ready to pull the trigger? Here’s the link to do just that!
If you have any questions about joining, please drop me a note at here! I’d love to chat with you!
Get the Stampin’ Up! Products Used in this Project:


Price: $16.50

Price: $10.00


Card Cuts Used in This Project:
Basic Black Cardstock: 5 1/2″ x 8 1/2″ (card base, scored and folded at 4 1/4″)
Silent Snowfall Specialty DSP: 3 1/4″ x 5 1/2″ (front panel); 2 1/4″ x 6″ (envelope flap)
Petal Pink Cardstock: Ornamental Christmas die cut large star
Gold Foil Sheets: 1 1/2″ x 5 1/2″ (x2 – “mats” for Silent Snowfall panel); Ornamental Christmas die cut large star, glimmers, ornaments, tree stand, and small star)
Basic White Cardstock: Ornamental Christmas die cut tree; 1 1/8″ x 2 1/2″ (sentiment); 4″ x 5 1/4″ (inner liner)
Modern Christmas Specialty DSP: 4 1/4″ x 5 1/2″ (card front panel)
If you need any stamping supplies, I’d be very happy to be your Demonstrator. Just click on the Order Stampin’ Up! Online Now button on the right side of the screen to go directly to my online store or drop me an email if you have any questions. Happy Stamping!
Shop the Clearance Rack here. Earn FREE Stampin’ Up! Products – Join my Punkin Head Peppermint Rewards – My online customer thank you program!
Finn Fan Fix 
Itty-bitty enjoying the sun on a nice Fall day.

Aaaandddd…learning to work the camera.

Finn was inside sleeping. And avoiding the Paps….
TTFN
M


 #20 Demonstrator in Sales in the US 2023-2024
 #13 Demonstrator in Leadership in the US 2023-2024
 #21 Demonstrator in Team Building in the US 2023-2024


 Inky Bee Stampers
 KarensCardCorner
 Stamp with Amy K
 Stamp With Nel
 Stampin With Shirley G
 Tarabeth Stamps
 TL's Bright Spot
Such a pretty card! Love the touches of pink, perfect! And the littler one is learning all of the poses for sure. 😉
Yup – she’s getting with the programm for sure! Thanks, Amy! 🙂
I LoveLoveLove this card, Mary! I tend to frequently use pink on my Christmas cards, and with the black and gold it really adds a bit of elegance.
Miss Addy, so darn cute! I do miss seeing Finn’s handsome face tho. 😉
LOL – he’ll be back, not to worry! :). Thanks so much, Pat! 🙂