Happy Sunday, y’all! Hope your weekend is going well! I actually got some grocery shopping done yesterday – me and about a million other folks! What WAS I thinking going to Sam’s and Costco on Saturday?!? 😳🤦♀️. Guess I was thinking I did NOT want to go TODAY!!
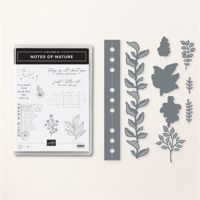
My card today is one that eased me right back into my wheelhouse – torn edges, foliage, vintage-y layers, bows and bling. I used the Notes of Nature bundle – one of my fave things ever! – and some Nature’s Sweetness Specialty DSP. Take a look-see:

The layout for this one was inspired by the Global Design Project sketch – tilt your head…

And the colors are from the Color Throwdown challenge.

I started by stamping the front of my Crumb Cake card base with Crumb Cake dots – using the image in the Notes of Nature stamp set.
Next, I cut out four Crumb Cake leaves using the die in the Notes of Nature set. Then, using Liquid Glue, I adhered them right to the front of the card base. I let them spill off the edges – and used my Paper Snips to trim the excess cardstock.

I made the mat by tearing a 3 1/2” x 4 3/4″ piece of Misty Moonlight cardstock down to a finished size of about 3 1/4″ x 4 1/2″. I adhered it to the card front with Liquid Glue.
Using a Blending Brush, I colored a 3 1/2” x 4 3/4″ piece of Nature’s Sweetness Specialty DSP with Crumb Cake ink. Then I tore IT down to 3 1/4″ x 4 1/2″ and adhered it with Stampin’ Dimensionals.

Using the dies in the Notes of Nature set, I cut out two larger leaves from Lost Lagoon cardstock and three smaller leaves from Boho Blue cardstock.
I adhered them to the card front with Liquid Glue.

I tied a simple bow using one length of gold Simply Elegant Trim and one length of Crumb Cake Baker’s twine and adhered it with a Glue Dot.
On a piece of Very Vanilla cardstock, I stamped the Notes of Nature sentiment in Lost Lagoon ink. Then I used a Stylish Shapes banner die to cut it out.

Using my Paper Trimmer, I sliced off the left end of the banner and then used double-stacked Stampin’ Dimensionals to adhere it to the card front over the bow.
I added some gold Neutrals Adhesive-backed Sequins and the card front was done!

On the inside, I stamped the Field Notes image, from Notes of Nature, in Crumb Cake ink in the corner of a Very Vanilla panel. I added the small leaves image in Lost Lagoon and the larger leaves twice – once in full-strength Boho Blue and again in stamped-off-once Boho Blue. I stamped the Crumb Cake dots a couple times and added some gold sequins.

I used Liquid Glue to adhere the panel to a Misty Moonlight mat and into the Crumb Cake card base and the card was done!
My Very Vanilla Medium Envelope got the collage of images from Notes of Nature on the front…

…and more Crumb Cake colored Nature’s Sweetness Specialty DSP on the envelope flap.

Et Voila! For a collage-a-holic like me (and some of you??) – Notes of Nature is a no-brainer-duh-gotta-have it bundle! Add the stunning Nature’s Sweetness Specialty DSP and…it’s card-making heaven!

I hope you like!
If you’d like to recreate this project, all the products and card cuts you’ll need are down below! And – this is the card I made on my Saturday Nite Live Video yesterday! If you’d like to see it – for the first time or again! – here ’tis!
I’ve also created a printable PDF with written instructions and a list of the products used to create this card. You can download, print and/or save it by clicking this image:

Missed any tutorials? You can check out my past projects right here!
TTFN
M

Connect with me! https://campsite.bio/stampsnlingers
HOST CODE FOR 1 FEB – 15 FEB: 9RSNRGDT
Use this host code when you order $50 or greater and receive a free gift (AND the Monthly Card Tutorial) from me! If your order is over $150, please do not use this code, but you’ll still get the free gift. The free gift is your choice of any item valued up to $10.00 in any active Catalog! That includes some of the Host Exclusive stamp sets! See my Customer Rewards page for full details.
Note: Make sure that you can see my name on the final checkout page listed as your Demonstrator when you order so that you know that you’re ordering with me and you’ll get my rewards!
You’ll also be getting a link to my ZOOM The Craftroom (an exclusive TWICE-A-WEEK online event for my customers) and the monthly Online Tutorial. The February Tutorial features the beautiful Thoughtful Expressions Bundle!


It’s Sale-A-Bration Time!

We ALL look forward to Sale-A-Bration each year and this year is no exception! And – since it coincides with the release of the wonderful new January – April 2024 Mini Catalog, there’s no doubt at all that THIS is the time to SHOP, HOST and JOIN!
Get all the deets at my Stampin’ Up! Promotions page right here!
NOW!
GET NEW SALE-A-BRATION CHOICES!!

SURPRISE! Stampin’ Up! is giving use a WHOLE NEW SET of goodies to choose from during Sale-A-Bration! Yup – they’ve just released even more products you can earn for FREE! Click the flyer below to take a look-see at the products just added to this promotion and then get busy! Sale-A-Bration ends 29 February!

WE’VE GOT TWO NEW KITS!
Kits Collection by Stampin’ Up! is all about making crafting fun, accessible, and inclusive! We’re always working hard to design a collection full of different product options to allow you and your customers oodles of options when it comes to finding that perfect project or gift. And – we’ve got two NEW kits for you to choose from!
Check out the Birthday Sparkle Kit!

Create glittering birthday cards and gift tags with the Birthday Sparkle Kit! It’s easy to create each project for your recipient or get ahead on your crafting for the year by making quick multiples. Either way, you’ve got a special paper craft that your recipients will love!
What’s in the box:

– Makes six cards and six gift tags.
– Die-cut paper pieces and twine.
– Glitter stickers, pressed wood picks, coordinating envelopes, and gold foil paper pieces!
– Fun stamp set!

Want to see how to make it? Click right here!
Or – maybe you’d like the new Happy Houseplants Kit!

Calling all plant lovers! The Happy Houseplants Kit is an adorable home decor crafting kit! Create four coordinated houseplant decor pieces. They can stand by themselves, or you can hang them on your wall. Either way, your houseguests will be amazed that you created it yourself!
What’s in the box:

– Four 6″ x 6″ white frames
– Precut paper pieces for you to curl and assemble inside the frames.
You don’t even have to stamp on this one – no inky fingers – just super cute projects to make! Want to see how to make it? Click right here!
Get the Stampin’ Up! Products This Project:


Price: $16.50


Card Cuts Used in the This Project:
Crumb Cake Cardstock: 4 1/4″ x 11″ (card base, scored and folded at 5 1/2″); Notes of Nature die cut long leaves for front (x4)
Misty Moonlight Cardstock: 3 1/4″ x 4 1/2″ (torn mat on front); 4″ x 5 1/4″ (mat for inner liner)
Boho Blue Cardstock: Notes of Nature die cut small leaves under sentiment (x3)
Lost Lagoon Cardstock: Notes of Nature die cut larger leaves for front (x2)
Very Vanilla Cardstock: Stylish Shapes Die cut (sentiment – trimmed to ); 3 7/8″ x 5 1/8″ (inner liner)
Nature’s Sweetness Specialty DSP: 3 1/4″ x 4 1/2″ (torn panel on front); 2 1/4″ x 6″ (envelope flap)
If you need any stamping supplies, I’d be very happy to be your Demonstrator. Just click on the Order Stampin’ Up! Online Now button on the right side of the screen to go directly to my online store or drop me an email if you have any questions. Happy Stamping!
Shop the Clearance Rack here. Earn FREE Stampin’ Up! Products – Join my Punkin Head Peppermint Rewards – My online customer thank you program!
Finn Fan Fix 
Ever seen an Aussie with squirrel entrails hanging from his mouth??

Now you have!
Oh – not REAL squirrel….

But – he’s making a job of it….almost got to the chewy/squeaky center!

TTFN
M


 #20 Demonstrator in Sales in the US 2023-2024
 #13 Demonstrator in Leadership in the US 2023-2024
 #21 Demonstrator in Team Building in the US 2023-2024


 Inky Bee Stampers
 KarensCardCorner
 Stamp with Amy K
 Stamp With Nel
 Stampin With Shirley G
 Tarabeth Stamps
 TL's Bright Spot
I LOVE this card sooooo much and it was fun watching you create it. Technology is great to a point, right?! As for the entrails…that look in his eyes gets me every time. My friends have a Beagle puppy and it swallowed the squeaky toy when he got to the center. Puppy is doing well after surgery. From the pics, it looks like he is not all Beagle, but maybe a little Great Dane too…lol. I’m sure Finn knows better cuz it wouldn’t taste as good as chips, popcorn, or yogurt!
Yeah – the orange squirrel has been removed from the field of play. We HAVE found squeekers on the floor – he loses interest FAST when they come out – but…not worth the worry! Thanks so much! 🙂
Such a pretty card! Love the colors and the layering is perfect! Poor squirrel! I don’t think that the surgeon can even fix that one!! 🙂
Nope – he’s terminal! :(. Thanks, Amy! 🙂
Absolutely beautiful! And, thank you for the tutorial.
You are most welcome – thank you!:)
Oh my! That is one lovely note card!
Hmmm…squirrels don’t fare so well – in the wild OR in the living room.
Thanks so much, Mom! And yes – squirrels mostly just can’t play as rough as an Aussie! 🙂
Awesome card, Mary. I love everything about it, especially the colors. Lost Lagoon, Misty Moonlight and Boho Blue are so pretty together.
You had me for a minute re Finn and squirrel entrails. 😆
Thanks so much, Pat – I do love this card! And – aren’t you glad it was NOT “real” squirrel parts!?! LOL!
Those eyes get me every time!
What can I say? I L O V E this card! Everything about it. Actually, my other daughter’s birthday is coming up and I CASEd this card for her. Thanks for sharing your talent and creativity.
Yeah – glad to give you an idea for another birthday card! Thank you! 🙂