
Happy Thursday, y’all – and welcome to the Happy Inkin’ Thursday Blog Hop! It’s a color week for the last week – and last Happy Inkin’ Thursday Blog Hop!! – of 2017! Can you even believe it!? Be sure to check out all the ladies’ projects before we slide into 2018, won’t you?
Here’s the color scheme we’re working with today:

I went pretty obvious for the week of the year we’re in. Yup! New Years. I used some Large Number Framelits and a few Christmas Happiness/Pretty Pines to celebrate the arrival of 2018! And…there’s another little sneak peek of the Celebrate You Thinlits – a free goody when Sale-A-Bration starts next week! Take a look-see:

I started with a panel of Copper Foil and cut the four numbers from the Large Numbers Framelits – making sure to hang on to the cut out pieces.
I laid the cut panel into my Pinewood Planks Dynamic TIEF – and added the little cut out pieces, too – and then embossed the whole thing. I used Fast Fuse and Liquid Glue to adhere the cut and embossed panel to a Whisper White mat.

I cut more numbers from some Thick Whisper White card stock – three more of each number, to be exact. Then I made stacks with Liquid Glue and glued the stacked numbers back into their spots. Then I used more Liquid Glue to add the little cut out pieces back into their spaces.
Using the Celebrate die from the Celebrate You Thinlits (available on 3 Jan), I cut the sentiment from some Silver Foil and adhered it over the numbers with little bits of Liquid Glue.

To decorate the card, I pulled out my Pretty Pines Thinlits and cut some pine boughs, a pine cone and some berries from Silver Glimmer Paper and Whisper White card stock. For the Silver Glimmer pine cone, I adhered it to a scrap of Whisper White with Liquid Glue and fussy cut it.
I looped a short length of Silver Mini Sequin Trim around, sticking it on with Liquid Glue, then I added the Pretty Pines die cuts over top.

I made a Billie Moan bow with some new Silver Baker’s Twine (get it on 3 Jan) and stuck it on with a Glue Dot. And – that was it for the card front!
On the inside, I used Smoky Slate ink – stamped off once – to add a Christmas Happiness pine bough in the center of a Whisper White panel. Over that, I used my Stamp-A-Ma-Jig to stamp a sentiment from the Season of Whimsy Host stamp set (available right now – but…only for a few more days!) in Versamark. I sprinkled it with Copper Stampin’ Emboss Powder and heat embossed it with my Heat Tool.

I Fast Fuse’d the panel to a Whisper White mat and into my Thick Whisper White card base, popped the card front on with Stampin’ Dimensionals and the card was done!
The front of my Whisper White Medium Envelope got a few stamped off once or twice Smoky Slate pine boughs from Christmas Happiness…

…and I embossed the envelope flap in the Pinewood Planks Dynamic TIEF.

Et Voila! Large Numbers Framelits and Pretty Pines in mixed metals to welcome the new year! Hope you like!
Now that you’ve seen my project, please take a little time to visit all the Happy Inkin’ Thursday Blog Hoppers today!
If you click on the Next Blog button, you’ll go right to Jari Francis’ page. And you can just click on the names below to go direct to all the blogs!

Mary Deatherage – YOU ARE HERE!
Have fun on the Hop!!
TTFN
Mary
HOST CODE FOR 16 DEC – 15 JAN: QGAJHYYU
Use this host code when you order and receive a free gift from me! But, if your order is over $150, please don’t use this code (you’ll miss out on your own Stampin’ Rewards if you use it) but you’ll still get the free gift. The free gift is your choice of any item valued up to $10.00 from the 2017-2018 Annual Catalog or the 2017 Holiday Catalog! And – you can even select one of the Host-exclusive sets! See my Rewards page for more details.
Take the Red Box Challenge!!
Between Now and 31 Jan 18 at 11:59 PM (MT).

Happy New Year, everyone! The Paper Pumpkin team is especially excited for 2018, and we have two great reasons: (1) This year’s kits are amazing and (2) We’ve decided to kick off 2018 with a superfun giveaway!
We’re calling it the Red Box Challenge, and it’s easy to get in on the fun!
Simply put together a WOW project using an unused, past kit—or buy a past kit that you’ve had your eye on. Then share an image of your project on Facebook or Instagram with #redboxchallenge and you will be entered into a random drawing to win a Paper Pumpkin kit.
Now, we think all of our kits are wonderful and amazing–but our random drawing winners will receive the upcoming Paper Pumpkin fifth anniversary March kit. Think: Gorgeous and collectible. Everyone is going to want one. AND the winners will get it in their mailbox before anyone else.
Sound fun? Check out the terms and conditions here, then start crafting your Red Box Challenge project today!
Note: Some project ideas will be selected from the entries and featured in Paper Pumpkin’s monthly newsletter and on our Facebook and Pinterest pages. Past alternative Paper Pumpkin projects you’ve created and posted on social media are not eligible for this contest.
Only a Few More Days!!

Hey, folks! Grab these goodies – before they’re gone!
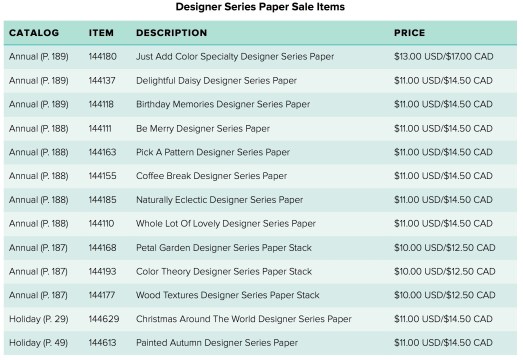
Check out the Retiring and Surplus Items List….

Get all the details on my Stampin’ Up! Promotions page – or go right to the Year End Sale goodies in my Online Store!
THE RESERVATION WINDOW IS OPEN…
BUT ONLY FOR A COUPLE MORE DAYS!

We can’t wait for you to get your hands on your very own Stamparatus and look forward to seeing the projects you’ll make with this incredible stamping tool.
I’ve got all the information over on my Promotions page – including a super little video with lots of information on this wonderful new stamp placement tool. Be sure to check it out – peruse the how-to-reserve-your-Stamparatus tutorial you’ll find there, and then get your reservation in before the 30th!!
STAMPIN’ UP! PRODUCTS USED IN TODAY’S PROJECT:
The Celebrate You Thinlits (Sale-A-Bration) and Silver Baker’s Twine (Occasions Catalog) will be available next week on 3 Jan!


CARD CUTS USED IN TODAY’S PROJECT:
Thick Whisper White Card Stock: 5 1/2″ x 8 1/2″ (card base, scored and folded at 4 1/4″); Large Number Framelits die cuts
Copper Foil: 3 7/8″ x 5 1/8″ (card front)
Whisper White Card Stock: 4″ x 5 1/4″ (mats for card front and for inner liner); Pretty Pines die cuts
Silver Glimmer Paper: Pretty Pines Thinlits die cuts
Silver Foil: Celebrate You Thinlits die cut
If you need any stamping supplies, I’d be very happy to be your Demonstrator. Just click on the Order Stampin’ Up! Online Now button on the right side of the screen to go directly to my online store or drop me an email if you have any questions. Happy Stamping!
Shop the Clearance Rack here. Earn FREE Stampin’ Up! Products – Join my Punkin Head Peppermint Rewards – My online customer thank you program!
No FFF’s on Blog Hop Days!


 Burlap Ribbon")


 #20 Demonstrator in Sales in the US 2023-2024
 #13 Demonstrator in Leadership in the US 2023-2024
 #21 Demonstrator in Team Building in the US 2023-2024


 KarensCardCorner
 Stamp with Amy K
 Stampin With Shirley G
 Tarabeth Stamps
 TL's Bright Spot