Well, it’s Friday. And….yes, it’s really Friday! We’re getting tomorrow (and Sunday!!) off!! Whoo-hooo!
And – I’m feeling particularly perky cuz – although I have to fly to CA and back next week (bleh), I splurged and upgraded myself to First Class! I justified it to myself every which way from Sunday – some valid… others…reaching a bit. But – in the end…yep. I pulled the trigger!
So, to celebrate, let’s talk about a card that uses one of my favorite techniques – the Triple Time technique. It’s super easy to do and looks like it took forever. Add in the Christmas Happiness pines and pine cones and a couple of gorgeous sentiments from Watercolor Christmas and it’s a slam dunk! Take a look-see:

I started the way most Triple Time cards start – I cut three panels of decreasing size of Very Vanilla card stock (okay – Triple Time cards do not have to be Very Vanilla, you know what I meant!) and stacked them up. On the smallest panel, I heat embossed a small sentiment from the Watercolor Wishes stamp set in Copper Stampin’ Emboss Powder.
When it was cool, I used a teensy dab of Liquid Glue between the layers to gently – and temporarily! – hold them together for stamping.

I stamped the Christmas Happiness pine bough image several times across the layers with Old Olive ink. Then I used the medium pine cone outline image and stamped it in Early Espresso. Finally, I added a couple of Christmas lights in Tuxedo Black Memento ink.
I used my new Stampin’ Blends to color the images – the two Crumb Cake pens for the pine cones, the two Daffodil Delight and Old Olive pens for the lights!

I carefully pulled the layers apart and matted each one on a piece of Wood Textures DSP. Then I added the two middle layers with Stampin’ Dimensionals – making sure my stamped images lined up correctly!
For my pine cone embellishments, I turned to the ever-faithful Pretty Pines Thinlits. I cut a couple of short pine boughs from Old Olive card stock and adhered them with Liquid Glue. The pine cones are cut from Wood Textures DSP (same design as my mats) and the backs are from Copper Foil. I adhered them together with Liquid Glue and popped them on with Liquid Glue and a Stampin’ Dimensional.

I tied a little bow from Jute Twine and adhered it with a Glue Dot. And that was it for the card front!
On the inside, I inked the Christmas Happiness pine bough in Old Olive ink, stamped it off once on scrap paper, and stamped it in the middle of a Very Vanilla panel. Over the top of that, I used my Stamp-A-Ma-Jig and stamped a second sentiment from Watercolor Christmas in Versamark Ink. Then I sprinkled it with Copper Stampin’ Emboss Powder and heated it up!

I Fast Fuse’d the panel to its Wood Textures DSP mat and into my Thick Very Vanilla card base, Fast Fuse’d the card front on and the card was done!
My Very Vanilla Medium Envelope got another Christmas Happiness pine bough and cone on the front. I colored the cone with my Stampin’ Blends…

…and I added more of the Wood Textures DSP to the envelope flap. Aaannndddd…when I remembered the “Stampin’ Blends bleed thru” adage (which I did when I saw where it had bled thru!!) I added another pine bough and cone. But – for that one, I folded a scrap of paper and put it between the layers to protect the front of the envelope! 🙂

Et Voila! Triple Time Technique! Christmas Happiness pine cones and boughs! Gorgeous sentiments from Watercolor Christmas! What’s not to love?! I hope you do! 🙂
TTFN
Mary
HOST CODE FOR 16 OCT – 31 OCT: 4HQU3GVF
Use this host code when you order and receive a free gift from me! But, if your order is over $150, please don’t use this code (you’ll miss out on your own Stampin’ Rewards if you use it) but you’ll still get the free gift. The free gift is your choice of any item valued up to $10.00 from the 2017-2018 Annual Catalog or the 2017 Holiday Catalog! And – you can even select one of the Host-exclusive sets! See my Rewards page for more details.
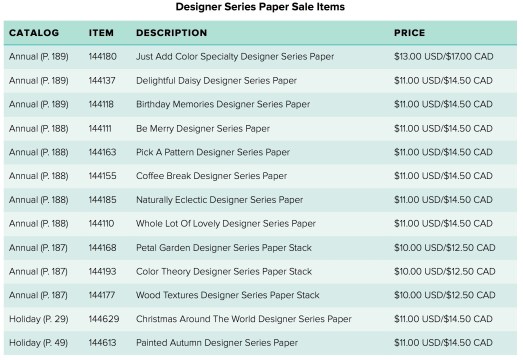
Designer Series Paper Sale…
All Month Long!

Let’s admit it: we all just love gorgeous Designer Series Paper! By popular demand, we are bringing back an incredible offer on Designer Series Paper. We’ll be able to buy three packages of select Designer Series Paper and get one FREE during October! This sale includes Designer Series Paper from both the annual and holiday catalogs. And we’re even including select Specialty and Designer Series Paper Stacks on sale!
So take advantage of this excellent opportunity and gather up lots of pretty paper! Take a look-see at what’ll be up for grabs!! Click the picture to open a handy – and colorful! – flyer!
MERRY PATTERNS HOST PROMOTION STILL AVAILABLE
Host a workshop or place an individual order totaling $300 or more (before shipping and tax) by the end of October, and you’ll earn this cool new stamp set for free! Click the picture to open up a printable flyer!

Get all the details on my Stampin’ Up! Promotions page right….here!
Stampin’ Blends – Available 1 November 17!

Say hello to a new world of colorful creativity! Meet Stampin’ Blends, artist-quality alcohol markers in 12 exclusive Stampin’ Up! colors.
With the release of the Stampin’ Blends on 1 Nov, we’ll also be offering a limited-time 16-card project kit and stamp set with beautiful line-art images. This fun kit – and the coordinating stamp set feature beautiful line image art that will help you get blending! Check it out!

Stampin’ Blends Features
- Add just the right amount of color where you need it with the brush tip or fine-point.
- Each color (except Ivory and Bronze) has a light and dark shade marker, available individually or in a combo pack.
- Stampin’ Up! has done in-house testing for evaporation and life testing and they are really happy with the results.
- Press fit seal prevents air from entering the barrel and causing evaporation.
- The nestable lids are easy to keep track of and have a tight fit for long-lasting color.
So – be watching for more information about this fun new way to get yer color on!!
PRODUCTS USED IN TODAY’S PROJECT:
Stampin’ Blends will be available on 1 Nov – that’s just around the corner! 🙂


CARD CUTS USED IN TODAY’S PROJECT:
Thick Very Vanilla Card Stock: 5 1/2″ x 8 1/2″ (card base, score and fold at 4 1/4″)
Wood Textures DSP: 4″ x 5 1/4″ (mats for card front and for inner liner); 3″ x 4″ (mat for middle layer); 2″ x 2 3/4″ (mat for sentiment layer); Pretty Pines die cut pine cones; envelope flap
Very Vanilla Card Stock: 3 7/8″ x 5 1/8″ (card front and inner liner); 2 7/8″ x 3 7/8″ (middle layer); 1 7/8″ x 2 5/8″ (sentiment layer)
Old Olive Card Stock: Pretty Pines pine boughs
Copper Foil: Pretty Pines pine cones
If you need any stamping supplies, I’d be very happy to be your Demonstrator. Just click on the Order Stampin’ Up! Online Now button on the right side of the screen to go directly to my online store or drop me an email if you have any questions. Happy Stamping!
Shop the Clearance Rack here. Earn FREE Stampin’ Up! Products – Join my Punkin Head Peppermint Rewards – My online customer thank you program!
Finn-Fan Fix (No more new pics – sorry!)
TTFN
M


 #20 Demonstrator in Sales in the US 2023-2024
 #13 Demonstrator in Leadership in the US 2023-2024
 #21 Demonstrator in Team Building in the US 2023-2024


 KarensCardCorner
 Stamp with Amy K
 Stampin With Shirley G
 Tarabeth Stamps
 TL's Bright Spot
Love it! Was there a reason you used DSP for the mats rather than Early Espresso or one of the other dark browns? It really shows up on the envelope flap but I can’t distinguish on the card. Does it show up more in real life? Just curious because I only have one sheet of that DSP 🙂 Glad you have a two-day weekend.
You can tell it’s “woody” in real life. And it has just a little “life” to it that plain card stock wouldn’t give it. I took a beat, too, before I used it as a mat – there are several wood designs I really like in the Wood Textures DSP and I’m kind of stingy with them! Thanks so much, Karen! 🙂
I love it , Mary! It looks so pretty with those extra pine cones and pine boughs. The inside is beautifully done, too. Super card.
Appreciate it, Jari, thanks! 🙂
Just beautiful Mary!! The colors are just perfect and the touch of wood texture DSP is perfect! Great card! 🙂
Thanks, Amy! 🙂
Had me from the jump!
Thought this might be right up your alley. Thanks, Mom! 🙂
Pine branches, pinecones, ok, sign me up! Love it! It’s a beauty. I felt a little like Karen about using the wood dsp. I think I’d try to cut out the centers of the layers to save them for later.
Thanks, Kathy and yea – probably should have done that, now that you mention it! 🙂
Et Voila! I love it! I’ve never tried that technique but always think they’re pretty and look more complicated than you make it sound! Love the inside too. TFS.
Thanks, Susan – do give it a try. It’s ridiculously easy! 🙂