Good morning, y’all! How goes the weekend!? We had a cooooooool day yesterday. I mean – it ALSO included a good bit of rain (thanks, Leo!) but mostly it was just blessedly cool! Finn had quite the pep-in-his-step when we went for our walk! And we even pulled on a light long-sleeve shirt! YEAH!!
Since last night was Saturday – specifically the 15th-Saturday-before Christmas! – I shared another Christmas project for you! This time it’s a super easy Treat (or small gift!) box made with the Countryside Corners die set! The one I made last night was decorated for Christmas with the Joy of Noel Bundle and Christmas Classics dies – plus the beautiful Joy of Christmas DSP! Take a look-see:

This one plays well with the Global Design Project outdoor theme challenge this week!

I saw this super cute box idea on Robin Ambrecht’s blog and…ran with it! 🙂
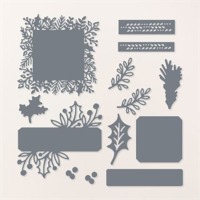
Using the next-to-largest Countryside Corners die, I cut out two pieces from the Pebbled Path paper in the beautiful Joy of Christmas DSP. These would be the sides of my treat box.

Now – this box can be made in four different sizes. This is the next-to-largest size and it started with a 5″ x 6″ piece of Pebbled Path cardstock.
I used my Simply Scored Score Tool to score the card base at 1″ and 4″ on the short side of the cardstock. Then I rotated the panel in the Score Tool and scored it at 2 1/2″ and 3 1/2″ on the long side. Or – 2 1/2″ from each edge! 🙂

I folded and burnished all the scored lines and then, using my Paper Snips, I made a couple of cuts to create the tabs – those are the dotted red lines on the photo above.
Using Tear & Tape Adhesive, I folded the sides and tabs in and adhered the box together. Best to check out the video for this – and I’ll give you a handy tip on how to wangle that Tear & Tape roll! 🙂

I used a Bone Folder to lightly curl a strip of Pebbled Path cardstock and used Tear & Tape Adhesive to adhere the ends to the sides of the box to make a handle.
Using Liquid Glue on the sides of the box, I adhered the two Countryside Corners die cut Joy of Christmas DSP pieces – making sure to center the die cuts on the box and line up the bottom with the bottom of the box.

With the box done, I used the Joy of Noel die set to cut out the NOEL sentiment from a piece of Cherry Cobbler plaid Joy of Christmas DSP.
Using Liquid Glue, I adhered the letters to the side of the box – centering the word on the handle.

Then I used more Joy of Noel dies to cut out a Shaded Spruce pine bough and a Gold Foil holly leaf. With the Christmas Classics dies, I cut an Old Olive sprig.
I adhered the foliage to the base of the handle with Liquid Glue.

I cut out a Tailor Made Tag sentiment tag from Very Vanilla cardstock and stamped the Joy of Noel sentiment in Cherry Cobbler.
Using the small circle die from the Online Exclusive Radiating Stitches set, I cut a Cherry Cobbler circle. Then I adhered the sentiment to it with Liquid Glue.

I added the circle/sentiment combination to the side of the box with Liquid Glue – then tied a simple bow with two pieces of Linen Thread and adhered that with Liquid Glue, too.

I added some gold Blooming Pearls and the treat box was done! 🙂
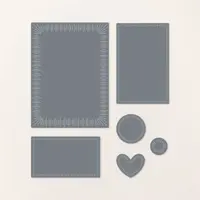
On last night’s video, I also shared a second box I made – one size larger – and decked out for Fall! It used the Pick of the Patch bundle and some Them Bones DSP!


And – here’s the template for that bigger box!

I’ll include the templates for the other two sizes in the printable PDF!

Et Voila! Two fun boxes, for sure! I love the Joy of Christmas DSP version so much – the Joy of Noel sentiment and foliage from it and Christmas Classics is the perfect embellishment for the paper, don’t you think!? Neither box would be so cool without the amazing Countryside Corners Dies – so…I hope they’re in your stash already or that you’ll ADD them! These little boxes would be perfect Hostess Gifts – or place markers at your holiday table!

I hope you like!
If you’d like to recreate this project, all the products and card cuts you’ll need are down below! And this is the card that I made on my YouTube live yesterday – if you’d like to see it – for the first time or again! – here ’tis!
I’ve also created a printable PDF with written instructions and a list of the products used to create this project. You can download, print and/or save it by clicking this image:

Missed any tutorials? You can check out my past projects right here!
TTFN
M

Connect with me! https://campsite.bio/stampsnlingers
HOST CODE FOR 16 SEP – 30 SEP: AXQJQ964
Use this host code when you order $50 or greater and receive a free gift (AND the Monthly Card Tutorial) from me! If your order is over $150, please do not use this code, but you’ll still get the free gift. The free gift is your choice of any item valued up to $10.00 in any active Catalog! That includes some of the Host Exclusive stamp sets! See my Customer Rewards page for full details.
Note: Make sure that you can see my name on the final checkout page listed as your Demonstrator when you order so that you know that you’re ordering with me and you’ll get my rewards!
You’ll also be getting a link to my ZOOM The Craftroom (an exclusive TWICE-A-WEEK online event for my customers) and the monthly Online Tutorial. The September Tutorial features the beautiful Autumn Leaves Bundle!


While Supplies Last!

Surprise, surprise! We’re offering a special release of five beautiful new Designer Series Paper options! These papers include fabulous holiday prints, gorgeous seasonal styles, and some spectacular timeless designs
Here’s the deets:
Sales Period: Starts 6 September
– The special release paper options will be available in the Online Exclusives category in the online store.
– Products will only be available while supplies last. Once products run out, they will no longer be visible in the online store.
Get the Stampin’ Up! Products Used in this Project:


Card Cuts Used in This Project:
Pebbled Path Cardstock: 5″ x 6″ (treat box – scored and folded as shown); 7/8″ x 5″ (handle)
Cherry Cobbler Cardstock: Radiant Stitches die cut circle
Shaded Spruce Cardstock: Joy of Noel die cut pine bough
Gold Foil: Joy of Noel die cut holly leaf
Old Olive Cardstock: Christmas Classics die cut sprig
Very Vanilla Cardstock: Tailor Made Tags die cut (sentiment)
Joy of Christmas DSP: Next-to-Largest Countryside Corners die cuts (x2); Joy of Noel die cut sentiment
If you need any stamping supplies, I’d be very happy to be your Demonstrator. Just click on the Order Stampin’ Up! Online Now button on the right side of the screen to go directly to my online store or drop me an email if you have any questions. Happy Stamping!
Shop the Clearance Rack here. Earn FREE Stampin’ Up! Products – Join my Punkin Head Peppermint Rewards – My online customer thank you program!
Finn Fan Fix 
I was amused to hear Wayne busily emptying Finn’s toy bed – they were behind me where I was sitting in the recliner yesterday.
I could hear him telling Finn…there you go – now you can lay in your bed! It’s all clear of your toys.
I said I didn’t think he WANTED to sleep IN the bed – and I was informed that he was getting right in it!
Whatev.
A few minutes later I got up and found…

My men. 🤦♀️🤦♀️🤦♀️🤷♀️🤷♀️🤷♀️
TTFN
M


 #20 Demonstrator in Sales in the US 2023-2024
 #13 Demonstrator in Leadership in the US 2023-2024
 #21 Demonstrator in Team Building in the US 2023-2024


 KarensCardCorner
 Stamp with Amy K
 Stampin With Shirley G
 Tarabeth Stamps
 TL's Bright Spot
Such cute treat boxes! Love them both, they’re the perfect size too! Well…if you would just wedge the bed between the table leg and the fireplace and then rumple it just so, then he’d want to sleep in it for sure. 😉 And I’m sure that they both helped you to pick up the toy mess too…
I know – I haven’t made it nearly uncomfortable for him to WANT to lay in it! And oh yes – they BOTH helped. Bwahahahahaha!! Thank you, Amy! 🙂
Finn always puts a smile on my face!
Mary, Mary. You should have made a HALLOWEEN treat box. I know, I’m not into that one either, but I do have some children in my life that will love a little treat box for Halloween. Just sayin.
Sorry I had to miss the ‘live’, but had a previous dinner engagement. It was a fundraiser, which included a pie auction. I donated a pie, and, would you believe? It garnered the top price of $160! Kind of made up for missing your video.
I know! I can’t believe I didn’t do that! Grab the faces from the set and add them to the pumpkins – then used a Halloween sentiment instead of the Fall one that I used! BOOM! Thanks so much, Julie – and…yes, I WILL take a piece of your pie! 🙂
In my experience, Dads can’t interpret what dogs want nearly as well as Moms can!
This is true!! 🙂
Oh, Mary, I think these will make really neat holders for hand-delivered Christmas gift cards! I could probably sneak in some pieces of Christmas candy, too. Thanks for the inspiration. Have a nice week!
They’d be great – and I think you could for sure get a couple three pieces of candy in! Thanks so much, Gail! 🙂