Good morning all – and welcome back to the week! Did you have a good weekend? We didn’t do a lot – finished those pesky taxes (sort of), dried some watermelon (yes, that’s a thing!) and… made a couple of cards! Me. Not Wayne or Finn. THEY did not make cards! 🙂
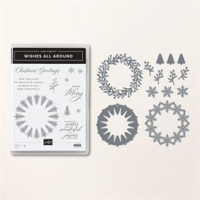
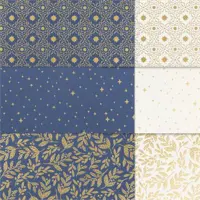
My card for today used a cool sketch challenge as the starting point and I picked one of the new Special Release DSPs – the Shining Christmas Specialty DSP for the base. Then I added a pretty wreath from the Wishes All Around Bundle – and…well. Take a look-see:
And here’s that sketch – from the Hand Stamped Sentiments Challenge!

I started with a 3 7/8″ x 4 7/8″ piece of the new Shining Christmas Specialty DSP that I cut into three 1 5/8″ x 3 7/8″ strips. I adhered those to a Cherry Cobbler mat using Liquid Glue. Tip: adhere the top and the bottom strips first – using a normal reveal around the edges. Then add the middle strip – splitting the difference between the two strips!

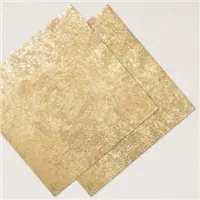
I made a frame from Distressed Gold Paper – using the next-to-largest and fourth-from-largest Deckled Rectangle Dies – I just ran them thru the Stampin’ Cut and Emboss Machine with both dies in place!

Using Liquid Glue – I adhered the frame to the card front. Then I made a smaller frame from Cherry Cobbler, using the second and third from largest Deckled Rectangle Dies.

I used Liquid Glue to adhere the thinner frame to the Distressed Gold frame.
Using the wreath die in the Wishes All Around die set – I cut a Distressed Gold and a Mossy Meadow wreath. I adhered them both to the card front – beginning with the gold die cut – using Liquid Glue.

On a strip of Cherry Cobbler cardstock, I stamped the Wishes All Around sentiment in Versamark Ink, sprinkled it with white Embossing Powder and heat set it with my Heat Tool.
I used Paper Snips to cut banners in both ends – and popped it into place with Stampin’ Dimensionals.

I tied a simple bow with two lengths of Very Vanilla Baker’s Twine and adhered it with Liquid Glue.
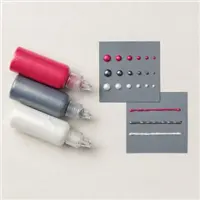
Finally, I made three large-ish “balls” on the wreath with Real Red Pearlized Enamel Effects. And then I put it aside – where I couldn’t accidentally smear that Enamel Effects while it dried! – and the card front was done!

For the inside, I stamped a second sentiment from Wishes All Around in Cherry Cobbler on a Very Vanilla panel. In the corners, I stamped the little sprig in Mossy Meadow. I added SMALL dots of the Real Red Pearlized Enamel Effects to the sprigs. And – let them dry!! 🙂

I used Liquid Glue to adhere the panel to a Cherry Cobbler mat and into my Thick Very Vanilla card base, popped the card front on with Stampin’ Dimensionals and the card was done!
My Very Vanilla Medium Envelope got the Mossy Meadow sprig – with VERY SMALL dabs of Real Red Pearlized Enamel Effects – on the front…

…and more of the Shining Christmas Specialty DSP on the envelope flap.

Et Voila! Traditional colors – with beautiful glossy and gold-foiled designs on one side – and quieter (matte) designs on the other – are the star on this while-supplies-last Shining Christmas Specialty DSP! You’re going to want a pack (or three!) for all your holiday projects! And take a good look at the cool Wishes All Around bundle while you’re at it!

I hope you like!
If you’d like to recreate this project, all the products and card cuts you’ll need are down below! And – I made a short video for Instagram – you can check it out right here! 🙂
I’ve also created a printable PDF with written instructions and a list of the products used to create this project. You can download, print and/or save it by clicking this image:

Missed any tutorials? You can check out my past projects right here!
TTFN
M

Connect with me! https://campsite.bio/stampsnlingers
HOST CODE FOR 16 SEP – 30 SEP: AXQJQ964
Use this host code when you order $50 or greater and receive a free gift (AND the Monthly Card Tutorial) from me! If your order is over $150, please do not use this code, but you’ll still get the free gift. The free gift is your choice of any item valued up to $10.00 in any active Catalog! That includes some of the Host Exclusive stamp sets! See my Customer Rewards page for full details.
Note: Make sure that you can see my name on the final checkout page listed as your Demonstrator when you order so that you know that you’re ordering with me and you’ll get my rewards!
You’ll also be getting a link to my ZOOM The Craftroom (an exclusive TWICE-A-WEEK online event for my customers) and the monthly Online Tutorial. The September Tutorial features the beautiful Autumn Leaves Bundle!


While Supplies Last!

Surprise, surprise! We’re offering a special release of five beautiful new Designer Series Paper options! These papers include fabulous holiday prints, gorgeous seasonal styles, and some spectacular timeless designs
Here’s the deets:
Sales Period: Starts 6 September
– The special release paper options will be available in the Online Exclusives category in the online store.
– Products will only be available while supplies last. Once products run out, they will no longer be visible in the online store.
Get the Stampin’ Up! Products Used in this Project:


Card Cuts Used in This Project:
Thick Very Vanilla Cardstock: 4 1/4″ x 11′ (card base, scored and folded at 5 1/2″)
Cherry Cobbler Cardstock: 4″ x 5 1/4″ (x2 – mat for card front and for inner liner); Deckled Rectangle die frame; 3/4″ x 3 7/8″ (sentiment)
Mossy Meadow Cardstock: Wishes All Around die cut wreath
Distressed Gold Specialty Paper: Deckled Rectangle die frame; Wishes All Around die cut wreath
Very Vanilla Cardstock: 3 7/8″ x 5 1/8″ (inner liner)
Shining Christmas Specialty DSP: 3 7/8″ x 4 7/8″ (card front – cut into 1 5/8″ wide strips); 2 1/4″ x 6″ (envelope flap)
If you need any stamping supplies, I’d be very happy to be your Demonstrator. Just click on the Order Stampin’ Up! Online Now button on the right side of the screen to go directly to my online store or drop me an email if you have any questions. Happy Stamping!
Shop the Clearance Rack here. Earn FREE Stampin’ Up! Products – Join my Punkin Head Peppermint Rewards – My online customer thank you program!
Finn Fan Fix 
So – the other day we decided that slicing up a watermelon and dehydrating it would be a good idea!

Finn agreed!

C’mon, Dad – you don’t have to dry it ALL!!!

NOW we’re talkin’!

Closer…

Down the hatch!

Luvs him some watermelon! 🙂
And – dehydrating it WAS a very good idea indeed!
TTFN
M


 #20 Demonstrator in Sales in the US 2023-2024
 #13 Demonstrator in Leadership in the US 2023-2024
 #21 Demonstrator in Team Building in the US 2023-2024


 KarensCardCorner
 Stamp with Amy K
 Stampin With Shirley G
 Tarabeth Stamps
 TL's Bright Spot
Love, love, love this card design! The wreath is beautiful over the Christmas tree background. So, does Finn like the dehydrated version as much as the real thing??
Thank you so much, Amy! And yes – he likes pretty much whatever we eat! 🤷♀️🤷♀️🤷♀️
Absolutely gorgeous card. Thank you for sharing the tutorial.
Thank you so much, Wendie – and glad that the tutorial helped! 🙂
Love all the LAYERS on the gorgeous card! And I hope you enjoy the watermelon. Friends recently started dehydrated fruit experiments and shared with us. The kiwi was yummalicious and my fav!
YES! We started with Kiwi and it is wonderful!! Having some fun with the fruits, for sure! Thanks, Judi! 🙂
Love your Christmas take on our sketch this week at Hand Stamped Sentiments. Thanks for playing along with us again.
Thanks much, Fiona – appreciate you stopping by!!
thanks for sharing and showing your cute Christmas card and Finn getting his watermelon—gotta love him:)
I do. I really really do – he is a joy to have around! Thank you so much, Donna! 🙂
Lovely card. Just found your site.
Thank you, Katrina – I appreciate it! And – welcome! 🙂
I LOVE the layered frame, Mary!!! Such a smart idea. You’ve got a good start on Christmas! Thanks for playing along with us at Hand Stamped Sentiments!
Thanks very much, Jenny – appreciate you coming by! 🙂
Love this so much, Mary! A pleasure to see the new papers, and I am thrilled with your frame – so brilliant to layer it! This came out so gorgeous! Now I have to find some dried watermelon to try, too, lol. Thanks so much for playing at Hand Stamped Sentiments!
The dried watermelon is yummy!! Thanks so much, Heather! 🙂
Beautiful card. GReat way to use that wreath over the tree background. Love that frame too. Genius!
Thanks so much, Julie – I appreciate it! 🙂