Happy Sunday, y’all! Hope your weekend is going well. And that you have power! If you’re in the Northeast…I am thinking that’s maybe a crap shoot! So my fingers are crossed that everyone has power and is warm! 🙂
So – if you were able to join me yesterday for my Facebook live, I appreciate you spending part of your weekend with me! If not, but you’d like to see the replay – here ’tis!
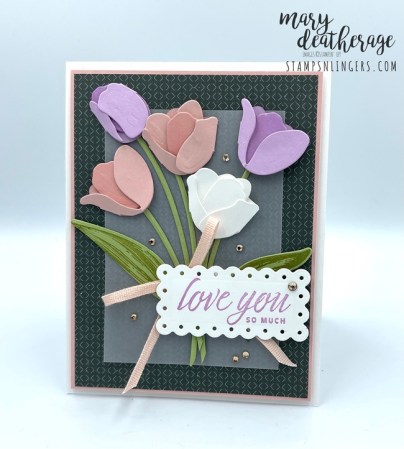
A couple weeks ago, I made a card with the Flowering Tulips stamp set – and showed you how you can combine the multi-step images to make pretty tulips. I didn’t use the Tulips dies for that one – but promised that I would soon – AND would show you how to combine the various dies to make 3D flowers. So…that’s what I did today! I placed my bouquet atop some pretty Artfully Composed DSP. Take a look-see:

I played along with two challenges on this one. The first one, from Color Throwdown, inspired my color palette!

And the theme is from the Global Design Project challenge.

I started by adhering a piece of Evening Evergreen paper from one my fave new DSP packs – the Artfully Composed DSP – on a piece of Blushing Bride cardstock. I used Glue Dots – placed so to be hidden by the rest of the decorations – to adhere a rectangle of Vellum cardstock in the middle of the card front.
Then – it was time to build a bouquet! 🙂
There are three flower types that you can make with the Tulips Dies. This is how the dies work together. SU has graciously given us enough to be able to cut multiples FAST!

This combination of dies cut shapes that can be assembled into the tulips!


I cut five total flowers – two in Fresh Freesia, two in Blushing Bride and one in Basic White.
For the two Blushing Bride flowers – I used a Light Flirty Flamingo Stampin’ Blend to color the smallest “petal”. I use a Light Fresh Freesia Blend on the small Fresh Freesia petals.

It’s easiest to see how to assemble the flowers by taking a gander at the video – you can fast forward to about the 5 minute mark. Note: you CAN use Liquid Glue to assemble them – but using Glue Dots adds a smidge more dimension – and so that’s what I used. I also added an actual Stampin’ Dimensional to a few of them, too! All see-able on the video! 🙂
I stamped a large and a small leaf from the Flowering Tulips set in Pear Pizzazz on Pear Pizzazz cardstock and cut them with their matching Tulips Dies. And I used the thin stem die to cut five Pear Pizzazz stems.

I laid everything out to get my bouquet “just right” and then began to adhere everything to the card front with Liquid Glue. No need to use any Dimensionals here! 🙂 A couple of the stems needed to be trimmed to size!

I tied a little bow from some Petal Pink ribbon (1/8″ Cotton Ribbon) and adhered it with a Glue Dot.
On a piece of Basic White cardstock, I stamped a Flowering Tulips sentiment in Fresh Freesia. Then I cut it with the smallest Scalloped Contours rectangle die.

I used double-stacked Stampin’ Dimensionals to adhere the sentiment over the bow, added some Champagne Rhinestone Basic Jewels and the card front was done!
On the inside, I stamped one of the Flowering Tulips flowers in Blushing Bride (the first image is in full-strength and the second is in stamped-off-once ink), with Pear Pizzazz stems and leaves. Then I added a few more Champagne Rhinestone Basic Jewels!

I used Liquid Glue to adhere the panel to a Blushing Bride mat and into my Thick Basic White card base, popped the card front on with Stampin’ Dimensionals and the card was done!
My Basic White Medium Envelope got more Blushing Bride and Pear Pizzazz Flowering Tulips on the front…

…and a little more Artfully Composed DSP on the envelope flap.

Et Voila! Oh – my – goodness!! I love these 3D Tulip Dies flowers, don’t you? And with the coordinating Flowering Tulips stamped images to decorate the other parts of your card and #nonekkidenvelopes….the sky is the limit! Can’t you just see a gorgeous bouquet with Tulips AND Daffodils!?!? Stampin’ Up! gives us the tools to DO that! 🙂

I hope you like!
If you’d like to recreate this card, all the products and card cuts are listed below!
And…I’ve also created a printable PDF with written instructions and a list of the products used to create this project. You can download, print and/or save it by clicking this image:

Missed any tutorials? You can check out my past projects right here!
TTFN
M


 #20 Demonstrator in Sales in the US 2023-2024
 #13 Demonstrator in Leadership in the US 2023-2024
 #21 Demonstrator in Team Building in the US 2023-2024


 KarensCardCorner
 Stamp with Amy K
 Stampin With Shirley G
 Tarabeth Stamps
 TL's Bright Spot