Happy Sunday, y’all! Hope your weekend is going well. And that you have power! If you’re in the Northeast…I am thinking that’s maybe a crap shoot! So my fingers are crossed that everyone has power and is warm! 🙂
So – if you were able to join me yesterday for my Facebook live, I appreciate you spending part of your weekend with me! If not, but you’d like to see the replay – here ’tis!
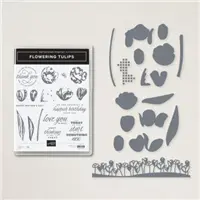
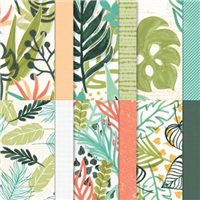
A couple weeks ago, I made a card with the Flowering Tulips stamp set – and showed you how you can combine the multi-step images to make pretty tulips. I didn’t use the Tulips dies for that one – but promised that I would soon – AND would show you how to combine the various dies to make 3D flowers. So…that’s what I did today! I placed my bouquet atop some pretty Artfully Composed DSP. Take a look-see:

I played along with two challenges on this one. The first one, from Color Throwdown, inspired my color palette!

And the theme is from the Global Design Project challenge.

I started by adhering a piece of Evening Evergreen paper from one my fave new DSP packs – the Artfully Composed DSP – on a piece of Blushing Bride cardstock. I used Glue Dots – placed so to be hidden by the rest of the decorations – to adhere a rectangle of Vellum cardstock in the middle of the card front.

Then – it was time to build a bouquet! 🙂
There are three flower types that you can make with the Tulips Dies. This is how the dies work together. SU has graciously given us enough to be able to cut multiples FAST!

This combination of dies cut shapes that can be assembled into the tulips!


I cut five total flowers – two in Fresh Freesia, two in Blushing Bride and one in Basic White.
For the two Blushing Bride flowers – I used a Light Flirty Flamingo Stampin’ Blend to color the smallest “petal”. I use a Light Fresh Freesia Blend on the small Fresh Freesia petals.

It’s easiest to see how to assemble the flowers by taking a gander at the video – you can fast forward to about the 5 minute mark. Note: you CAN use Liquid Glue to assemble them – but using Glue Dots adds a smidge more dimension – and so that’s what I used. I also added an actual Stampin’ Dimensional to a few of them, too! All see-able on the video! 🙂
I stamped a large and a small leaf from the Flowering Tulips set in Pear Pizzazz on Pear Pizzazz cardstock and cut them with their matching Tulips Dies. And I used the thin stem die to cut five Pear Pizzazz stems.

I laid everything out to get my bouquet “just right” and then began to adhere everything to the card front with Liquid Glue. No need to use any Dimensionals here! 🙂 A couple of the stems needed to be trimmed to size!

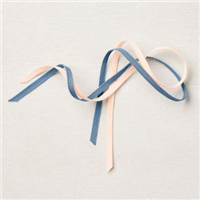
I tied a little bow from some Petal Pink ribbon (1/8″ Cotton Ribbon) and adhered it with a Glue Dot.
On a piece of Basic White cardstock, I stamped a Flowering Tulips sentiment in Fresh Freesia. Then I cut it with the smallest Scalloped Contours rectangle die.

I used double-stacked Stampin’ Dimensionals to adhere the sentiment over the bow, added some Champagne Rhinestone Basic Jewels and the card front was done!
On the inside, I stamped one of the Flowering Tulips flowers in Blushing Bride (the first image is in full-strength and the second is in stamped-off-once ink), with Pear Pizzazz stems and leaves. Then I added a few more Champagne Rhinestone Basic Jewels!

I used Liquid Glue to adhere the panel to a Blushing Bride mat and into my Thick Basic White card base, popped the card front on with Stampin’ Dimensionals and the card was done!
My Basic White Medium Envelope got more Blushing Bride and Pear Pizzazz Flowering Tulips on the front…

…and a little more Artfully Composed DSP on the envelope flap.

Et Voila! Oh – my – goodness!! I love these 3D Tulip Dies flowers, don’t you? And with the coordinating Flowering Tulips stamped images to decorate the other parts of your card and #nonekkidenvelopes….the sky is the limit! Can’t you just see a gorgeous bouquet with Tulips AND Daffodils!?!? Stampin’ Up! gives us the tools to DO that! 🙂

I hope you like!
If you’d like to recreate this card, all the products and card cuts are listed below!
And…I’ve also created a printable PDF with written instructions and a list of the products used to create this project. You can download, print and/or save it by clicking this image:

Missed any tutorials? You can check out my past projects right here!
TTFN
M

Connect with me! https://campsite.bio/stampsnlingers
HOST CODE FOR 16 JAN – 31 JAN: ABK32SQ6
Use this host code when you order $50 or greater and receive a free gift (AND the Monthly Card Tutorial) from me! If your order is over $150, please do not use this code, but you’ll still get the free gift. The free gift is your choice of any item valued up to $10.00 in any active Catalog! That includes some of the Host Exclusive stamp sets! See my Customer Rewards page for full details.
Note: Make sure that you can see my name on the final checkout page listed as your Demonstrator when you order so that you know that you’re ordering with me and you’ll get my rewards!
You’ll also be getting a link to my ZOOM The Craftroom (an exclusive TWICE-A-WEEK online event for my customers) and the monthly Online Tutorial. The January Tutorial features the Honeybee Home Bundle!


Stamp-N-Storage Sale Ends 31 Jan 2022!

Stamps, dies, and punches are the layers to your card (you know that I – personally – NEVER EVER use layers…. 😂😂😂😂😂) but SOME people do! These supplies can be the most fun to organize, but also the most challenging. To help you on your journey to an organized craft space, this week Stamp-N-Storage is offering a 10% OFF sale on some amazing solutions for storing your Dies, stamp sets and punches!! For your savings add coupon code 8WEEKS5 during the checkout process.
- All Shelves
- Magnet Cards
- Storage Pockets
- Stamp-n-Die Bundle
- Creative Crate
- Crate Dividers
- Stamp Cards
- Peg Stamp Nook
- Dies Shelf
- All Punch Holders
Sale ends at midnight CST, January 31, 2022 – and it’s on some of my most used favorites! I keep all my die sets on Magnet Cards, inside Storage Pockets and inside my Creative Crates!
Paper. Inks. Markers. We all have them – and we all need them handy and organized and staying ready-to-go! And, for me – Stamp-N-Storage is the best and highest quality there is!
![]()
Don’t forget to use the code: 8WEEKS5 when you checkout, okay??
PLEASE NOTE: I do receive a small affiliate fee when you use my Stamp-n-Storage shopping links. But – you’ve seen plenty of pictures of my stamping space – both at home and when I’ve traveled! – and you KNOW that I am a HUGE fan and love their quality products!! I recommend them to everyone!

As is the case with ALL our Stampin’ Up! Sale-a-Brations, the January – February Sale-a-bration event has a SHOP, HOST and JOIN promotion! Check it out!
SHOP!

- There are 7 new products (4 stamp sets and 3 paper packs) that are available as free items to choose from with a Level 1 order (free with an order of $50+)
- There are 2 new items (1 stamp set and paper BUNDLE and and an amazing Sentiment set!) that are available as free choices with a Level 2 order (free with an order of $100+).

HOST!

- There’s also a great new host exclusive stamp set called Calming Camelia that you can pick up for FREE with either a personal order of $300+ or a party with sales totaling $300+!

- Drop me an email at stamps-n-lingers@comcast.net if you’re interested in setting up a personal host code for you and your friends to use – when you collect orders to reach the $300 retail point then you’ll get this cool sentiment-only stamp set for FREE! And that’s on TOP of the free Sale-A-Bration picks you’ll have!
JOIN – HERE’S THE BEST PART OF ALL!

- There is an AWESOME joining promotion happening! If you purchase the Starter Kit between January 4 and February 28, you’ll get to pick a TWO FREE stamp sets with your Starter Kit!! All stamp sets except for host exclusive and Sale-a-bration stamp sets are can be picked as your free sets!!
- When you purchase the Starter Kit for $99 + taxes (if applicable) before the end of Sale-a-bration, the kit ships for FREE and you get to pick $125 in Stampin’ Up! merchandise and you’ll get TWO additional FREE stamp sets with your kit! Yay!! Two free stamp sets in addition to $125 in merchandise for $99, yes please!!
If you have any questions about joining, please drop me a note at stamps-n-lingers@comcast.net, I’d love to chat with you!
You can also see additional information on my blog here: https://stampsnlingers.com/join-my-team/ and on my Stampin’ Up! site here: https://stampsnlingers.stampinup.net/join_now

Get the Stampin’ Up! Products Used in this Project:

Price: $11.50


Card Cuts Used in This Project:
Thick Basic White Cardstock: 4 1/4″ x 11″ (card base, scored and folded at 5 1/2″)
Blushing Bride Cardstock: 4″ x 5 1/4″ (x2 – mats for card front and for inner liner); Tulip Die cut flowers
Fresh Freesia Cardstock: Tulip Die cut flowers
Pear Pizzazz Cardstock: Tulip Die cut stems and leaves
Vellum Cardstock: 2 7/8″ x 4 1/8″ (panel on card front)
Basic White Cardstock: Scalloped Contour Die cut (sentiment); 3 7/8″ x 5 1/8″ (inner liner); Tulip Die cut flower
Artfully Composed DSP: 3 7/8″ x 5 1/8″ (card front); 3″ x 6″ (envelope flap)
If you need any stamping supplies, I’d be very happy to be your Demonstrator. Just click on the Order Stampin’ Up! Online Now button on the right side of the screen to go directly to my online store or drop me an email if you have any questions. Happy Stamping!
Shop the Clearance Rack here. Earn FREE Stampin’ Up! Products – Join my Punkin Head Peppermint Rewards – My online customer thank you program!
Finn Fan Fix

Finn has a little….quirk.
Okay – he’s got a few cute quirks but this one…has made me laugh more times than I can count.
To be sure – I DO try not to laugh while looking at him – I don’t want him to feel bad.
But…well. YOU try not to chuckle.

What? You were able to keep from chuckling? How ’bout….

Still nothing? Okay. You force me to bring out The Big Guns.

I DID warn you! 😂😂😂😂
He’s just “holding the dog”! 😉
TTFN
M


 #20 Demonstrator in Sales in the US 2023-2024
 #13 Demonstrator in Leadership in the US 2023-2024
 #21 Demonstrator in Team Building in the US 2023-2024


 KarensCardCorner
 Stamp with Amy K
 Stampin With Shirley G
 Tarabeth Stamps
 TL's Bright Spot
Such a pretty card! Love those tulip dies, so easy to use! Hahahaha…good thing he’s there supervising himself. Someone needs to keep the dog in line. 😉
Thanks, Amy! And yes – he’s the dog for the job! 🙂
You make me laugh every time! Glad I caught you live last night but I know I don’t have the patience for this set 🙂 My sister-in-law enjoyed watching you create too. I was making a card at 6 AM today and she was making one at 8 AM. She’s hooked on making her own envelopes too…lol!
Nah – give ’em a go – they’re really easy once you know how they all go together! And think of them with some daffodils! 😳😳😳 Thanks so much, Karen! 🙂
Love the tulips and your design to show them off! Thanks for the good directions on putting them together! TFS. Finny is too cute. Those little quirks are part of his fun-loving personality!
He’s a card, that’s for sure! Thank you so much, Susan! 🙂
Beautiful! Love all of the dimension and detail on the die cut flowers. Thanks for joining us for this week’s Color Throwdown!
Thanks, Lori, for the kind words and for taking time to come by! 🙂
Lovely card, Mary! Finn loves the camera! So cute!
Thank you so much, Carol! Yep – he’s a camera boy! 🙂