Good morning! I hope you’re having a great weekend! The baby shower yesterday was very nice – everyone had a great time! My desserts were a hit and – most critically! – I re-found a maple recipe that had been a favorite a few “events” back. I thought I’d used a “maple” recipe – and had NOT been able to find it to re-create it. It turns out – I had MODIFIED a recipe – without annotating the mods. I have remedied that! To quote a famous literary figure – “As God is my Witness, I will NEVER lose that recipe again!” Okay – maybe not a DIRECT quote… 🤷♀️🤷♀️😂
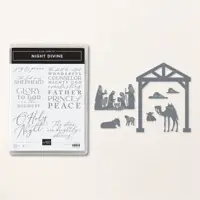
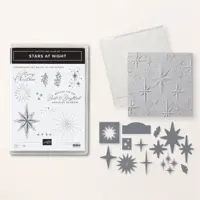
My card today is one that may surprise you. Not cuz it’s all that surprising in and of itself – but because it came from ME!! I used the Night Divine and Stars at Night Bundles to make a clean, simple and GORGEOUS Christmas card – one that’s perfect for making multiples! Take a look-see:

I started by stamping the Night Divine sentiment in Tuxedo Black Memento Ink near the bottom of a Basic White panel.
When it had dried, I embossed it in the Stars at Night Hybrid Embossing Folder.

Using Liquid Glue, I adhered the panel to a Basic Black mat.
Using the camel die in the Night Divine set, I cut out three camels – one each in Basic Black, Basic Gray and Smoky Slate.

Starting with the Smoky Slate die cut camel – I adhered them to the card front with Liquid Glue. Then came the Basic Gray and finally the Basic Black camels.

Using Black Stampin’ Dimensionals – I adhered the matted panel to a Silver Foil mat. Note: in the video, I used Smoky Slate cardstock for this mat – and it looks great! So…you can make that modification easy peasy if you like! 🙂

For the inside, I stamped the Stars at Night stars in Smoky Slate on a Basic White panel.

Using Liquid Glue, I adhere the panel to a Basic Black AND a Silver Foil (or Smoky Slate!) mat, and into the Thick White Card base, popped the card front on with Black Stampin’ Dimensionals and the card front was done!
My Basic White Medium Envelope got the Smoky Slate Stars at Night stars on the front…

…and I embossed the envelope flap in the Stars at Night Hybrid Embossing Folder.

Et Voila! Okay – so…this is NOT my usual kinda card, I know! But…man. I really really love how it turned out! The simple die cuts – and gorgeous sentiment (that FONT!!) from Night Divine are perfect on the star-strewn Stars at Night embossed card front. And – easy to make a bunch of them, right?!?

I hope you like!
If you’d like to recreate this card, all the products and card cuts you’ll need are down below! And – this is the card I made on my YouTube live yesterday. If you’d like to see it – for the first time or again! – here ’tis:
And here’s a look at the card I made on the video!

I think I kind of like the Smoky Slate version better! How about you??

I’ve also created a printable PDF with written instructions and a list of the products used to create this project. You can download, print and/or save it by clicking this image:

Missed any tutorials? You can check out my past projects right here!
TTFN
M

Connect with me! https://campsite.bio/stampsnlingers
HOST CODE FOR 16 OCT – 31 OCT: M2FEYGPH
Use this host code when you order $50 or greater and receive a free gift (AND the Monthly Card Tutorial) from me! If your order is over $150, please do not use this code, but you’ll still get the free gift. The free gift is your choice of any item valued up to $10.00 in any active Catalog! That includes some of the Host Exclusive stamp sets! See my Customer Rewards page for full details.
Note: Make sure that you can see my name on the final checkout page listed as your Demonstrator when you order so that you know that you’re ordering with me and you’ll get my rewards!
You’ll also be getting a link to my ZOOM The Craftroom (an exclusive TWICE-A-WEEK online event for my customers) and the monthly Online Tutorial. The October Tutorial features the beautiful Merriest Trees Bundle!


CELEBRATING 35 YEARS!!
Starter Kit Promotion
3 – 31 October 2023

We’re celebrating our 35th Anniversary IN STYLE – with an amazing Starter Kit joining Special!
Here’s the deets!
Thru 31 October, anyone who joins our fun crafting community as a new demonstrator can choose EITHER 35% OFF the cost of their Starter Kit OR get 35% MORE product with their Starter Kit!
Whoo-hoo!
Here’s the deets!
Promotion Period: 3–31 October
Signing Deadline: 31 October 2023; 11:59 PM (MT)
New demonstrators can choose one of the following options for their Starter Kit:
Select Option 1 – save on your Starter Kit Purchase! – Get 35% OFF the normal cost of a Stampin’ Up! Starter Kit. Those who select this option will still receive $125 worth of SU product but will only pay $64.35 plus tax. And – shipping of the kit is FREE!
OR
Select Option 2 – pick MORE fun Stampin’ Up! Product! – Get 35% MORE product with your Starter Kit. Those who select this option will pay the usual $99 plus tax – but will get to select $168.75 worth of product! And – shipping of the kit is FREE!!
BUT WAIT! There’s MORE!!
You’ll ALSO get FREE OnStage@Home Registration!
Those who sign up for a Starter Kit during this offer will also be automatically registered for FREE* to our virtual OnStage event on 11 November – that’s a $77 value! And – you don’t even have to travel – just do it from home. In your jammies, if you like!
- Those who sign up for this offer have the opportunity to watch the event independently, gathered together with other demonstrators, or with their Team Leader.
- Demonstrators who join during this promotion will be automatically added to the OnStage attendees; you won’t even need to register separately.
- Demonstrators who join during this promotion will also receive an email with all the information about this event.
Whether you’d like to start a little side hustle or simply take advantage of the awesome 20-25% discount, I would very much love for you to join my Critters-N-Creatin’ Krew team! We have a great time together – even though we live all over the country!

Check right here to get more info about joining Stampin’ Up! and why being a “Critter” is a great idea! I mean – look at those faces! 😎

And – you can click the flyer below and print it out if you like. You can scan the QR Code to get started! Yes – I AM that hip! 😎

Get the Stampin’ Up! Products Used in this Project:


Card Cuts Used in This Project:
Thick Basic White Cardstock: 4 1/4″ x 11″ (card base, scored and folded at 5 1/2″)
Silver Foil Specialty Paper: 4″ x 5 1/4″ (x2 – bottom mat for card front and inner liner)
Basic Black Cardstock: 3 7/8″ x 5 1/8″ (x2 – middle mat for card front and inner liner); Night Divine die cut camel
Smoky Slate Cardstock: Night Divine Die Cut camel
Basic Gray Cardstock: Night Divine Die Cut camel
Basic White Cardstock: 3 3/4″ x 5 ” (x2 – card front and inner liner)
If you need any stamping supplies, I’d be very happy to be your Demonstrator. Just click on the Order Stampin’ Up! Online Now button on the right side of the screen to go directly to my online store or drop me an email if you have any questions. Happy Stamping!
Shop the Clearance Rack here. Earn FREE Stampin’ Up! Products – Join my Punkin Head Peppermint Rewards – My online customer thank you program!
Finn Fan Fix 
I HAVE told him it’s really not safe to pick up hitchhikers!

He doesn’t really listen. 🤷♀️🤷♀️
As you might imagine – that’s the the tip of the iceberg!
TTFN
M


 #20 Demonstrator in Sales in the US 2023-2024
 #13 Demonstrator in Leadership in the US 2023-2024
 #21 Demonstrator in Team Building in the US 2023-2024


 KarensCardCorner
 Stamp with Amy K
 Stampin With Shirley G
 Tarabeth Stamps
 TL's Bright Spot
Lovely card! I have been undecided about the newest hybrid EF, but your simple CAS card convinced me that I need it. Smokey Slate would be more cost effective than Silver Foil if making a large number of multiples. Thanks for sharing your creativity.
Absolutely! With just one sheet of that finish in the Silver foil pack…! And – I really like the Smoky Slate anyway!! 🙂
Stunning card, Mary. I’m definitely making this one.
Thanks, Nel! 🙂
Such a pretty card! Love the neutral colors, perfect for your design! Poor Finn…he just wants to bring a few friends in with him and he gets busted. 😉
Right!? Just a…few!…little hitchhikers!! Thanks very much, Amy! 🙂
Perfect card! I’m making multiples of a more complicated card with this set…..but if I run out of steam or time, I’ll switch to this card (smile)
Whatever did Finn get into….and bring in the house!! Still, he can do no wrong….
They’re grass burs – we call them hitchhikers! They stick to shoes – socks – pant legs – and DOGS!! 🤦♀️🤦♀️. Thank you so much, Faith! 🙂
Love this card, simply elegant!!
Thanks very much, Beverly! 🙂