Good morning and Happy Friday. The LAST Friday – heck the last DAY! – in June! I think you know that means the DSP sale ends tonight, right?! But – more importantly – our Starter Kit Plus promotion ALSO ends tonight. And…it would be a shame for you to miss all the extra ($30 worth, in fact!) good things you’ll get if you join today!! So – don’t make me sad, okay?? 😉
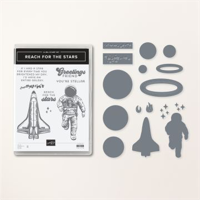
Now – my card today is a fun fold – and it’s way easier than it looks, I promise! It’s called a Book Jacket Fun Fold – and I saw how to make it from Sue Campfield’s blog. I decorated mine with the gorgeous Stargazing DSP (on sale!!) and a bunch of fun goodies from the Reach for the Stars bundle. Take a look-see:

The layout on the front of the card was inspired by this week’s Paper Players challenge.

And – this is FOR SURE a FUN FOLD so…I’m playing along again at the Creative Creases challenge! 🙂

I made the card first. Using two pieces of Basic Black cardstock – I scored and folded them both.
The first one – I’m calling it the “Back and End Flap” is 5 1/2″ x 7 1/4″ that I scored and folded at 4 1/4″.

The second piece – “”Spine” and Front” – is 5 1/2″ x 6 3/4″ – scored at 1/2″, 1 1/2″, 2 1/2″ and 3 1/2″ – with all the score lines folded in the same direction.

Using Tear & Tape on the 1/2″ section of the second piece, I folded and adhered it to create the “spine”. The video is the best place to see how to assemble the card – it starts at the 6 minute mark if you want to skip right to that part. 🙂

I folded the larger piece at 4 1/4″ – and then – with the fold on the RIGHT as I looked at it, used Tear & Tape adhesive to adhere the “spine” to the left end of the panel. Guess what? The video is the best place to see how to do THIS, too! 🤷♀️

I matted all the Stargazing DSP pieces on their Blueberry Bushel mats…
– Front: 3 1/8″ x 5 3/8″ mat with 3″ x 5 1/4″ DSP
– Spine: 7/8″ x 5 3/8″ mat with 3/4″ x 5 1/4″ DSP
– Inside of Card: 3 1/8″ x 5 3/8″ mat with 3″ x 5 1/4″ DSP
– “Secret Inside” panel: 2 7/8″ x 5 3/8″ mat with 2 3/4″ x 5 1/4″ DSP
– Back of “Secret Inside” panel: 2 7/8″ mat with 2 3/4″ x 5 1/4″ DSP (this will look like the front when the card is closed…it’s the panel you see in the picture just above!)
…and then adhered all but the matted front onto their respective places on the card using Liquid Glue.
Whew! Got it?? Okay – then it was time for me to decorate with the fun Reach for the Stars bundle and Stargazing DSP.

First – I did a bunch of die cutting.
– Smallest Reach for the Stars circle die – I cut a piece of dark DSP with stars (this will be the face mask of the astronaut).
– Next two bigger circle dies – cut out two planets right out of the Stargazing DSP. I picked a Pumpkin Pie and a Berry Burst planet.
– Fourth from smallest circle die – two planets – one in Pumpkin Pie (sentiment) and one in Crushed Curry.
– Both star dies – used them to cut out a bunch of stars from the silver Holographic Trio Specialty Paper.
– Two of the larger “flame” dies from Basic White cardstock.
– Stamped the shuttle in Blueberry Bushel on Basic White and cut it out with its Reach for the Stars die.
– Stamped the astronaut in Tuxedo Black Memento Ink on Basic White and cut it out with its Reach for the Stars die.
– And – this isn’t a die cut, sorry! – I fussy cut one of the smaller “Saturn” images from the DSP.

I stamped the sentiment from Reach for the Stars in Blueberry Bushel ink on the larger Pumpkin Pie die cut planet.
I used Liquid Glue to adhere two strips of Berry Burst Holographic Trio Specialty Paper to the card front.
Then, starting with the smallest die cut planet – I adhered them to the Front panel with Liquid Glue.

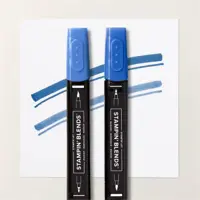
I used my Light Blueberry Bushel Stampin’ Blend to add some color and shadowing to the die cut shuttle. And I brushed all the colored parts with the Clear Wink of Stella Glitter Brush.
I colored the “flames” with the Light and Dark Pumpkin Pie Stampin’ Blends.

I added the Crushed Curry planet with Liquid Glue, then adhered the shuttle over the top of it with Liquid Glue (I used Stampin’ Dimensionals on the video and…yep – like it better that way!) and then slid the flames into place with Liquid Glue.

Then – I used a bunch of little dots of Liquid Glue to adhere a bunch of Holographic die cut stars! I used some on the “spine”, too!
For the “secret inside” panel – with the astronaut – I adhered the fussy cut Saturn with Liquid Glue.
I colored the creases and folds – lightly (don’t get carried away!) – of the space suit using my Light Fresh Freesia Stampin’ Blend. Then I adhered the die cut to the panel with Liquid Glue.
I brushed that smallest Reach for the Stars circle die cut piece of dark Stargazing DSP with the Clear Wink brush (doesn’t it make sense that that face mask would be shiny?!?) and adhered it with Liquid Glue.
Finally – whew! – I stamped the sentiment in Blueberry Bushel and snipped the words with my Paper Snips. I edged each piece with the Fresh Freesia Stampin’ Write Marker and adhered them to the panel with Liquid Glue.
I added some more of the die cut stars with Liquid Glue – and the card was done.
My Basic White Medium Envelope got the Reach for the Stars splatters image stamped a few times in Blueberry Bushel and the stars in Fresh Freesia on the front…

…and more of the Stargazing DSP on the envelope flap.

Et Voila! Okay. So. The video is about 10 min longer than normal – but don’t let that scare you off from this card! The Book Jacket Fun Fold is really not that hard – you’ll see I’ve got it together in about 15 minutes. The rest is all the decorating! 😎 So – take a look at that to see how to make the fun fold. And then – the rest of it is all the steps and pieces and parts for decorating it with the Reach for the Stars bundle and amazing Stargazing DSP!

I hope you like!
If you’d like to recreate this card, all the products and card cuts you’ll need are down below! And this is the card I made on my YouTube video yesterday. If you’d like to see it – for the first time or again! – here ’tis! This card really IS easier to SEE how to make than it is to READ how to make. It’s really easy – I promise!
I’ve also created a printable PDF with written instructions and a list of the products used to create this project. You can download, print and/or save it by clicking this image:

Missed any tutorials? You can check out my past projects right here!
TTFN
M

Connect with me! https://campsite.bio/stampsnlingers
HOST CODE FOR 16 JUN – 30 JUN: BZF46JRT
Use this host code when you order $50 or greater and receive a free gift (AND the Monthly Card Tutorial) from me! If your order is over $150, please do not use this code, but you’ll still get the free gift. The free gift is your choice of any item valued up to $10.00 in any active Catalog! That includes some of the Host Exclusive stamp sets! See my Customer Rewards page for full details.
Note: Make sure that you can see my name on the final checkout page listed as your Demonstrator when you order so that you know that you’re ordering with me and you’ll get my rewards!
You’ll also be getting a link to my ZOOM The Craftroom (an exclusive TWICE-A-WEEK online event for my customers) and the monthly Online Tutorial. The June Tutorial features the fun Zany Zoo Bundle!


HUGE DSP SALE ENDS TODAY!
 Here’s the deets!
– Sale Period is 1 – 30 Jun 2023
– There is no limit to how many packages of Designer Series Paper may be purchased during this promotion.
– Only select Designer Series Papers are available at a 15% discount during this promotion. Check out the printable flyer below to see the papers included in the sale.
– Designer Series Paper ordered as part of a Starter Kit or with Stampin’ Rewards qualify for the 15% discount.
– Designer Series Papers are from the new 2023–2024 Annual Catalog (p. 129–132) and Online Exclusives.
Click right here to go to the DSP special in my Online Store!
THIS IS IT! TODAY’S THE LAST DAY!

Today is the last day for you to get even more FREE products in your customizable Starter Kit. Between 1–30 June, those who sign up can get $155 worth of products for only $99 + free business supplies + free shipping + all the fun being a part of Stampin’ Up!
Here’s the deets!
PROMOTION DATES: 1–30 JUNE 2023
– When new team members purchase their Starter Kit, they will be able to redeem $155 of Starter Kit eligible products for just $99
– Shipping of your new kit is FREE!!
I’d love to have you on the team! Get all the deets on this awesome Starter Kit promotion right here!
If you have any questions about joining, please drop me a note at here, I’d love to chat with you!
You can also see additional information on my Stampin’ Up! site here!

Get the Stampin’ Up! Products Used in this Project:


Card Cuts Used in This Project:
Basic Black Cardstock: 5 1/2″ x 7 1/4″ (Back and end Flap piece – scored and folded at 4 1/4″); 5 1/2″ x 6 3/4″ (“spine” and front flap piece – scored and folded at 1/2″, 1 1/2″, 2 1/2″ and 3 1/2″)
Blueberry Bushel Cardstock: 3 1/8″ x 5 3/8″ (x2 – mats for front flap and for Inside of card); 7/8″ x 5 3/8″ (mat for “spine”); 2 7/8″ x 5 3/8″ (x2 – mats for “secret inside” panel and back of “secret inside” panel)
Holographic Trio Specialty Paper: 1/4″ x 5 1/4″ (x2 – on front panel); Reach for the Stars die cut stars
Basic White Cardstock: Stamped & Die Cut Reach for the Stars images; fussy cut sentiment on “secret inside” panel; Larger Reach for the Stars die cut “flames”
Stargazing DSP: 3 ” x 5 1/4″ (x2 – front flap and Inside of card); 3/4″ x 5 31/4″ (“spine”); 2 3/4″ x 5 1/4″ (x2 – “secret inside” panel and back of “secret inside” panel); Die cut planets; Smallest Reach for the Stars circle die (astronaut face mask); 2 1/4″ x 6″ (envelope flap)
If you need any stamping supplies, I’d be very happy to be your Demonstrator. Just click on the Order Stampin’ Up! Online Now button on the right side of the screen to go directly to my online store or drop me an email if you have any questions. Happy Stamping!
Shop the Clearance Rack here. Earn FREE Stampin’ Up! Products – Join my Punkin Head Peppermint Rewards – My online customer thank you program!
Finn Fan Fix 
Head on Mom’s foot (pink sock – hard to see under fur-bucket). Holding Mr. Reindeer.

What else does a dog need??
Well – cookies. Cookies are good!
TTFN
M


 #20 Demonstrator in Sales in the US 2023-2024
 #13 Demonstrator in Leadership in the US 2023-2024
 #21 Demonstrator in Team Building in the US 2023-2024


 KarensCardCorner
 Stamp with Amy K
 Stampin With Shirley G
 Tarabeth Stamps
 TL's Bright Spot
WOW, just WOW! I need to go watch the video…not that I’m going to make this…but because I want to see the whole process. I hope you’ll think about editing your post so you can enter it in Creative Creases along with The Paper Players. Pretty, pretty, pretty please?!
LOL – okey dokey, Karen! I’ll fix it up! Thanks for the so kind words! 🙂
Such a cool card! Love the designer paper and images, perfect with your design! Finn does have a rough life! Looks like the only thing missing is Mr Bear…but I’m guessing that he was not far out of the photo. 😉
No – Mr. Bear was feeling shy – but he was near to paw, for sure! Thanks so much, Amy! 🙂
What a FUN card! I may have to rethink getting this suite.
It’s pretty cool! Thanks, Carol! 🙂
Mary this is a great fun fold and perfect to showcase the fabulous stamps and papers in the space suite – I love it! Thanks for sharing with us over at The Paper Players this week!
Thanks so much, Joanne! Appreciate the kind words! 🙂
Mary, this is OUT OF THIS WORLD!!!!!! I absolutely LOVE IT!!!!!!! So creative and fun! I love all the colors and the fun fold is amazing!!!!! Now, I want to give this a try! Your DSP and all the space items are just amazing! YOU rocked my sketch challenge this week!!!!! Thanks for joining us at The Paper Players!
Thanks so much, Claire – it is SUCH a great suite!! The DSP is stupendous! 🙂
Otherworldly…
Thanks, Mom! 🙂
Mary, I was so happy to see this fun fold in the Creative Creases Challenge! I can’t wait until Debbie and Rae see it. Thanks for entering it!! Best of luck.
Karen, DT
Thanks, Karen – I think it’s a really cool fold! 🙂
Whoa, Mary, this is a very cool card! I can just imagine giving that card to my grandson in 5-6 years. I will have to watch the video though because it’s looking a bit intimidating. Thank you for playing with Creative Creases Challenge, and I hope you can join us again soon. We really appreciate your support!
Debbie, DT
Secrets To Stamping
Thanks so much, Debbie – it LOOKS way harder than it is! Promise! Appreciate the kind words!
Mary, I love all the bright colors and subject of your card. A new fold for me. I’ll be trying it soon! Thank you for joining us for Creative Creases Challenge #60. Hope to see you for Challenge #61
Thanks so much, Rae – appreciate you stopping by! 🙂