Good morning and Happy Friday! Wanna hear something REALLY scary!? Hang on to your hat.
There are 93 days until Christmas.
Yes. Ninety. Three.
Less than 100. Three months.
In other words…it’s TOMORROW!!!! 😳😳😳😳😳
To that end, I have a fun stocking stuffer for you today! If you were able to join me yesterday for my YouTube Live then you were able to watch me make it. If not but you’d like to watch the replay here ’tis! I highly recommend that you watch it – this isn’t a terribly difficult box – but…it’s a LOT easier to see how to make it from a video than it is from reading!!
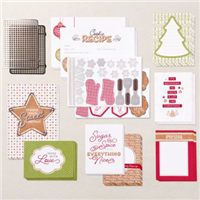
I saw this the first time at our retreat this past weekend – Susan Stanley brought one for us to make as her shoe-box swap! Her version used the Blackberry Beauty Suite of products for a Fall theme. Of course, you can decorate this little treat box any way you like – I’ve made it a Christmas stocking stuffer (cuz…it’s a perfect GINORMOUS candy bar delivery system!!). I decorated mine with some Heartwarming Hugs DSP and goodies from the Gingerbread & Peppermints Suite. Take a look-see:

This is a fun box to make – and I love that it adds the addition of an easel!
Note: you DO need to have 12″ x 12″ cardstock in your base color (mine is Crumb Cake in this one.).
I cut the Crumb Cake cardstock down to 9 1/8″ x 9 7/8″ and then used my Simply Scored Scoring Tool to score along the 9 7/8″ side at 4 1/8″, 4 3/4″, 8 7/8″ and 9 1/2″. Then I rotated the cardstock 90 degrees and scored along the 9 1/8″ side at 1/2″, 1 1/8″ and 8 1/2″.
I cut portions of the cardstock “out” and created some tabs – check out the template:

…this is what it should look like when you’re done.

I matted three pieces of Heartwarming Hugs DSP on Garden Green cardstock and then used Liquid Glue to adhere one to the top and one to the bottom of the box. Save the third matted panel for later.
I ran Tear & Tape Adhesive along the small tab (marked “Adhesive” on the template) and then, folding the opposite side over – lined up the edges and secured them together. Did this sound confusing? Yeah – I get it. Check out the video – it’s a lot easier to decipher when you can see it! 🙂
I matted strips of the Heartwarming Hugs DSP on Garden Green and then used Liquid Glue to adhere them to the narrow sides of the box.

The easel is another piece of Crumb Cake cardstock, cut to 4″ x 8″ and scored along the long side at 3 5/8″ and 7 3/8″. I applied Liquid Glue to the smallest tab and slid it inside the top of the box.

I used Liquid Glue to close the other end of the box.
The card front – if you will – is another piece of the Heartwarming Hugs DSP, matted on Garden Green and adhered to the bottom half of the easel mechanism with Liquid Glue.
I adhered a “cooling rack” from the Gingerbread & Peppermints Memories & More Card Pack with Liquid Glue. The cookies are from the Gingerbread Dies – I cut solid shapes from Crumb Cake and the “icing” from Basic White (using the detailed dies). I adhered them together with Liquid Glue and then popped them onto the cooling rack with Stampin’ Dimensionals.

I stamped the sentiment from Frosted Gingerbread in Garden Green on a piece of Basic White and then cut it with a die from the Tasteful Labels Dies. I adhered the sentiment to beneath the cookies with Stampin’ Dimensionals.
The spatula is a sticker from the Gingerbread & Peppermints Memories & More Card Pack. I patted the sticky side on my shirtsleeve to un-sticky-fy it – then adhered it with a couple of thin pieces of Stampin’ Dimensionals.

I decided that the back of the easel needed a little sumpin’ sumpin’, so I matted more Heartwarming Hugs DSP on Garden Green and adhered it with Liquid Glue.

For the easel stop, I used a sentiment sticker from the Gingerbread & Peppermints Memories & More Card Pack. I again de-sticky-fied the back and then adhered it with Stampin’ Dimensionals – setting it so it would support the easel at the angle I was looking for!

Y’all – that’s it. All that was left was to slide a GINORMOUS candy bar (thank you, Susan Stanley!!) inside and close the top!

Et Voila! I can see so many occasions that just beg for CANDY – and a wonderful candy-delivery-system would be awesome! This one, for Christmas, gets a lot of help from the Frosted Gingerbread bundle and the fun Gingerbread & Peppermints Memories & More Card Pack! What gift giving opportunity can you think of that would benefit from this treat box??

I hope you like!
If you’d like to re-create this card, all the card cuts and products used are listed down below!
TTFN
M

Connect with me: https://campsite.bio/stampsnlingers
I’ve created a printable PDF with written instructions and a list of the products used to create this project. You can download, print and/or save it by clicking this image:

HOST CODE FOR 16 SEP – 30 SEP: 9Y9BGNFK
Use this host code when you order $50 or greater and receive a free gift (AND the Monthly Card Tutorial) from me! If your order is over $150, please do not use this code, but you’ll still get the free gift. The free gift is your choice of any item valued up to $10.00 in any active Catalog! That includes some of the Host Exclusive stamp sets! See my Customer Rewards page for full details.
Note: Make sure that you can see my name on the final checkout page listed as your Demonstrator when you order so that you know that you’re ordering with me and you’ll get my rewards!
You’ll also be getting a link to my ZOOM The Craftroom (an exclusive TWICE-A-WEEK online event for my customers) and the monthly Online Tutorial. The September Tutorial features the Beauty of Tomorrow Bundle!


DON’T MISS OUT!!

We’d LOVE to have you join us – I mean, seriously – this is such an AMAZEBALLS time to pull the trigger! Get the usual amazing Starter Kit for $99 + FREE SHIPPING – and select $125 in Stampin’ Up goodies of your choice! Sale-a-Bration will ALSO give you an ADDITIONAL FREE Bundle from the Jul – Dec 2021 Mini Catalog!

But – there’s more to joining SU than the free stuff and the awesome 20-25% discount (although that’s HUGE!). It’s also about community, right? And the people that you’ll come to know and be friends (and even family!) with. We’ve got a great group of ladies and gentlemen in the Critters-N-Creatin’ Krew team and I’d love to have you join and get to know us! 🙂 We have Happy Discount Shoppers and Team Builders – whatever you want out of SU!… there’s a place for you in Critters-N-Creatin’ Krew!
Head over to my Joining page – you’ll get more info about what being a Demonstrator will get you and…what the Critters team will bring to you! And – if you’ve got more questions – I am more than happy to chat!! Just give me a holler!
Maybe YOU’LL be joining us for our next team Retreat – it’s in October of 2022!

I’ve done the knuckle-counting thing and confirmed that there are – in fact – ONLY 30 Days in September. WHich means…there are less that TEN DAYS REMAINING to take advantage of the second – and FINAL! – Sale-a-bration special for 2021! Like the special earlier in the year, this one has got some awesome new products that you can earn for FREE with orders of $50+ and orders of $100+ placed between now and 30 September!
The August – September Sale-a-bration event has a BUY, HOST and JOIN promotion just like the Sale-a-bration event earlier this year! Get ALL the details over on my Stampin’ Up! Promotions page!
Get the Stampin’ Up! Products Used in this Project:


Card Cuts Used in This Project:
Crumb Cake Cardstock: 9 1/8″ x 9 7/8″ (box base – scores along the 9 7/8″ side at 4 1/8″, 4 3/4″, 8 7/8″ and 9 1/2″ and along the 9 1/8″ side at 1/2″, 1 1/8″ and 8 1/2″); 4″ x 8″ (easel – scored along the long side at 3 5/8″ and 7 3/8″)
Garden Green Cardstock: 3 7/8″ x 7 1/4″ (x 3 – mats for easel, box top and box bottom); 3 5/8″ x 3 7/8″ (mat for back of easel); 1/2″ x 4″ (x 2 – mats for short-sides of box); 1/2″ x 7 1/4″ (x 2 – mats for long sides of box)
Basic White Cardstock: Tasteful Labels Die cut (sentiment)
Heartwarming Hugs DSP: 3 3/4″ x 7 1/8″ (x 3 – easel, box top and box bottom); 3 1/2″ x 3 3/4″ (back of easel); 3/8″ x 3 7/8″ (x 2 – short-sides of box); 3/8″ x 7 1/8″ (x 2 – long sides of box)
If you need any stamping supplies, I’d be very happy to be your Demonstrator. Just click on the Order Stampin’ Up! Online Now button on the right side of the screen to go directly to my online store or drop me an email if you have any questions. Happy Stamping!
Shop the Clearance Rack here. Earn FREE Stampin’ Up! Products – Join my Punkin Head Peppermint Rewards – My online customer thank you program!
Finn Fan Fix

While this…

…is completely open to interpretation…..
THIS…

…is about as clear as it can be. Here’s my Boo-bear. Play. With. Me. Now!!
TTFN
M


 #20 Demonstrator in Sales in the US 2023-2024
 #13 Demonstrator in Leadership in the US 2023-2024
 #21 Demonstrator in Team Building in the US 2023-2024


 KarensCardCorner
 Stamp with Amy K
 Stampin With Shirley G
 Tarabeth Stamps
 TL's Bright Spot
Such a cute gift box! The easel is so fun, perfect for all of those holiday treats. Are you sure that’s what Finn wants? I’m thinking that it still might not be clear. 😉
I don’t know. I might need to study the picture a little more! 😂 thanks, Amy! 🙂
Every part of Finn is so precious! I came here mainly to see him because I watched you create this fantastic project yesterday. Great directions. Have a wonderful weekend. 44 degrees in Murphy this morning. I always ask Alexa in the morning. You were about 7 degrees warmer! Oh, how I wish I were in the mountains!!
I’m sure it’s gorgeous in NC right now! Fall is when the south shines, it really is! Thanks very much, Karen – glad you were on the vid last night!! And yes – he’s sort of awesome from schnoozle to wiggler! 🙂
I love this candy box! What a super idea….my GNO group only exchanges cards but this will be perfect to add a little oomph to the card! TFS
Finny missed you last weekend…he’s ready to share his fun with you.
NO one says no to chocolate (if they do….hmmmm!). Thanks, Susan! Might be a good little gifty for Will one of these days soon, too! 🙂
Looks as if the Boo is holding up better than I hoped.
He’s doing great!! And is much loved!!
Mary, in your blog post and in the PDF you have the measurements for the box listed at 9 1/2″ x 9 7/8″ but in the video you said to cut the card stock to 9 1/8″ x 9 7/8″. The 9 1/8″ x 9 7/8″ is also printed on the template. I have discovered that by comparing all the measurements of all the parts of this box that the 9 1/2″ measurement is too long. I wanted to make you aware of this mistake.
Sheesh – I’m sorry about that! Thanks for figuring it out and letting me know! I’ve fixed it – hopefully everywhere! Thank you so much! 🙂