Good morning, y’all – it’s the next-to-last day of the Bonus Days EARNING period! Yep – that’s right. Today and tomorrow – you’ll still be EARNING Bonus Days coupons (one $5 coupon for every $50 spent before shipping and tax). Then – starting on 1 August – you can start to REDEEM them (ie: SPEND them!).
And – this is a SUPER good time to be SURE that you’re on my list to get the new Sept – Dec 2023 Mini Catalog! I’ll be ordering packs and packs of them on 2 August and then mailing them out to everyone who’s ordered $50 or more from me in the last year! Not sure if that includes YOU!? Give me a shout or…go ahead and place an order over $50 (and get another Bonus Days Coupon while you’r at it!) and then you’ll know for SURE!
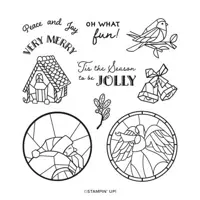
And – you MIGHT want to pick up the So Very Merry stamp set and a pack or three of One Horse Open Sleigh 6″ x 6″ DSP from the Online Exclusives! With these – and a couple other goodies – you could make today’s pretty Christmas card! Take a look-see:

The layout – plus a few other elements – was inspired by the Global Design Project CASE the Designer challenge this week!

I started by adhering a piece of Misty Moonlight paper from the One Horse Open Sleigh 6″ x 6″ DSP on a Crumb Cake mat for the card front.
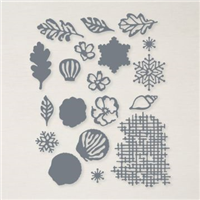
I cut out five snowflakes – three large and two medium – from Basic White cardstock using the Chic Dies.

On a piece of Basic White, I stamped the Santa image from the So Very Merry stamp set in Tuxedo Black Memento Ink and punched it out with the 2 3/8″ Circle Punch.
Using my Dark Smoky Slate, Light Cherry Cobbler and Light and Dark Pool Party Stampin’ Blends – I colored the Santa.
I used the Ivory Stampin’ Blend for his face – and the Petal Pink Stampin’ Write Marker for his nose!

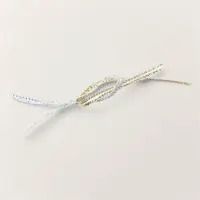
I adhered the Chic Die cut snowflakes using Liquid Glue, then used a little Stampin’ Seal to adhere a doubled length of silver trim from the Gold & Silver 1/8″ Trim Combo Pack and a doubled length of Crumb Cake Baker’s Twine.
Over the ribbon, I adhered the punched circle Santa with Stampin’ Dimensionals.

On a strip of Crumb Cake cardstock, I stamped just the top line of the So Very Merry sentiment in Misty Moonlight ink.
I snipped an angled end on the strip and then adhered it with Liquid Glue.
I tied a bow with a length of the silver 1/8″ Trim and length of the Crumb Cake Baker’s Twine – then adhered it to the sentiment strip with a Glue Dot.

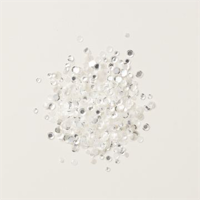
Using the putty end of the Take Your Pick Tool and some little dots of Liquid Glue, I adhered a bunch of Loose Silver Sequins – and the card front was done!
On the inside, I inked just the bottom line of the So Very Merry sentiment in Misty Moonlight and stamped a Basic White panel. Next to the sentiment, I stamped the little holly bunch in Tuxedo Black – and colored it with the Light Cherry Cobbler and Dark Pool Party Stampin’ Blends.

I used Liquid Glue to adhere the panel to a Crumb Cake mat and into my Cherry Cobbler card base, popped the card front on with Stampin’ Dimensionals – and the card was done!
My Basic White Medium Envelope got the So Very Merry holly bunch on the front…

…and more of the One Horse Open Sleigh DSP on the envelope flap.

Et Voila! I’m so happy that this So Very Merry stamp set was re-stocked after it sold out SO fast! It’s very fun and very pretty – I love the stained-glass feel! I’m not even going to talk about the One Horse Open Sleigh 6″ x 6″ DSP – we’ve established that it is STUNNING and a “must have” for all your Christmas projects!

I hope you like!
You’ve still got time to cash in on Bonus Days – just a TWO DAYS left to EARN those coupons (maybe THIS stamp set DSP and dies??) and then it’ll be time to REDEEM them in August!
If you’d like to recreate this card, all the products and card cuts you’ll need are down below! And – this is the card I made yesterday on my YouTube Live yesterday! If you’d like to see it – for the first time or again! – here ’tis!
I’ve also created a printable PDF with written instructions and a list of the products used to create this project. You can download, print and/or save it by clicking this image:

Missed any tutorials? You can check out my past projects right here!
TTFN
M

Connect with me! https://campsite.bio/stampsnlingers
HOST CODE FOR 16 JUL – 31 JUL: DUK29WMX
Use this host code when you order $50 or greater and receive a free gift (AND the Monthly Card Tutorial) from me! If your order is over $150, please do not use this code, but you’ll still get the free gift. The free gift is your choice of any item valued up to $10.00 in any active Catalog! That includes some of the Host Exclusive stamp sets! See my Customer Rewards page for full details.
Note: Make sure that you can see my name on the final checkout page listed as your Demonstrator when you order so that you know that you’re ordering with me and you’ll get my rewards!
You’ll also be getting a link to my ZOOM The Craftroom (an exclusive TWICE-A-WEEK online event for my customers) and the monthly Online Tutorial. The July Tutorial features the beautiful Earthen Textures Bundle!


Here’s the Deets!
Earning Period ENDS: 31 July 2023 at 11:59 p.m. (MT)
- Earn a $5 coupon for every $50 spent (before shipping and tax).
- All coupon codes will be emailed right after a qualifying purchase has been made. Customers can shop, purchase, and earn coupons as a guest if they provide a valid email at checkout. However, customers are encouraged to create an account on our online store.
- If a participant earns multiple codes from a single order, they will receive one email with multiple codes. If they earn multiple codes from multiple orders, they will receive separate emails for each code earned.
- All order types qualify for this promotion. Phone and email orders still require an email address.
- Orders started before the promotion begins will not count toward earning coupon codes. For example, if you add items to your cart before 6 July and wait to purchase until that date or later, then those items will not qualify towards earning coupons. You must add items to your cart and complete your purchase during the earning period.
- There’s no limit to the number of coupon codes you can earn per order or throughout the duration of the earning period.
Get ready to REDEEM – Starting on 1 August!
Redemption Period: 1–31 August 2023
Last Day to Redeem: 31 August 2023 at 11:59 p.m. (MT)
- There is no limit to the number of coupon codes participants can redeem on an order during the redemption period. If using multiple codes, they must be separated by a space.
- Coupons may be redeemed one time only.
- Coupon codes may be redeemed for any product (excluding Starter Kits, demonstrator supply items, and Paper Pumpkin month-to-month subscriptions).
- New prepaid Paper Pumpkin codes may be discounted using Bonus Days coupon codes.
Get the Stampin’ Up! Products Used in this Project:


Card Cuts Used in This Project:
Cherry Cobbler Cardstock: 4 1/4″ x 11″ (card base – scored at folded at 5 1/2″)
Crumb Cake Cardstock: 4″ x 5 1/4″ (x2 – mat for card front and for inner liner); 1/2″ x 3″ (sentiment)
Basic White Cardstock: 2 3/8″ Circle Punch (So Very Merry art piece); Chic die cut snowflakes (x5); 3 7/8″ x 5 1/8″ (inner liner)
One Horse Open Sleigh 6″ x 6″ DSP: 3 7/8″ x 5 1/8″ (card front); 2 1/4″ x 6″ (envelope flap)
If you need any stamping supplies, I’d be very happy to be your Demonstrator. Just click on the Order Stampin’ Up! Online Now button on the right side of the screen to go directly to my online store or drop me an email if you have any questions. Happy Stamping!
Shop the Clearance Rack here. Earn FREE Stampin’ Up! Products – Join my Punkin Head Peppermint Rewards – My online customer thank you program!
Finn Fan Fix 
There were some brazen interlopers down on the arena the other day.
Cady was like…are you KIDDING me right now??! That is MY grass!

Y’all better be gettin’ gone!!

She made it happen!
And Finn “helped”!
🙂
TTFN
M


 #20 Demonstrator in Sales in the US 2023-2024
 #13 Demonstrator in Leadership in the US 2023-2024
 #21 Demonstrator in Team Building in the US 2023-2024


 KarensCardCorner
 Stamp with Amy K
 Stampin With Shirley G
 Tarabeth Stamps
 TL's Bright Spot
Such a pretty card! Love the colors and your design is perfect! Good thing that the pony and Finn got rid of those critters. 🙂
Yep – they’re on the job!! Thanks so much, Amy! 🙂
Really nice card Mary…the color combination of pool party, red, and misty moonlight is spot on.
Thank you, Charlotte – it’s one of my faves! 🙂
I made one this morning. This might be my Christmas card for the year, although I have a problem tying the bow. Thanks for the great tutorial.
Glad you liked it enought to give it a try! If you like it for your Christmas card – maybe use just the silver trim for those!! :). Thanks so much, Nel! 🙂
Goose Goose – multiplied.
For sure! 🙂