Good morning. Guess what day it is? Again!? Yep – FRIDAY! Whoo-hoo! We’re teetering on the cusp of the weekend – and you only have to get thru about….8 hours of work before you are FREE!!! 🙂
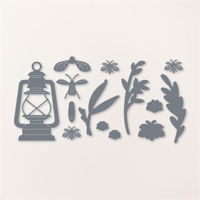
I pulled out the Lighting the Way stamp set for today’s card and – imagine my surprise when I realized that I had never even mounted the stamps?! They were still on their packing acetate. I was a little gobsmacked! 🤷♀️🤷♀️. But – I made good use of it – and the coordinating dies for this one – and also used my Scalloped Contours dies (which is a true workhorse in any crafter’s tool chest). Take a look-see:

The layout for this one was inspired by the sketch at The Paper Players this week.

I started with a Lost Lagoon card base – and, across the bottom, used the three leaves images in the Lighting the Way stamp set to stamp in Pretty Peacock. Some of the images were in full strength and some in stamped-off-once ink.

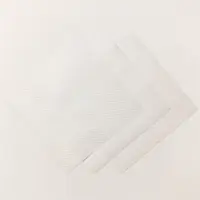
I used the next-to-largest Scalloped Contour die to cut out a piece of the leaves-strewn Vellum Basics Specialty DSP.
I used the second-from-largest die in the Scalloped Contours die set to cut out a Pretty Peacock rectangle.
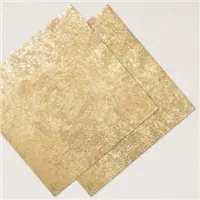
And – I used the lantern die from the Lighting the Way die set to cut out a Distressed Gold lantern.

I set both rectangles – and the lantern die cut – in place and then used the large “glow” stamp in the set to stamp the Vellum die cut in Daffodil Delight ink. Then I set it aside to dry.
In the meantime, near the bottom of the Pretty Peacock die cut, I stamped a Lighting the Way sentiment in Versamark ink, sprinkled it with white Stampin’ Emboss Powder and heat embossed it with my Heat Tool.

Near the top, I stamped the lightning bug “trail” image from the set in Versamark, sprinkled it with gold Stampin’ Emboss Powder and heat set that as well
With the ink dry on the Vellum die cut, I used Stampin’ Seal – only on the right side (where it would be hidden by the Pretty Peacock piece) – to adhere it to the card front. I used Stampin’ Seal to add the Pretty Peacock die cut as well.
Then I adhered the lantern in place with Stampin’ Dimensionals.
I die cut three little lightning bugs from Berry Burst and popped them onto the card front with small pieces of Stampin’ Dimensionals.
I used a Glue Dot to adhere a simple bow tied with two pieces of Linen Thread, added some Rhinestone Basic Jewels – and the card front was done!
On the inside, I stamped PART of the Lighting the Way sentiment in Pretty Peacock ink on a Basic White panel. In the corner, I stamped the trail image in Daffodil Delight, the smallest “glow” image in stamped-off-once Daffodil Delight – and the small lightning bug in Berry Burst!

I used Liquid Glue to adhere the panel to a Berry Burst mat and into the Lost Lagoon card base and the card was done!
My Basic White Medium Envelope got the Lighting the Way “trail”, small glow and Berry Burst lightning bug on the front…

..and I stamped more leaves, some small “glow” images (x3) and the lightning bug (x3) on the envelope flap, too!

Et Voila! I can NOT believe it’s taken me this long to use this fun Lighting the Way stamp set and coordinating dies. What in the world, Mary!? 🤦♀️ I’m so glad I finally pulled it off the shelf! The Scalloped Contours dies, on the other hand, are oft used – and will stay that way!!

I hope you like!
You’ve still got time to cash in on Bonus Days – just a few more days to EARN those coupons (maybe THIS stamp set and dies??) and then it’ll be time to REDEEM them in August!
If you’d like to recreate this card, all the products and card cuts you’ll need are down below! And – this is the card I made yesterday on my YouTube Live yesterday! If you’d like to see it – for the first time or again! – here ’tis!
I’ve also created a printable PDF with written instructions and a list of the products used to create this project. You can download, print and/or save it by clicking this image:

Missed any tutorials? You can check out my past projects right here!
TTFN
M

Connect with me! https://campsite.bio/stampsnlingers
HOST CODE FOR 16 JUL – 31 JUL: DUK29WMX
Use this host code when you order $50 or greater and receive a free gift (AND the Monthly Card Tutorial) from me! If your order is over $150, please do not use this code, but you’ll still get the free gift. The free gift is your choice of any item valued up to $10.00 in any active Catalog! That includes some of the Host Exclusive stamp sets! See my Customer Rewards page for full details.
Note: Make sure that you can see my name on the final checkout page listed as your Demonstrator when you order so that you know that you’re ordering with me and you’ll get my rewards!
You’ll also be getting a link to my ZOOM The Craftroom (an exclusive TWICE-A-WEEK online event for my customers) and the monthly Online Tutorial. The July Tutorial features the beautiful Earthen Textures Bundle!


Here’s the Deets!
Earning Period ENDS: 31 July 2023 at 11:59 p.m. (MT)
- Earn a $5 coupon for every $50 spent (before shipping and tax).
- All coupon codes will be emailed right after a qualifying purchase has been made. Customers can shop, purchase, and earn coupons as a guest if they provide a valid email at checkout. However, customers are encouraged to create an account on our online store.
- If a participant earns multiple codes from a single order, they will receive one email with multiple codes. If they earn multiple codes from multiple orders, they will receive separate emails for each code earned.
- All order types qualify for this promotion. Phone and email orders still require an email address.
- Orders started before the promotion begins will not count toward earning coupon codes. For example, if you add items to your cart before 6 July and wait to purchase until that date or later, then those items will not qualify towards earning coupons. You must add items to your cart and complete your purchase during the earning period.
- There’s no limit to the number of coupon codes you can earn per order or throughout the duration of the earning period.
Get the Stampin’ Up! Products Used in this Project:


Card Cuts Used in This Project:
Lost Lagoon Cardstock: 4 1/4″ x 11″ (card base – scored at folded at 5 1/2″)
Berry Burst Cardstock: 4″ x 5 1/4″ (mat for inner liner); Lighting the Way die cut lightning bugs (x3)
Vellum Basics Specialty Paper: Next-to-Largest Scalloped Contours die cut rectangle on front
Distressed Gold Specialty DSP: Lighting the Way die cut lantern
Pretty Peacock Cardstock: Second-from-Largest Scalloped Contours die cut rectangle on front (sentiment)
Basic White Cardstock: 3 7/8″ x 5 1/8″ (inner liner)
If you need any stamping supplies, I’d be very happy to be your Demonstrator. Just click on the Order Stampin’ Up! Online Now button on the right side of the screen to go directly to my online store or drop me an email if you have any questions. Happy Stamping!
Shop the Clearance Rack here. Earn FREE Stampin’ Up! Products – Join my Punkin Head Peppermint Rewards – My online customer thank you program!
Finn Fan Fix 
He does not need words…

Any doubt in your mind what he wants??

That face gets him….EVERYTHING!
TTFN
M


 #20 Demonstrator in Sales in the US 2023-2024
 #13 Demonstrator in Leadership in the US 2023-2024
 #21 Demonstrator in Team Building in the US 2023-2024


 KarensCardCorner
 Stamp with Amy K
 Stampin With Shirley G
 Tarabeth Stamps
 TL's Bright Spot
Such a pretty card! Love the die cut lantern and the lightening bugs! Ha! Finn does have you wrapped around his paw. 🙂
He does, indeed! Thanks, Amy! 🙂
Oh I do love this card, Mary….it uses one of my very favorite sets. How fun that you ‘see it’ in a different way than I did, and now I want to make one like yours. Who wouolda thought that Berry Burst bugs would look so cute!! As for Finn……..well, EVERYTHING he does is cute!!
He is a Master-Cute-er, for sure! Thanks for the inspiration, Faith! 🙂
Probably a stuffed carrot isn’t “it”…
Actually – that’s exactly what he wants – hold it, Mom! Throw it! PLAY!!! 🙂
A fabulous card Mary – the pop of pink from the fireflies is so eye-catching! Thanks for playing along with my sketch challenge over at The Paper Players this week!
Thanks so much, Joanne – appreciate the kind words! 🙂
Gorgeous card!! Love this set. And, love the way Finn ‘works’ you!
He sure does do that, doesn’t he?!? Thanks, Julie! 🙂