Happy Happy Hawwwmp Day, y’all!! How was yesterday – do you have lots of new goodies on the way?!? I sure do – a BUNCH of share paper that will be here on Thursday AND…my own new catalog order! I am a little afeared of how the house is going to look with all the piled up Stampin’ Up! boxes!
You might want to watch for a YouTube notification on Thursday…if my order arrives at any sort of decent time, I’ll try to go live and give y’all a look! Be sure to subscribe to my YouTube channel – and then select All Notifications (click the “bell”!) so that you’ll know when I go live! 🙂
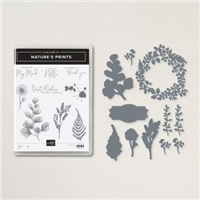
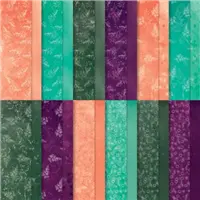
Today’s card is another W fold – the first one I did a couple week back was in horizontal/landscape orientation – this one is in vertical/portrait mode. I used the new and amazing Nature’s Prints Bundle and Pretty Prints DSP to create this one. Take a look-see:

Now – this one comes with a bonus! This fold/card is the focus of the Wednesday Tutorial over at SplitCoast Stampers! 🙂 You can see the tutorial – written! – and the video on how to make this card right here! Enjoy! And – SCS is a GREAT source of ideas and inspiration and technique tutorials – so…be sure you check this one out and then spend some time looking around, okay??
I started with a regular sized card base in top-fold portrait orientation. These cards work best (for me!) if you create the card front first – and then get the innards inside.

I began by adhering a piece of Pretty Prints DSP on Petal Pink for the card front – then added a coordinating strip – also matted on Petal Pink – across the panel with more Liquid Glue.
I cut a cool label shape with a die from the Natural Prints Die set (bundled with Nature’s Prints for a sweet 10% savings!) from Petal Pink and adhered it with Liquid Glue.

I cut some Basic White and Soft Succulent foliage using the Natural Prints dies and adhered them to the card front with Liquid Glue.
On a piece of Basic White, I stamped a Nature’s Prints sentiment in Soft Succulent, cut it with a Stylish Shapes circle die and then popped it onto the card front with Stampin’ Dimensionals.

I adhered the card front to the front of my card base with Liquid Glue.
For the inside, I adhered two large panels of Pretty Prints DSP on both inside panels of the card base, using Liquid Glue. Note: normally, you know I’d mat these panels – but…there’s a lot of layers of card stock here and…you just don’t need the extra weight or thickness! 🙂

To make the “w” mechanism, I scored and folded a strip of Soft Succulent at 2 3/4”, 5 1/2” and 8 1/4”.

I put Liquid Glue on the two end panels and then adhered it to the inside of the card base – aligning the edges of the strip with the edges of the card base.


See the “w”??

Then it was time to decorate! I cut four Stylish Shapes squares from Petal Pink to be used as mats for the three squares of Basic White and one square of Pretty Prints DSP.
One white square got another Nature’s Prints sentiment in Soft Succulent and then I adhered it to the middle panel.

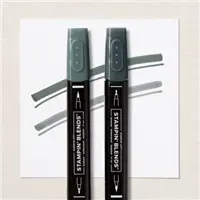
I stamped some foliage from Nature’s Prints in Evening Evergreen and Soft Succulent and then cut them with their matching Natural Prints dies. I also stamped the small flower in Soft Succulent and cut it out – then colored it with my Dark Petal Pink Stampin’ Blend. And I cut a few more Basic White leaves, too.
Each white square is stamped first with a leaf and then adhered to its mat and then to the “w” mechanism with Liquid Glue.

Using Liquid Glue, I added the stamped and die cut leaves – making sure to keep them “inside” the folds so they wouldn’t interfere with the movement of the mechanism. I trimmed stems as needed to make that work. It’s PAPER, people – make it do what you need it to do! 😉
The final square sports a Pretty Prints DSP square and a sentiment from Nature’s Prints. It’s cut with one of the Stylish Labels dies – and adhered with Liquid Glue.

I tied a couple of bows from white Baker’s Twine and adhered one to the card front and the second to the middle panel on the inside. I also colored several Rhinestone Basic Jewels with my Dark Evening Evergreen Stampin’ Blend and adhered them here, there and everywhere – inside – front – wherever I thought it needed a little BOOM! and the card was done!
My Basic White Medium Envelope got a Nature’s Prints fern in Evening Evergreen and the “frond” in Soft Succulent – inked once – stamped twice – on the front…

…and more Pretty Prints DSP on the envelope flap.

Et Voila! Oh my – I love this fun fold and I really love it with the amazingly gorgeous Pretty Prints DSP and the Nature’s Prints bundle, don’t you?? This Sun Prints Suite is destined to be one of the most popular in the new catalog, I am totally sure!

I hope you like!
If you’d like to recreate this card, all the products and card cuts you’ll need are down below!
And…I’ve also created a printable PDF with written instructions and a list of the products used to create this project. You can download, print and/or save it by clicking this image:

Missed any tutorials? You can check out my past projects right here!
TTFN and…

🙂
M

Connect with me! https://campsite.bio/stampsnlingers
HOST CODE FOR 1 MAY – 15 MAY: Q7H6KS77
Use this host code when you order $50 or greater and receive a free gift (AND the Monthly Card Tutorial) from me! If your order is over $150, please do not use this code, but you’ll still get the free gift. The free gift is your choice of any item valued up to $10.00 in any active Catalog! That includes some of the Host Exclusive stamp sets! See my Customer Rewards page for full details.
Note: Make sure that you can see my name on the final checkout page listed as your Demonstrator when you order so that you know that you’re ordering with me and you’ll get my rewards!
You’ll also be getting a link to my ZOOM The Craftroom (an exclusive TWICE-A-WEEK online event for my customers) and the monthly Online Tutorial. The May Tutorial features the Happiness Abounds Bundle!


CHECK OUT THIS AMAZEBALLS STARTER KIT SPECIAL!!

If you’ve been on the fence about joining the team and getting all the great perks of being a Demonstrator, well…THIS is the time to pull the trigger! I just mixed my metaphors here but…you know what I mean! THIS is a great time to join the team and pick up your very own Stampin’ Up! Starter Kit!!
During the month of May – Stampin’ Up! is offering a most amazeballs SPECIAL JOINING BONUS.
This month only, when you join Stampin’ Up!, you’ll get $66.50 in FREE 2022-2024 In Color merchandise over and above the $125 of products that you normally get with your Starter Kit and the free business supplies, free shipping, a free paper Pumpkin Kit and all the fun being a part of Stampin’ Up!
The Starter Kit is only $99 + tax!! And if you join between 3 – 31 May 2022, you’ll get all this:
- $125 Stampin’ Up! merchandise of your choice
- $66.50 in 2022-2024 In Color merchandise
- 2022–2024 In Color Grid Paper (item 160009)
- 2022–2024 In Color Ink Pad Collection (item 161108)
- 2022–2024 In Color Cardstock Collection (item 159204)
- 2022–2024 In Color 6″ x 6″ Designer Series Paper Assortments (item 159253)
- Free business supplies and catalogs
- Free past Paper Pumpkin Kit
- Free shipping!!
Why be a Demonstrator? Well…once you join, you’re going to get:
- At least a 20% discount on everything that you order as a Demonstrator!
- Early peeks at new release items and preorders for new items for about a month before they are available to purchase!
- The ability to attend Demonstrator exclusive Stampin’ Up! events!
- No pressure to sell to anyone, hold classes or workshops or run a business. You can simply order for yourself and get the discount! And as long as you have at least $300 in sales per quarter, you’ll continue as an active Demonstrator and continue to get the discount. If you aren’t able to maintain the $300 per quarter minimums, you simply go back to being a customer, no commitment required and no penalty if decide that being a Demonstrator isn’t right for you.
- If you DO decide that you want a side hustle – then you’ll find that Stampin’ Up! DOES have an extensive library of class and project ideas for those wishing to jump into hosting classes as well as training to help start your business, should you choose to do that. And – of course, I’m always here to help with whatever you need! 🙂
Why join with me?
- The Critters-N-Creatin’ Krew (CNCK for short!) has a fun Facebook page where we chat and share our projects and you can even win fun prizes!.
- Monthly team meetings via video conference where we talk about the latest happenings at Stampin’ Up! and share project ideas. Even though we’re located all over the United States the power of the internet lets us get together “in person” online and have lots of fun chatting!
- Free access to our online class tutorials.
- Team giveaways and prizes! We do fun giveaways and prizes for sharing projects and for reaching sales and team goals.
- Have I mentioned we’re a pretty fun group of folks? No?? Well – we totally are – and we’d love to have you join us!

Got questions about joining? Drop me a note at stamps-n-lingers@comcast.net! I’d be happy to chat with you more about it and I would LOVE to have you join my awesome CNCK team!
Ready to join us?? Click on the banner below to head over to my Stampin’ Up! website and get started!

Hope I see your name come across my e-mail SOON! 🙂
 Here’s the deets!
1. All orders of $50 or greater (before shipping and taxes) placed through my online store between today (3 May 22) and the end of the day on 10 May 22 will earn DOUBLE PEPPERMINT REWARD POINTS!!
2. Don’t forget to add the Host Code below if your order is under $150 to get your free thank you gift (orders over $150 automatically get the free thank you gift!). NOTE FOR MY HOST CODE LADIES – you guys use your own Club code – cuz…you’re already getting Double Peppermint Points! 😉
3. For more information about my Punkin Head Peppermint Reward points (my buyer reward program), click here.
Happy Shopping, Saving and Peppermint-Gathering!
Head on over to my Online Store to get started!
Stamps-N-Lingers Special Bundles Still Available!

I’ve been placing all the Special Bundle orders this morning! Whoo-hoo! If you haven’t picked a bundle or three, there’s still time to cash in and save some $$!
These are some curated groupings of new goodies from the catalog, which will save you 10-15% over the cost of ordering them all yourself! I’ve got TEN bundles to select – pick one…pick five!…and a 2022-2024 In Color Ribbon Add On, too!
Here’s the bundles…
Bundle #1 – All the Pretty In Colors Bundle (Charge $158)
Bundle #2 – A La Carte Die Cutting Wonders (Charge $264)
Bundle #3 – Stamp It Emboss It Backgrounds (Charge $165)
Bundle #4 – It’s Kind of a Guy Thang (Charge $152)
Bundle #5 – Artistically Speaking (Charge $206)
Bundle #6 – Animal Magnetism (Charge $186)
Bundle #7 – For the Young (and Young at Heart!) (Charge $178)
Bundle #8 – Flowers And More (Charge $206)
Bundle #9 – Organic Beauty (Charge $176)
Bundle #10 – Speak It! (Charge $191)
In Color Ribbon Add On Bundle – (Charge $55)
Intrigued?? Head over to the Special Bundles page to get all the Deets and an order form. These are only going to be around thru 17 May 2022!
See you soon!
Stamp-N-Storage Spring Sale

You’ve got your order in – either thru the Online Store or some of my Special Bundles. Now…time to get organized! Stamp-N-Storage to the rescue!
This is The Big One, y’all! With 15% off EVERYTHING on the site PLUS FREE SHIPPING on domestic orders (that’s the 48 contiguous states!) over $100 – now is THE perfect time to prep your space for the influx of awesomeness that is on the horizon!
No coupon code is needed. Discounts are automatically added during the checkout process. Sale ends at midnight CT, 9 May 2022 (that’s one week from today!).
I’ve posted so many times about all the great Stamp-N-Storage products that I use – I’m a pretty big fan and I think it’s fair to say that I am 100% a Stamp-N-Storage Girl – so…I’m not going to waste your time with that on this post. Instead…here’s a link to just one of the MANY posts where I’ve shared my fave goodies!!
![]()
Happy shopping – storing – saving – and organizing!!
PLEASE NOTE: I do receive a small affiliate fee when you use my Stamp-n-Storage shopping links. But – you’ve seen plenty of pictures of my stamping space – both at home and when I’ve traveled! – and you KNOW that I am a HUGE fan and love their quality products!! I recommend them to everyone!
Get the Stampin’ Up! Products Used in this Project:


Card Cuts Used in This Project:
Soft Succulent Cardstock: 4 1/4″ x 11″ (card base – scored and folded at 5 1/2″); 1 3/4” x 11” (“W” mechanism, scored and folded at 2 3/4”, 5 1/2” and 8 1/4”); Natural Prints die cut large leaves (x2)
Petal Pink Cardstock: 4” x 5 1/4” (mat for card front); 1 7/8” x 4” (mat for smaller designer paper panel on front); Natural Prints die cut label (under sentiment);
Stylish Shapes Die 2 3/8” Square die cuts (x4 – mats for inside panels)
Basic White Cardstock: 1 3/4” Stylish Shapes circle die (sentiment); 2 1/8” squares (x3 required – for inside panels); Natural Prints die cut small leaves (x5 – 3 on front); Natural Prints die cut large leaves (x2 on inside); Stamped and die cut Nature’s Prints foliage (1 fern, 1 frond, 1 small flower); Natural Prints die cut label (inside sentiment banner)
Pretty Prints DSP: 3 7/8” x 5 1/8” (card front); 1 3/4” x 3 7/8” (coordinating pattern – smaller panel on front); 2 1/8” square (for inside decoration – under sentiment banner); 4 1/8” x 5 3/8” (x2 – for inside card base panels); 3” x 6” (for envelope flap)
If you need any stamping supplies, I’d be very happy to be your Demonstrator. Just click on the Order Stampin’ Up! Online Now button on the right side of the screen to go directly to my online store or drop me an email if you have any questions. Happy Stamping!
Shop the Clearance Rack here. Earn FREE Stampin’ Up! Products – Join my Punkin Head Peppermint Rewards – My online customer thank you program!
Finn Fan Fix

That moment when your dog throws you under the bus by highlighting your not-so-bueno housekeeping skills! 🤷♀️🤷♀️


Onion skin??
TTFN
M


 #20 Demonstrator in Sales in the US 2023-2024
 #13 Demonstrator in Leadership in the US 2023-2024
 #21 Demonstrator in Team Building in the US 2023-2024


 KarensCardCorner
 Stamp with Amy K
 Stampin With Shirley G
 Tarabeth Stamps
 TL's Bright Spot
Just finished watching your video on Splitcoaststampers. Beautiful card! I’ve never done a W in vertical format. Reminds me of a waterfall card. I could kick myself for not ordering this paper! I’ll be making the card today with something new I imagine. I thought for sure Finn was going to have a dimensional cover on his nose…but an onion skin…lol! See you tonight, my friend.
That nose picks up EVERYthing! Have fun making it – and…I’m sure you’ll order this paper soon – it’s too pretty not to have some of it! 🙂 Thanks, Karen! 🙂
Such a pretty card! Love the fun fold inside too! Poor Finn, he was just checking things out and he got busted… 🙂
Yup – airing the dirty laundry…er…floor! 😉 Thanks, Amy! 🙂
Thanks, Mary, for this great tutorial for this beautiful W-fold card. I can’t wait to make it with all the new Stampin Up DSP arriving soon. Enjoy your day!
Have fun with your new bounty!! And thank you for the kind words, Hilda! 🙂
Thanks for sharing this neat card, Mary.. I like the W going down from the top instead of the regular side to side..
Thank you! It’s kind of fun, I think! 🙂
Mary, I loved your video tutorial on SCS! This is a wonderful and inventive fun fold design and Ithe papers, die cut stems and stamped sentiments you used are beautiful. TFS!
Thank you for watching, Stef – and for the kind words! 🙂
Beautiful card! I thought too that Finn would have a dimensional cover on his nose. Housework is over-rated…lol!
Yes it is. I hate it very much! 🤷♀️ Thank you, Carol! 🙂