Good morning and happy half-way-thru-the-weekend! Hope yours is going well – our weather is spectacular and we spent most of yesterday in the garden. We transplanted our blueberries into the raised bed – planted 4 more baby-bluies. It was a nice way to spend the afternoon!
Two of my team members made cards this week using the cool In Bloom stamp set and coordinating Pierced Blooms die set from the 2021-2022 Annual Catalog. Their pretty cards reminded me of how cool this set is – the die set in particular! – so I pulled it out! And I used it to make a reprise on a fun fold I did for you a few weeks back. Take a look-see:

This is the card that I made last night on my YouTube live – if you were able to join me, I appreciate you spending part of your weekend with me! If not, but you’d like to watch the replay, here ’tis!
I was playing along with the Festive Friday challenge this week. I got Sparkle – Polka Dot – Bright Colors – Twine – Celebratory Sentiment – Rhinestones – and Layers! 😉

I started with a piece of Basic Black cardstock, cut to 5 1/2″ x 8 1/2″, that I scored and folded at 2 1/8″ and again at 4 1/4″. I folded the 4 1/4″ as a “valley” (so…normally) and the 2 1/8″ fold the other way. It becomes a “z” fold.

I cut a couple of Mango Melody mats (2″ x 2″) into triangles and then adhered them to the back of the card in the corners. I added triangles cut from 1 3/4″ x 1 3/4″ squares of black-and-white Pattern Party DSP (this is a Host Reward in the Annual Catalog – you can get it for free with a $180 order!) with more Liquid Glue.
I stamped an In Bloom sentiment in Granny Apple Green on a piece of Basic White and added some In Bloom flowers in Daffodil Delight, Mango Melody and Granny Apple Green. I matted the panel on Mango Melody and adhered it to the inside of the card.

I matted two strips of the Pattern Party DSP on Mango Melody cardstock and adhered them to the two front panels with Liquid Glue.
To make the pop out mechanism, I scored a second 2 7/8″ x 2 7/8″ square of Mango Melody cardstock on the diagonal. Then I put the score line on the 1 7/8″ mark on my Paper Trimmer keeping it in the “diagonal” orientation (this is easier to “see” in the video that it is to write!) and snipped the end off the corner.
I folded the square – then set it right over the back matted square. I put Liquid Glue just on the left side of the square – then closed the card over the top of the glued side.

I cut a 2 3/4″ square piece of the DSP in to two triangles and adhered one of them to the visible side of the pop-up mechanism.
Then I created two more Mango Melody-matted DSP squares and, using Liquid Glue (only on ONE side!!), I adhered them to the front panel.

I stamped the In Bloom sentiment in Granny Apple Green on a piece of Basic White and cut it with the label die in the Pierced Blooms die set. Using Liquid glue, I adhered the sentiment to the bottom square on the front panel.

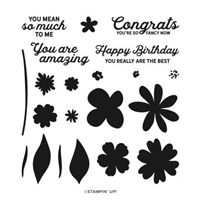
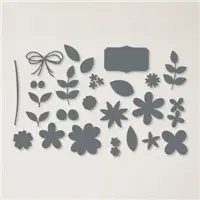
Then it was time to cut petals and flowers and leaves! And – let me tell you, there are 27 dies in the Pierced Blooms Die set – so…you can have a total POSIE PARTY!! This picture will let you see the elements I picked and put together.

For the flower on the pop-out piece – I adhered the leaves to the triangle first – making sure they didn’t extend past the edge of the card. Then I added the flower with Liquid Glue (on that one, the smallest middle flower is popped on with a Dimensional).
I adhered the leaves and two flowers to the top square with Liquid Glue.

I added the two leaves to the bottom square by the sentiment, then tied a little bow with two lengths of white Baker’s Twine from the Baker’s Twine Essentials Pack. I adhered the bow with a Glue Dot, then used double-stacked Stampin’ Dimensionals to add the flower.
I adhered three little flowers on the sentiment – added some Rhinestone Basic Jewels – and the card was done!
My Basic White Medium Envelope got more of the In Bloom flowers on the front…

…and more of the Pattern Party DSP on the envelope flap.

Et Voila! Okay – thank you thank you to Tara Carpenter and Terry Lynn Bright for using this set last week and reminding me how COOL the Pierced Blooms die set and coordinating In Bloom stamp set really is! If you love flowers – and…who doesn’t?!?!…then this is a wunnermus die set to own! AND – it works in the currently-on-sale-for-20%-off Mini Stampin’ Cut and Emboss Machine!! Winner winner!

I hope you like!
Don’t miss your chance to pick up the handy and highly portable Mini Stampin’ Cut and Emboss Machine – and all the great bundles that are on sale! When you make a $50+ purchase from me this month (ALL month!) – whether you buy the Mini Stampin’ Cut and Emboss Machine and/or any of the sale bundles or not – you’re going to get the MEGA Tutorial Bundle – on top of your peppermints, your normal ordering gift AND the Daffodil Daydream Tutorial. That’s a lotta loot! 🙂 All the deets are down below!
If you’d like to recreate this card, all the products and card cuts you’ll need are down below!
And…I’ve also created a printable PDF with written instructions and a list of the products used to create this project. You can download, print and/or save it by clicking this image:

Missed any tutorials? You can check out my past projects right here!
TTFN
M

Connect with me! https://campsite.bio/stampsnlingers
HOST CODE FOR 16 MAR – 31 MAR: T4MP6PJS
Use this host code when you order $50 or greater and receive a free gift (AND the Monthly Card Tutorial) from me! If your order is over $150, please do not use this code, but you’ll still get the free gift. The free gift is your choice of any item valued up to $10.00 in any active Catalog! That includes some of the Host Exclusive stamp sets! See my Customer Rewards page for full details.
Note: Make sure that you can see my name on the final checkout page listed as your Demonstrator when you order so that you know that you’re ordering with me and you’ll get my rewards!
You’ll also be getting a link to my ZOOM The Craftroom (an exclusive TWICE-A-WEEK online event for my customers) and the monthly Online Tutorial. The March Tutorial features the Daffodil Daydream Bundle!


ORDERING BONUS FROM ME!
GOOD FOR THE ENTIRE MONTH OF MARCH!
Check out this GINORMOUS bundle of Tutorials – featuring SIX of the amazing bundles in the Savings Are in Bloom Promotion!!
![]()
Everyone who places an order of $50 or greater (before shipping & tax) in the month of March 2022 (that’s right – ALL month!!) will receive a huge bonus tutorial package from me! You’ll get THIRTY ONE projects featuring bundles that are included in the Savings Are In Bloom Promotion. What?!? It’s like…it was planned or something! 😉
- Sweet As A Peach – July 2021
- Quiet Meadow – June 2021
- Pansy Patch – May 2021
- Art Gallery – April 2021 (contains retired items)
- Hydrangea Haven – February 2021 (contains retired items)
- Celebrate Sunflowers – June 2020 (contains retired items)
Note: there ARE some retired products used in several projects, but…I have faith you’ll be able to work around that!!
AND – you’ll STILL get:
- Peppermint Rewards!
- The Daffodil Daydream Tutorial! (if you’re counting – that is SEVEN Tutorials with a total of THIRTY SEVEN beautiful projects for you to use!
- A $10 ordering gift of your choice!
Wow – that’s a lotta stuff, right?!? TONS of creative inspiration….20% off on the Mighty Mini Stampin’ Cut and Emboss Machine….20% off coordinating bundles…Peppermints!…Ordering Gift!
SAVINGS ARE IN BLOOM
Mini Cut & Emboss Machine and Select Bundles 20% Off March 1-31!!

During the month of March, you can pick up the Mini Stampin’ Cut & Emboss Machine at a 20% discount! This miniature machine is compatible with a large selection of Stampin’ Up! embossing folders and dies. Build your craft collection and combine the Mini Stampin’ Cut & Emboss Machine with any (or all!) of the select stamp-and-die bundles that are also available for 20% off during the month of March!
Savings Are In Bloom Promotion Details:
- Promotion Sales Period: 1 Mar – 31 Mar 2022
- Promotion Ends: 31 March 2022 at 11:50 PM MT
- The Mini Stampin’ Cut & Emboss Machine will be available for purchase at a 20% discount.
- A number of select stamp-and-die bundles that are compatible with the Mini Stampin’ Cut & Emboss Machine will also be available for purchase at a 20% discount.
You can see the full list of bundles included in the sale on this flyer, click the image to open the full-size PDF:

All the deets are at my Stampin’ Up! Promotions Page. And here’s the goods in my Online Store!
Let me know if you have any questions.
AVAILABLE NOW FROM STAMP-N-STORAGE!
It’s the new Super Combo Holder that holds your Stampin’ Up!® ink pads, refill bottles, Stampin’ Write markers and Stampin’ Blend markers all together. No more searching for matching colors!

This new holder is available in 24, 36 & 48 count; standard desktop or wall mount options only. Note: There isn’t an IKEA version because of the additional space needed for the blend markers.
Happy Ink Pad/Refill/Marker/Blend-Storing!
PLEASE NOTE: I do receive a small affiliate fee when you use my Stamp-n-Storage shopping links. But – you’ve seen plenty of pictures of my stamping space – both at home and when I’ve traveled! – and you KNOW that I am a HUGE fan and love their quality products!! I recommend them to everyone!
Get the Stampin’ Up! Products Used in this Project:

Price: $18.00


Card Cuts Used in This Project:
For the Card:
Basic Black Cardstock: 5 1/2″ x 8 1/2″ (card base, scored and folded at 2 1/8″ and 4 1/4″)
Mango Melody Cardstock: 2″ x 5 3/8″ (x2 – mats for two vertical DSP panels); 2 7/8″ x 2 7/8″ (x2 – “pop” mechanism and mat for inner liner); 2″ x 2″ (x2 – cut into triangles – mats for inner liner triangles); 1 7/8″ x 1 7/8″ (x2 – mats for front two DSP squares)
Basic White Cardstock: In Bloom die cut label (sentiment); 2 3/4″ x 2 3/4″ (inner liner)
Pattern Party DSP: 1 7/8″ x 5 1/4″ (x2 – two vertical DSP panels); 2 3/4″ x 2 3/4″ (cut into triangles – need one for the pop-up mechanism); 1 3/4″ x 1 3/4″ (x4 – cut 2 into triangles for the inner liner triangles and the other two go on the front squares); 3″ x 6″ (envelope flap)
For the Flowers:
Daffodil Delight Cardstock: Pierced Blooms flowers and petals
Mango Melody Cardstock: Pierced Blooms flower and petals
Granny Apple Green Cardstock: Pierced Blooms leaves
If you need any stamping supplies, I’d be very happy to be your Demonstrator. Just click on the Order Stampin’ Up! Online Now button on the right side of the screen to go directly to my online store or drop me an email if you have any questions. Happy Stamping!
Shop the Clearance Rack here. Earn FREE Stampin’ Up! Products – Join my Punkin Head Peppermint Rewards – My online customer thank you program!
Finn Fan Fix

Yesterday was so gorgeous that we took the opportunity to work in our new garden beds!
We decided last week to expand the “new” garden and bring all the raised beds from behind the barn into the “fold” – to maybe slow the deer down a little? And…consolidate all the garden “stuff”.
To facilitate transplanting these four big blueberries and four NEW blueberry plants…

…we pulled down 4 fence panels and…

…brought in the Big Guns.

Work smarter – not harder, right??
Success! All eight bushes in the ground!

Hopefully today or tomorrow we’ll get the raspberries transplanted.
So – speaking of working.
This is WAYNE working…

And THIS is FINN working!

No opposable thumbs but…who’s the smartest one on the farm?! 🤷♀️🤷♀️🤷♀️
TTFN
M


 #20 Demonstrator in Sales in the US 2023-2024
 #13 Demonstrator in Leadership in the US 2023-2024
 #21 Demonstrator in Team Building in the US 2023-2024


 KarensCardCorner
 Stamp with Amy K
 Stampin With Shirley G
 Tarabeth Stamps
 TL's Bright Spot
Such a pretty card! The colors are perfect and I love the fancy fold design! Yeah, I’m with Finn…hang out in the shade and supervise…I’m good at that too. 😉
Me, too – it’s really my preferred “task! 🙂 Thanks, Amy! 🙂
I just love this card and was sorry to have missed you last night but I’ll watch the replay. Finn is smart to be in the shade supervising. Can’t wait to see your garden when it’s all done.
Yes. Yes he is! We’re having fun making it – hopefully it’ll actually produce some food! 😳😳 Thanks, Karen! 🙂
Mary – this card is absolutely stunning!! I love everything about it – as you’ve taken a sort of homespun stitched design and ramped it up into a truly delicious card to see!! Wowweee, cazooweeee…
Thank you so much, Susan! 🙂
I think this may be one of my favorite cards of all time! And…I may need to add these dies to my list of must-haves! Love your videos, Mary. You explain things so well.
I agree with you regarding the deer. I was driving down a country lane last week and had to stop for 4 deer to cross the road. It was the highlight of my day!
It’s a great die set! I really love the flowers you can put together with it! I love seeing the dee, for sure!! 🙂 Thanks, Pat!
The card was very nice – i need to do more “bright and colorful”. My question has to do with “Wayne, working”. What, exactly, is he doing? Rototilling? And, what are those raised beds made from?
Hey Linda – thank you so much! I love the pops of yellow and orange on the black! Wayne’s rolling hand truck to place one of the raspberries (currently in a pot) to close to where it’s going to end up. The two large beds are made from standing rib metal – Wayne made them for us last year. The lower ones are pine boards! 🙂
Love the bright colours against the black Mary and the fancy fold is awesome and such a great way to show off those blooms (I will miss them!) Thanks for playing with us over at Festive Friday!
Thank you, Joanne! Appreciate those kind words – and you taking time to come by! 🙂
Beautiful card! Thanks for participating in Festive Friday Challenges.
Thank you, Melva – appreciate you coming by! 🙂
Mary, you really are the master of fun folds! I love the black and yellow – such a bold color combo and allows the orange and green to pop. so glad you joined us at Festive Friday this week
Jaydee
Aww – thank you so much, Jaydee! I appreciate those kind words! 🙂
Wow Mary! This is an amazing #bright&happy card! I love it! It was fun to see the planting process too. I have raised gardens too and love to garden 🙂
Blessings, Beth 🙂
Thank you so much, Beth! I appreciate the kind words. Raised beds are the best, aren’t they!?! Sooo much easier on the back! 🙂
Congratulations, Mary! Your fabulous creation was selected as a Festive Fave over at the Festive Friday Challenge. Please hop over to the challenge blog to grab your winner’s badge for your blog. Thanks so much for joining us and I hope you will play along again soon!
Thank you so much!! I really appreciate it – and you know I’ll be back! Thanks for coming by to let me know, Stephanie! 🙂