Good morning and happy happy Hawwmmmp Day!! Hope you’re having a great time – saving money on beautiful papers and buying up great new kits and “spending” those Bonus Days coupons! Whoo-hoo!!
Just a scheduling note – at some point today – the Big Brown Truck will roll into my driveway with my Pre-Order from the new Sep – Dec 2024 Mini Catalog! Once I sort of make sense of it all – I’ll be going live on my YouTube channel with a sneaky peek! So…be watching for a notice – I’ll try to give you a heads up, okay!? 😎
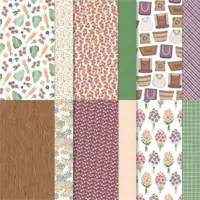
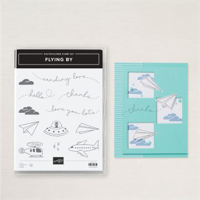
My card today is a super cute one – using a set that I’d bet…a little money!…that you overlooked (one might even say….FLEW over?!) or…dismissed as just for kids. I respectfully request that you take a second look at the cute Flying By stamp set – and see what happens when you do a little quick fussy cutting and add some fun paper – like the Bright & Beautiful 6″ x 6″ DSP (on sale NOW!). Take a look-see:

I did a quick video on how to make this one, which is posted on Instagram. You can see it on YouTube right here!
I started by adhering some star-strewn paper from the Bright & Beautiful 6″ x 6″ DSP to the front of my Azure Afternoon card base using Liquid Glue.
I cut a second piece of the DSP and – using the next-to-smallest square Stylish Shapes die – cut three windows in the paper.

I placed a slightly-smaller piece of Basic White cardstock behind the DSP and used a pencil to lightly outline where the windows would be.
Using the two cloud images in the Flying By set, I stamped Balmy Blue clouds onto the Basic White – a couple “in” each window.

I set the DSP panel back in place on the white cardstock and stamped the Flying By “hello” sentiment in Blueberry Bushel ink – ensuring that part of the “flight-path” was inside the window.
I erased all my pencil lines and used Stampin’ Dimensionals to adhere the DSP panel over the Basic White panel.

Using Liquid Glue, I adhered the panel to the front of the card base.
On a piece of Basic White cardstock, I stamped three paper airplanes from Flying By in Tuxedo Black Memento Ink. Then I used Paper Snips to fussy cut the three planes.
Using Stampin’ Dimensionals – I adhered a plane into each window. Note: I made sure that the middle plane was aligned with the “flight-path”.

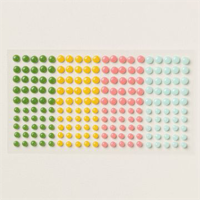
I added a few Adhesive-backed Dots for Days and the card front was done!
On the inside, I stamped a few paper planes and clouds on a piece of Basic White cardstock. Using the bullet-tip of my Blueberry Bushel Stampin’ Write Marker, I added free-hand “flight-paths”.

I used Liquid Glue to adhere the panel to the inside of the Azure Afternoon card base and the card was done!
My Basic White Medium Envelope got a Flying By paper airplane and clouds – and a freehand “flight-path” on the front…

…and more of the Bright & Beautiful 6″ x 6″ DSP on the envelope flap.

Et Voila! I had a hard time choosing between the paper airplane and the cute little UFO in the Flying By set – I think you could use EITHER one on this card and it would be perfect! And the Bright & Beautiful 6″ x 6″ DSP – have I mentioned that it’s on SALE this month! – is such fun and cheerful paper – it’ll add a smile to ANY card!

If you’d like to recreate this card, all the products and card cuts you’ll need are down below! As I mentioned above – I posted a short video on Instagram this morning on how to make this card. If you’d like to watch that – click right here! 🙂
I’ve also created a printable PDF with written instructions and a list of the products used to create this project. You can download, print and/or save it by clicking this image:

Missed any tutorials? You can check out my past projects right here!
TTFN
M

Connect with me! https://campsite.bio/stampsnlingers
HOST CODE FOR 1 AUG – 15 AUG: HT7SYDP7
Use this host code when you order $50 or greater and receive a free gift (AND the Monthly Card Tutorial) from me! If your order is over $150, please do not use this code, but you’ll still get the free gift. The free gift is your choice of any item valued up to $10.00 in any active Catalog! That includes some of the Host Exclusive stamp sets! See my Customer Rewards page for full details.
Note: Make sure that you can see my name on the final checkout page listed as your Demonstrator when you order so that you know that you’re ordering with me and you’ll get my rewards!
You’ll also be getting a link to my ZOOM The Craftroom (an exclusive TWICE-A-WEEK online event for my customers) and the monthly Online Tutorial – featuring Country Flowers for August orders.


TIME TO REDEEM YOUR BONUS DAYS COUPONS!

It’s time to start redeeming those Bonus Days coupons that you gathered up in July!! You can redeem them on any order(s) placed during the month of August! Whoo-hoo!
Here’s the deets!
REDEMPTION Period: 1–31 August 2024 (11:59 p.m. (MT)) – that means it starts THIS Thursday, 1 August!
- There’s NO LIMIT to the number of coupon codes you can redeem on an order during the redemption period. You’ll see a box to enter your code(s) during checkout – if you’re redeeming multiple codes, you’ll need to separate them by a space .
- Coupon codes may be redeemed one time only. They cannot be redeemed after the 31 August.
- Coupon codes may be redeemed for any product (excluding Starter Kits). They can’t be used on exchanges.
- Bonus Days coupon codes CAN be applied to month-to-month Paper Pumpkin subscriptions and NEW PREPAID subscriptions!
Here’s a pictorial “How To” for when you’re ready to redeem those coupons!
– Once you’ve entered all your goodies into your cart – click View Cart.
– Step 1 – Enter the Host Code and then Click the little “+” Sign

– Step 2 – Enter your code(s) in the box, separating them with spaces.

– Be sure to hit apply – you’ll see the merchandise total decrease by the amount of your coupon codes. Then you just checkout as normal!
REMINDER: Your order total will be the total AFTER the coupon(s) are applied. So..if you’re aiming at an Ordering Gift from me – and extra peppermints! – then that total needs to be $50 or greater!! 😎
DSP SALE GOING ON NOW!

Between 6–31 August, you can shop select Designer Series Paper from the 2024–2025 Annual Catalog* at 15% off!
This is the perfect time to stock up and save on some of your favorite paper.
Here’s the Deets:
Sales Period: 6–31 August 2024
Ordering Deadline: 31 August at 11:59 p.m. (MT)
- Specialty paper, cardstock assortments, Designer Series Paper stacks, and paper not yet live is not included in the sale.
- Customers must open and close the order during the allotted dates to receive the discount.
- There are NO limits on ordering. However, product is only available while supplies last.
- Designer Series Paper purchased with Stampin’ Rewards or as part of a Starter Kit WILL qualify for the discount.

WHAT’S ON SALE!


Sale: $10.62
Price: $12.50

Sale: $10.62
Price: $12.50


Sale: $10.62
Price: $12.50

Sale: $10.62
Price: $12.50


Sale: $10.62
Price: $12.50


Sale: $10.62
Price: $12.50


Sale: $10.62
Price: $12.50

Sale: $10.62
Price: $12.50
CHECK OUT OUR TWO NEW KITS!

We’ve got a little something for Halloween and a second little something for Christmas!! Check them out!
Our first kit is a no-stamping home decor kit for Halloween! It’s the Haunted Home Kit and…it’s adorable! And – it sure would be fun to do with the kids or the grands! 🙂

Get your Halloween crafting on with the Haunted Home Kit! This kit comes with all the paper pieces you need to assemble your very own haunted paper house. You’ll start with cardboard walls, precut vellum, and other paper pieces for accessorizing. Assemble the house following the instructions – and then add your own ghostly touch to it. It’s the perfect paper crafting activity for any gathering with fellow crafters, friends, and family during the spooky season!
Want to see this one in action!? Here’s a quick little VIDEO for you!
The second kit for August is the Christmas Wishes CARD kit!! LOVE the non-traditional colors!! And – with everything you need to make the cards right in the box – this is one that would be great to toss in the suitcase for a quick crafty-break on vacay or a business trip!! BOOM!

Keep your Christmas card crafting easy AND elegant with the Christmas Wishes Kit! This kit comes with bright red (it’s Poppy Parade – one of my faves!) card bases detailed with gold foil and coordinating gold, shimmer envelopes. Create your own Christmas cards using the precut paper pieces, the stamp set, and Stampin’ Spot. PLUS – use the included address labels to send your cards to your recipients!
If you want to watch this one go together – check out this quick VIDEO!
I think you need head over to the Kits Collection to check out ALL the kits that are currently available – that’s the best way to see EVERYTHING! But..if you just want to go straight to these new ones…here you go! 😎


Get the Stampin’ Up! Products Used in this Project:

Sale: $10.62
Price: $12.50


Card Cuts Used in This Project:
Azure Afternoon Cardstock: 4 1/4″ x 11″ (card base – scored and folded at 5 1/2″)
Basic White Cardstock: 3 5/8″ x 4 7/8″ (behind raised DSP panel on front); Stamped & fussy cut paper airplanes (x3); 4″ x 5 1/4″ (inner liner)
Bright & Beautiful 6″ x 6″ DSP: 4 1/4″ x 5 1/2″ (front card panel); 3 3/4″ x 5″ (card front); 2 1/4″ x 6″ (envelope flap)
If you need any stamping supplies, I’d be very happy to be your Demonstrator. Just click on the Order Stampin’ Up! Online Now button on the right side of the screen to go directly to my online store or drop me an email if you have any questions. Happy Stamping!
Shop the Clearance Rack here. Earn FREE Stampin’ Up! Products – Join my Punkin Head Peppermint Rewards – My online customer thank you program!
Finn Fan Fix 
This just never gets old.

What you CAN’T see is that the fan is blowing right on his…
…err…
Pantaloonies….
😎
TTFN
M


 #20 Demonstrator in Sales in the US 2023-2024
 #13 Demonstrator in Leadership in the US 2023-2024
 #21 Demonstrator in Team Building in the US 2023-2024


 KarensCardCorner
 Stamp with Amy K
 Stampin With Shirley G
 Tarabeth Stamps
 TL's Bright Spot
Such a cute card! Love the fun paper airplane images and that sentiment is perfect! Good thing Finn was sound asleep…otherwise he’d be saying “Moooommm!” 🙂
Yes – he’s given up all hope of controlling his mom and her camera!! Poor guy! Thanks, Amy! 🙂