Happy Sunday, y’all! I hope your weekend is going well!
At our retreat a few weeks ago, two talented ladies brought beautiful Christmas ornament projects for us to make! I gave y’all a peek at them and when I got requests to show how to make them… I decided that was a great idea!
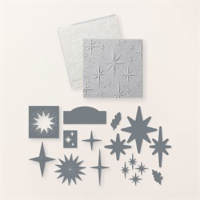
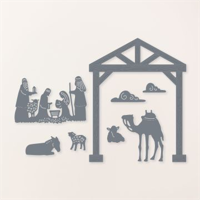
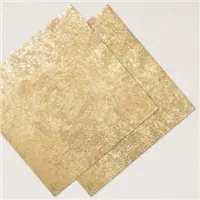
I’ve got two designs for you – both made pretty much the same way, with slightly different decorations. One showcases the Stars at Night Hybrid Embossing Folder dies and the other the Nativity die from the Night Divine die set. BOTH use the now-retired (SOO sorry!) Shining Brightly Specialty DSP. Take a look-see:

The first ornament – brought to us by Judi Hartbarger! – starts with two next-to-largest Stylish Shapes circles cut from Shining Brightly Specialty DSP – one in Very Vanilla and one one in Night of Navy.

I used the star die from Stars At Night to cut out three Night of Navy stars. Using my Paper Trimmer, I lightly – LIGHTLY!! – scored down the center of each die cut and folded them in half.
Using Liquid Glue, I adhered the three stars together – putting glue on just half of the backs of two stars and aligning all the tips.

I used a doubled length of gold Simply Elegant Trim to add to a 3″ gold Macrame hoop (get them at most hobby/craft stores or…here’s a link to them on Amazon!). I looped it around the bottom of the hoop – then knotted it on the other side.
Using Liquid Glue – I “sandwiched” the gold trim between two of the Stylish Shapes circle die cuts

Then I used Liquid Glue to adhere the star to the Very Vanilla side of the ornament. The video below is a good way to see how to do that! 🙂
I cut out a four-point Stars at Night star from Distressed Gold Specialty Paper and adhered it to the middle of the star with Liquid Glue.
A quick piece of knotted Night 0f Navy & Gold 1/2″ Glittered Ribbon finished off the first ornament!

For the second ornament – this one courtesy of Linda Nye! – my two next-to-largest Stylish Shapes circle dies were cut from Gold Foil (for the front) and from the same Night of Navy and Gold Shining Brightly Specialty DSP.
I used the Night Divine die to cut out a Night of Navy Nativity and then used the next-to-largest Stylish Shapes circle die to cut it into shape.

Using little tiny dots of Liquid Glue, I adhered the die cut to the Gold Foil die cut circle.
Then I repeated the Simply Elegant Trim and “sandwiching” that I’d done on the first ornament.
I tied a pretty bow with the Night 0f Navy & Gold 1/2″ Glittered Ribbon.

I cut a Distressed Gold star using a Stars at Night die and adhered it with Liquid Glue. Since I still had them – I added an Adhesive-backed Star Trinket.

Et Voila! Y’all – these are so pretty and fun! Night Divine and Stars at Night are NOT the only options – how many different ways could you think of to decorate these as tree ornaments or Gift Toppers? !

I hope you like!
If you’d like to recreate this card, all the products and card cuts you’ll need are down below! And – this is the card I made on my 6 Saturdays Till Christmas Saturday Night Live Video last night! If you’d like to see it – for the first time or again! – here ’tis!
I’ve also created a printable PDF with written instructions and a list of the products used to create this project. You can download, print and/or save it by clicking this image:

Missed any tutorials? You can check out my past projects right here!
TTFN
M

Connect with me! https://campsite.bio/stampsnlingers
HOST CODE FOR 16 NOV – 31 NOV: Q9UWV4E7
Use this host code when you order $50 or greater and receive a free gift (AND the Monthly Card Tutorial) from me! If your order is over $150, please do not use this code, but you’ll still get the free gift. The free gift is your choice of any item valued up to $10.00 in any active Catalog! That includes some of the Host Exclusive stamp sets! See my Customer Rewards page for full details.
Note: Make sure that you can see my name on the final checkout page listed as your Demonstrator when you order so that you know that you’re ordering with me and you’ll get my rewards!
You’ll also be getting a link to my ZOOM The Craftroom (an exclusive TWICE-A-WEEK online event for my customers) and the monthly Online Tutorial. The November Tutorial features the beautiful Magical Meadow Bundle!


NEW CATALOG TIME!? YEP!

Hard as it is to believe – we’re heading into New Catalog Season! Whoo-hoo for new goodies to yearn after and play with!
I’ll be ordering boxes and packs and cases of the new Jan – Apr 2024 Mini Catalogs AND the Jan – Feb 2024 Sale-A-Bration Catalogs on 5 December.
If you’re in my Online Host Club OR have ordered at least $50 from me in the past 12 months – then your name is on my list! If you’re not sure – please reach out and I’ll let you know!
If you aren’t a customer of mine yet and would like to be (and you’re not already working with another demonstrator) – then there’s still time to head over to my Online Store and get an order of >$50 in retail in. Maybe some goodies from the Seasonal Sale?!? 😎😎😎 You’ll automatically be added to my mailing list, earn an ordering gift (don’t forget that Host Code!), Peppermint rewards and our amazing Tutorial Bundle! Not sure what I’m nattering on about? Check out my Customer Rewards program!
SNEAK PEEK!
I can’t show you the cover yet, but I CAN share a little sneak peek unboxing video I did of my Product Purchase Premier goodies (one of the BEST benefits of being a demonstrator is getting to order EARLY!)!
If you want to see what all I got – here’s the video!
Get the Stampin’ Up! Products Used in this Project:


Card Cuts Used in This Project:
Night of Navy Cardstock: Stars at Night Die cut stars (x3); Night Divine die cut Nativity
Distressed Gold Specialty Paper: Stars at Night Die cut small stars (2 total)
Shining Brightly Specialty DSP: Next-to-largest Stylish Shapes circle die cuts (x2 for each ornament)
If you need any stamping supplies, I’d be very happy to be your Demonstrator. Just click on the Order Stampin’ Up! Online Now button on the right side of the screen to go directly to my online store or drop me an email if you have any questions. Happy Stamping!
Shop the Clearance Rack here. Earn FREE Stampin’ Up! Products – Join my Punkin Head Peppermint Rewards – My online customer thank you program!
Finn Fan Fix 
The other night I called Finny to go with me to feed the pony.
He flew by me and I caught a glimpse of…not-dog color.

Upon closer inspection…

Mooooom!! Mr. Moose wants to come with us to the barn! I PROMISE I’ll carry him the WHOLE WAY!
No. Mr. Moose did NOT get to help us feed. He had to wait in the house.
TTFN
M


 #20 Demonstrator in Sales in the US 2023-2024
 #13 Demonstrator in Leadership in the US 2023-2024
 #21 Demonstrator in Team Building in the US 2023-2024


 KarensCardCorner
 Stamp with Amy K
 Stampin With Shirley G
 Tarabeth Stamps
 TL's Bright Spot
Such pretty ornaments! The colors and designs are perfect! Poor Finn…he was just trying to bring another helper along 😉
Extra hands make for lighter work! 🤷♀️🤷♀️. Thanks, Amy! 🙂
Addy says Mr. Moose will be safe in his house …😉
Yep – he needs to stay where he’s safe. And clean. Clean is good. Relative – but good! 🙂