Good morning and happy Sunday! Did you remember to turn your clocks – microwaves – cable boxes – CAR RADIOS?! – back!? Or are you in the school that just leaves some of the too-hard-to-change clocks on one time all year? I may or may not leave the truck alone – I can’t actually remember how to do it so…. 🤷♀️ Why, oh why, can’t we just leave the time alone??
We’re almost at the end of our retreat – dang it! 😢 It’s been so much fun – we’re already making plans for next year! Which means…there’s still time for you to establish your Critter-dom status! 😎😎😎
Since y’all missed out on the 8-Saturdays-till-Christmas video last night (sorry – not sorry!) – I decided to do a Christmas card for you today – AND I even made a short video on how to make it. I’m a giver that way. 🙄 This one features the fun stand-alone Handcrafted Elements dies – with supporting roles from Night Divine, Joy of Noel and Christmas Classics. Take a look-see:

The design was loosely inspired by the sketch challenge at the Global Design Project this week!

I started out by stamping the Night Divine sentiment in Cherry Cobbler near the bottom of a Basic White panel.
Then I embossed the panel in the Timber 3D Embossing Folder, which I matted on a piece of Cherry Cobbler for the card front.

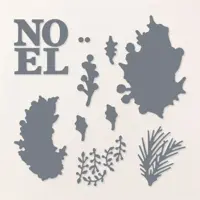
I adhered a piece of Basic White cardstock to a piece of Adhesive Sheet and then cut out three pine boughs using the Joy of Noel die.
I peeled the backing off and adhered the boughs in a stylish swag down the top of the card.

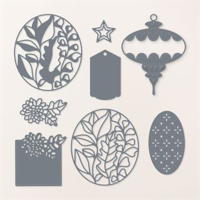
Using the two dies from Handcrafted Elements – I cut out the small oval from Gold Foil and the larger (top) ornament from Cherry Cobbler cardstock.
Using Liquid Glue – sparingly!! – I adhered the Cherry Cobbler die cut to the Gold Foil ornament. Isn’t it pretty??
Using Stampin’ Dimensionals, I adhered the ornament to the card front with Stampin’ Dimensionals.
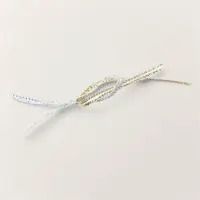
I tied a little bow from gold trim from the Gold & Silver 1/8″ Trim Combo Pack and adhered it with a Glue Dot.

I added a few Iridescent Rhinestone Basics Jewels and the card front was done.
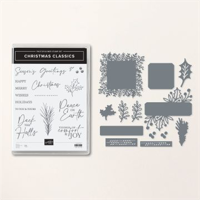
For the inside, I stamped the sentiment words from Christmas Classics in Cherry Cobbler on a Basic White panel. Over the top, in stamped-off-once Shaded Spruce ink, I added a pine bough from Christmas Classics. I even stuck on another little Iridescent Rhinestone Basics Jewel.

I used Liquid Glue to adhere the panel to a Cherry Cobbler mat and into my Thick Basic White card base, popped the card base on with Stampin’ Dimensionals and the card was done!
My Basic White Medium Envelope got the Joy of Noel boughs in Shaded Spruce (I stamped twice without re-inking) on the front…

…and again on the envelope flap.

Et Voila! Clean and Simple. Not my usual jam but….oh how I love the white-on-white pine boughs – Joy of Noel is the bomb! Combined with the Christmas Classics bundle – it’s parfait! And, when you’re looking for a beautiful Christmas sentiment, no need to look any further than Night Divine for the perfect choice!

I hope you like!
If you’d like to recreate this card, all the products and card cuts you’ll need are down below! And I made a short video for Instagram on how to make this card – if you’d like to give it a watch, click right here.
I’ve also created a printable PDF with written instructions and a list of the products used to create this project. You can download, print and/or save it by clicking this image:

Missed any tutorials? You can check out my past projects right here!
TTFN
M

Connect with me! https://campsite.bio/stampsnlingers
HOST CODE FOR 1 NOV – 15 NOV: PQH4AHD7
Use this host code when you order $50 or greater and receive a free gift (AND the Monthly Card Tutorial) from me! If your order is over $150, please do not use this code, but you’ll still get the free gift. The free gift is your choice of any item valued up to $10.00 in any active Catalog! That includes some of the Host Exclusive stamp sets! See my Customer Rewards page for full details.
Note: Make sure that you can see my name on the final checkout page listed as your Demonstrator when you order so that you know that you’re ordering with me and you’ll get my rewards!
You’ll also be getting a link to my ZOOM The Craftroom (an exclusive TWICE-A-WEEK online event for my customers) and the monthly Online Tutorial. The November Tutorial features the beautiful Magical Meadow Bundle!


Get the Stampin’ Up! Products Used in this Project:


Card Cuts Used in This Project:
Thick Basic White Cardstock: 4 1/4″ x 11″ (card base, scored and folded at 5 1/2″)
Cherry Cobbler Cardstock: 4″ x 5 1/4″ (x2 – mats for card front and inner liner); Handcrafted Elements die cut ornaments
Gold Foil: Handcrafted Elements die cut ornaments
Basic White Cardstock: 3 7/8″ x 5 1/8″ (x2 – card front and inner liner); Joy of Noel die cut bough (x3)
If you need any stamping supplies, I’d be very happy to be your Demonstrator. Just click on the Order Stampin’ Up! Online Now button on the right side of the screen to go directly to my online store or drop me an email if you have any questions. Happy Stamping!
Shop the Clearance Rack here. Earn FREE Stampin’ Up! Products – Join my Punkin Head Peppermint Rewards – My online customer thank you program!
Finn Fan Fix 
Finn’s at home with his Dad – a Boy’s Weekend! – so….here’s a blast from the Way Back Machine!

TTFN
M


 #20 Demonstrator in Sales in the US 2023-2024
 #13 Demonstrator in Leadership in the US 2023-2024
 #21 Demonstrator in Team Building in the US 2023-2024


 KarensCardCorner
 Stamp with Amy K
 Stampin With Shirley G
 Tarabeth Stamps
 TL's Bright Spot
Such a pretty card! Love the white background with the beautiful ornament! Sweet picture of Finn. 🙂
Thanks, Amy! It’s hard to take a NOT sweet pic of the man! 🙂
Mary, a classic Christmas card. I like it alot.
Thank you, ma’am! 🙂
Stunning card, Mary!
Thanks so much, Carol! 🙂
Gorgeous card! Glad you had a great time at your craft retreat!
We sure did, Gail – thank you! 🙂