Good morning on the cusp of the weekend! I hope you’ve had a good week and that you’re ready to wind down and take a couple of days off!
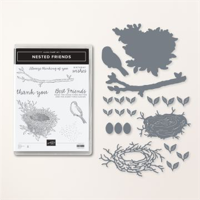
My card for today uses the sweet new Nested Friends bundle – which has one of the best bird and nest images in it that I’ve ever seen! I also pulled out the free Day At The Farm DSP and…a few other goodies! Take a look-see:

The unusual layout is from the Tuesday Morning Sketches challenge!

And I selected the bird theme thanks to The Paper Players challenge!

I started by adhering a piece of the Day at the Farm DSP to the front of a Balmy Blue card base. The front of this paper – which you can get for FREE during the Jan-Feb 2023 Sale-A-Bration with a $50+ – is all farm-y, but the back sides are less…specific!

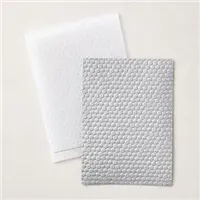
Next up, I embossed a piece of Crumb Cake cardstock in the Hive 3D Embossing Folder. Then, I set the panel in place on the card base, turned it and the card upside down and used a pencil to mark where I wanted to trim to make the corner. With the Paper Trimmer, I cut the excess off. Then I adhered it to the card front with Liquid Glue.

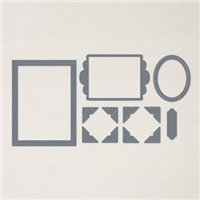
Using the Fabulous Frames die set, I cut a Basic White frame and adhered it with Liquid Glue. Then I stamped the branch in Soft Suede on a piece of Basic White, cut it with the matching Nested Friends die and colored it with my Light Crumb Cake and Light Mossy Meadow Stampin’ Blends. I adhered the colored branch to the card front with Liquid Glue.
On a piece of Crumb Cake cardstock, I stamped the pretty nest image from Nested Friends in Soft Suede ink and then cut it out with the matching die in the Nested Friends die set.

I colored the nest with my Light Crumb Cake, Dark Balmy Blue and Light Mossy Meadow Stampin’ Blends and then adhered it with Liquid Glue.
The nest is two die cuts from the Nested Friends set – the solid (bottom) is Soft Suede, and the more detailed (top) nest is Crumb Cake. I adhered them with Liquid Glue. Then I cut out 5 little eggs from Crumb Cake cardstock and adhered them into the nest with Liquid Glue.

I stamped the little bird in Soft Suede on Basic White and cut it out with the Nested Friends die. I colored her with my Dark Balmy Blue and Light So Saffron Stampin’ Blend.
On a piece of Basic White, I stamped the Nested Friends sentiment in Balmy Blue, then I edged the strip with my Soft Suede Stampin’ Write Marker.

I adhered the sentiment with Liquid Glue and popped the bird over the top with a couple of Stampin’ Dimensionals.
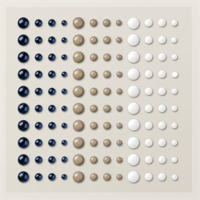
A few white Enamel Dot Essentials finished off the card front.

On the inside, I stamped the second Nested Friends sentiment in Balmy Blue on a piece of Basic White cardstock. Then I stamped the branch in Soft Suede and colored it with the Light Crumb Cake and Mossy Meadow Stampin’ Blends.

I used Liquid Glue to adhere the panel to a Soft Suede mat and into the Balmy Blue card base and the card was done!
My Basic White Medium Envelope got the Nested Friends branch on the front…

…and a little more of the Day at the Farm DSP on the envelope flap.

Et Voila! Oh my – Nested Friends – with the sweet images (and that darling little bird!!) – PLUS the dies that cut everything out and give you a nearly 3D bird nest! – is just such a cool bundle! And I really like the options for designs that you’ll get with the Day at the Farm DSP (don’t forget it’s got that great plaid in it, too!) – and its price is DEFINITELY right! 🙂

I hope you like!
If you’d like to recreate this card, all the products and card cuts are listed below! And – this is the card that I made on my YouTube live yesterday – if you’d like to see it – for the first time or again! – here ’tis!
https://youtube.com/live/lWMPg-T88RE
I’ve also created a printable PDF with written instructions and a list of the products used to create this project. You can download, print and/or save it by clicking this image:

Missed any tutorials? You can check out my past projects right here!
TTFN
M

Connect with me! https://campsite.bio/stampsnlingers
HOST CODE FOR 16 JAN – 31 JAN: 9HSSTWEC
Use this host code when you order $50 or greater and receive a free gift (AND the Monthly Card Tutorial) from me! If your order is over $150, please do not use this code, but you’ll still get the free gift. The free gift is your choice of any item valued up to $10.00 in any active Catalog! That includes some of the Host Exclusive stamp sets! See my Customer Rewards page for full details.
Note: Make sure that you can see my name on the final checkout page listed as your Demonstrator when you order so that you know that you’re ordering with me and you’ll get my rewards!
You’ll also be getting a link to my ZOOM The Craftroom (an exclusive TWICE-A-WEEK online event for my customers) and the monthly Online Tutorial. The January Tutorial features the brand new Country Bouquet Bundle!


My Online Host Club is a great way to build up your Stampin’ Up! tool chest a little at a time – and gather up the new goodies that you’ve got your eye on! AND – you’ll also receive host benefits – but I do the “host” duties for you! 😎 If any of that sounds like something you’d be interested in – then….read on!
Here’s how it works!
Clubs consist of three folks – who are part of the club for 6 months. During that period- you’ll get to be the host TWICE – getting all the benefits, but…doing no extra work! And – the first month is a Sale-A-Bration month! 🙂
You sign up for two consecutive 3-month “terms” and commit to:
– A $50.00 minimum order each month
– Placing your order by the 20th of each month
– Using the Host code for each month that I send to you in an email at the beginning of each month
This is how the schedule might look (if “Judy”, “Cynthia” and “MaryAnne” signed up! 😎) As you can see, each member gets to host TWICE during the six months!!

Here’s the deets!
– You’ll have AT LEAST a $150.00 Workshop order during EACH of your host months! Which means you’ll have at least $15.00 of Stampin’ Rewards dollars to spend on the exclusive Host Stamp Sets, or any other current Stampin’ Up! product during your host months. Stampin’ Rewards are Stampin’ Up!-speak for “free money”!
– You’ll earn DOUBLE PEPPERMINTS on your Host Club Orders. Each $50 order earns 4 reward points, a $75 order earns you 6 reward points, etc. You’ll earn at least 24 reward points during your membership, meaning you’ll automatically earn at least ONE $40 Peppermint rewards gift! (Remember – when you gather up 16 Peppermints, you get to select a free reward gift valued up to $40!). You can get more info about my Punkin’ Heads Customer Rewards Program right here.
– You’ll receive a FREE monthly tutorial with 4-5 projects and access to all previous tutorials for the duration of the club. Right now, there are around SEVENTY-FOUR tutorials available only to Online Host Club members. That’s around THREE HUNDRED AND SEVENTY not-seen-on-our-blogs projects for you to use as inspiration (and they ALL have all the card cuts and instructions!)
– Access to my Two Weekly Zoom The Craftroom online Zoom Parties – where you can come craft and chat with me and other customers!
– FREE catalogs during your membership term
– FREE shipping in your TWO Host Months
– A FREE STAMP SET of your choice valued up to $25 at the end of each “term”, any current set (excluding host sets)! That’s TWO free stamp sets in six months!
– At the end of the full 6 months, you’ll get first dibs at signing up for the next 6 month term!
Like I said above, this is a great time to join a club – with the Jan – Apr 2023 Mini Catalog live now, the Jan – Feb 2023 Sale-A-Bration still going on – and an amazing Annual Catalog, too. Oh – and the NEW 2023-2024 Annual Catalog will go live in May!
So – if you’re looking to build up your stash a little bit at a time – all while earning free product and Double Peppermints – without doing any extra work then…. It’s hard to find a downside, y’all!
Let me know quick as a bunya if you have questions or if you want one of the spots I have open!
Sale-a-Bration 2023 Going on Now!

Sale-a-Bration is the coolest time of year at Stampin’ UP! Check out all the goodness – we’ve got reasons to SHOP – reasons to HOST – and…HUGE reasons to JOIN!!
Get all the deets on my Stampin’ Up! Promotions page – or…find out why NOW is the BEST time to join the team!
Here’s a hint…

Get the Stampin’ Up! Products Used in this Project:


Card Cuts Used in This Project:
Balmy Blue Cardstock: 4 1/4″ x 11″ (card base, scored and folded at 5 1/2″)
Crumb Cake Cardstock: 3 3/4″ x 5″ (embossed front panel – trimmed to size); Stamped and die cut Nested Friends nest; Die cut detailed nest; die cut eggs
Soft Suede Cardstock: Die cut detailed nest; 4″ x 5 1/4″ (mat for inner liner)
Basic White Cardstock: Fabulous Frames die cut frame; 5/8″ x 2 1/2″ (sentiment); Stamped and die cut Nested Friends branch and bird; 3 7/8″ x 5 1/8″ (inner liner)
Day at the Farm DSP: 4 1/4″ x 5 1/2″ (front panel on card); 2 1/4″ x 6″ (envelope flap)
If you need any stamping supplies, I’d be very happy to be your Demonstrator. Just click on the Order Stampin’ Up! Online Now button on the right side of the screen to go directly to my online store or drop me an email if you have any questions. Happy Stamping!
Shop the Clearance Rack here. Earn FREE Stampin’ Up! Products – Join my Punkin Head Peppermint Rewards – My online customer thank you program!
Finn Fan Fix 
The other night Finn got up on the sofa with me and then…assumed his cat pose…
…complete with completely tucked up front paws!

Mooooooom!!! No pictures of my cat paws!!

TTFN
M


 #20 Demonstrator in Sales in the US 2023-2024
 #13 Demonstrator in Leadership in the US 2023-2024
 #21 Demonstrator in Team Building in the US 2023-2024


 KarensCardCorner
 Stamp with Amy K
 Stampin With Shirley G
 Tarabeth Stamps
 TL's Bright Spot
Such a pretty card! Love the little bird and the nest is awesome! Poor Finn…sometimes you feel like a cat, sometimes you don’t. 😉
I feel like I’ve heard that! 😂😂 Thanks, Amy! 🙂
Finn has very expressive eyes…no need to talk!
Surprise! I LOVE this card! Everything about it. I feel a CASE coming on.
I am NOT surprised that you love this card, my friend! Thank you! 🙂
Beautiful card!
Thanks, Mom! 🙂
Mary, I love the use of the DSP and all the texture on your card. So glad you shared this this beauty with us at the Paper Players this week
Jaydee
Thanks much, Jaydee – appreciate you stopping by!
Beautiful card! I think I may need this set now! Thanks for playing over at The Paper Players Challenge!
Thanks, Tara – appreciate you stopping by! 🙂
So so perfectly BEAUTIFUL!! Thanks so much for creating with us this week at Tuesday Morning Sketches!
Thank you so much for the kind words, Patti! 🙂
Beautiful card. Love all the textures and details Thanks for joining at Tuesday Morning Sketches.
Thanks much, Donna – appreciate you stopping by!! 🙂
This is lovely! The paper is beautiful and I really love the bird. Thank you for joining us at Tuesday Morning Sketches.
Thanks so much, Melissa – appreciate you stopping by!! 🙂
Gorgeous card!! I love your use of the frame!!
Thanks for playing along this week at Tuesday Morning Sketches
Debbie – TMS DT
Debbie’s Dash of This and That
Thank you so much, Debbie! Appreciate the kind words!