Well, good morning and welcome back to the work week. Hope you’ve got a good week ahead! And – if you’re in FL or on the east coast and impacted by Ian…I know that ALL of us are sending prayers and hope for healing and recovery your direction! We were very fortunate here in Atlanta – we didn’t get so much as a raindrop. My heart hurts watching the devastation! 🙁
Okay – on with the business at hand! My card today is a Christmas card – I mean…it’s October, so…time to get on the stick! This one uses the pretty Mistletoe Magic Bundle and some sweet Painted Christmas DSP. Take a look-see:

The layout for this one is from the Freshly Made Sketches challenge this week.

I started by adhering a panel of Painted Christmas DSP to a piece of Garden Green cardstock for the card front.
Next, I cut out the largest Stylish Shapes circle die from Basic White cardstock and embossed it in the pine-bough Wintry 3D Embossing Folder. Then I adhered it to the card front with Liquid Glue.

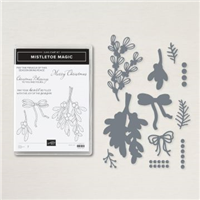
I used the Mistletoe Dies to cut out….
– A large detailed…sprig?…from Soft Sea Foam Cardstock and a second sprig from Vellum Cardstock.
– Six Garden Green pine boughs – 3 of each of the two sizes.
On a piece of Basic White cardstock, I stamped the large image from Mistletoe Magic in Garden Green. Then I cut it out with the matching die from the bundled Mistletoe Dies.

I colored the leaves with my Light and Dark Soft Sea Foam Stampin’ Blends – the stem with the Light Crumb Cake AND Light Soft Sea Foam Blend – and the berries with the Light and Dark Flirty Flamingo Blends. I swiped some Clear Wink of Stella over the berries.
I started by adhering the die cut foliage to the embossed circle using Liquid Glue. You can see I snipped the ends off the boughs to keep them inside the circle. 🙂

Then I added the stamped, colored and die cut mistletoe sprig with more Liquid Glue.

I stamped the Mistletoe Magic sentiment in Garden Green on a piece of Basic White and cut it with a label die from Stylish Shapes.
I popped the sentiment on with Stampin’ Dimensionals.

I used the dies to cut a pretty bow from some Flirty Flamingo cardstock and adhered it with Liquid Glue – tucking it up under the sentiment.
I added a pink 2021-2023 In Color Opal Round to the sentiment and some Iridescent Basic Jewels to the card front (and one to the middle of the bow) – and the card front was done!

On the inside, I stamped a second Mistletoe Magic sentiment in Garden Green on a Basic White panel. In the corner, I stamped the smaller mistletoe image in Garden Green and colored it with the Soft Sea Foam, Crumb Cake and Flirty Flamingo Blends. I added Clear Wink of Stella to the berries.

I used Liquid Glue to adhere the panel to a Garden Green mat and into my Flirty Flamingo card base, popped the card front on with Stampin’ Dimensionals and the card was done.
My Basic White Medium Envelope got the small Mistletoe Magic sprig on the front…

…and more of the Painted Christmas DSP on the envelope flap.

Et Voila! How pretty is the Mistletoe Magic foliage – both the stamped images and the sweet die cut sprigs from the bundled Mistletoe Dies?! And I think they’re perfect on the Painted Christmas DSP, don’t you? Now – you may be wondering if I REALLY needed to emboss the circle in the Wintry 3D Embossing Folder. I know you can’t really see it in the pictures. But – in person…you can for sure tell it’s embossed with pine boughs and…it’s a sweet little finishing touch!

If you’d like to recreate this card, all the products and card cuts you’ll need are down below! And – I did a quick video on how to make this card – you can see it right here!
And…I’ve also created a printable PDF with written instructions and a list of the products used to create this project. You can download, print and/or save it by clicking this image:

Missed any tutorials? You can check out my past projects right here!
TTFN
M

Connect with me! https://campsite.bio/stampsnlingers
HOST CODE FOR 1 OCT – 15 OCT: SCFS2B2G
Use this host code when you order $50 or greater and receive a free gift (AND the Monthly Card Tutorial) from me! If your order is over $150, please do not use this code, but you’ll still get the free gift. The free gift is your choice of any item valued up to $10.00 in any active Catalog! That includes some of the Host Exclusive stamp sets! See my Customer Rewards page for full details.
Note: Make sure that you can see my name on the final checkout page listed as your Demonstrator when you order so that you know that you’re ordering with me and you’ll get my rewards!
You’ll also be getting a link to my ZOOM The Craftroom (an exclusive TWICE-A-WEEK online event for my customers) and the monthly Online Tutorial. The October Tutorial features the Leaves of Holly Bundle!


Double Peppermints Ordering Special
1 Oct – 7 Oct 2022!

Here’s the deets!
1. All orders of $50 or greater (before shipping and taxes) placed in my online store thru 1:59am (Eastern Time) on 7 Oct 2022 will earn DOUBLE PEPPERMINT REWARD POINTS!!
2. Don’t forget to add my Host Code (SCFS2B2G) if your order is under $150 to get your free thank you gift (orders over $150 automatically get the free thank you gift – so don’t put in the host code!). Hey, Host Club ladies – be sure you’re adding YOUR host code (not mine!) – you’re getting Double Peppermints anyway!! 🤙🤙🤙
3. For more information about my Punkin Head Peppermint Reward points (my buyer reward program), click here.
Here’s a handy link right to my Online Store. 🙂
Drop me a note at Stamps-N-Lingers@comcast.net if you have any questions.
TOMORROW IS THE BIG DAY!!

That’s right – it a ONE DAY ONLY FREE SHIPPING extravaganza on orders over $75 (before tax)!!
Here’s the deets!
– FREE SHIPPING starts at 12:01AM MOUNTAIN TIME on 4 Oct and ENDS at 11:59PM on 4 Oct. Yes – ONE. DAY. ONLY!!

– Free shipping applies after the qualifying amount has been met.
– The minimum qualifying amount to receive free shipping is $75 or more (before tax). WEIRD that my Double Peppermints Special is the SAME amount! 🤔🤔🤔
– If you use a coupon code, please remember it will lower the order’s retail amount. The order must still meet the qualifying threshold of $75 to be eligible for free shipping.
– Free shipping only applies during the 24-hour period the promotion is live – which means that the order must be opened and closed on 4 October 2022.
– With the exception of month-to-month Paper Pumpkin subscriptions, all Stampin’ Up! products qualify for the promotion.
– Prepaid Paper Pumpkin subscriptions are eligible for FREE shipping under the same rules as all other Stampin’ Up! items during the promotion.
– Month-to-month Paper Pumpkin subscriptions are NOT eligible for free shipping. Subscriptions billed and shipped this month will be charged for the normal amount ($23.50 USD | $32.50 CAD shipping included) + tax.
– The free shipping promotion does not cover the additional cost for expedited shipping.

NEW KIT! The Birthday Organizer Kit
Coming on 4 Oct 22


The Birthday Card Organizer Kit has everything you need to plan ahead and never forget another birthday again! And who doesn’t need THAT!?!
- Item #161056 $25
- Kit includes one 8″ x 10″ (20.3 x 25.4 cm) monthly planner with space to record birthdays each month as well as a pocket sleeve to hold birthday cards.
- Includes 12 full-size birthday cards, 6 of 2 designs, and 12 coordinating envelopes.
- Includes Glue Dots, Stampin’ Dimensionals, Adhesive-Backed Embellishments, and Tear & Tape Adhesive
- Includes die-cut florals and pieces ready for you to use—no prep work required!
- Includes sticker sentiments and die-cut labels in Dutch, English, French, and German
- Coordinating colors: Basic Black, Evening Evergreen, Petal Pink, Sahara Sand, and Soft Succulent
Starter Kit PLUS Joining Special
Starts on 4 Oct 2022!

October is a fabulous time to join Stampin’ Up! You will get even MORE FREE products in your customizable Starter Kit! Between October 4-31, when you join, you will get $155 worth of products in your Starter Kit for only $99!! That’s an EXTRA $30 in FREE product of your choice!! Plus you’ll get free shipping and all the fun being a part of Stampin’ Up! and our Inkin’ Krew Team!
STARTER KIT+ PROMOTION DATES: 4 – 31 OCTOBER 2022
- When you purchase your Starter Kit, you will be able to redeem $155 of Starter Kit eligible products for just $99!!
- You can select any eligible Stampin’ Up! products up to the stated value of $155.
- Your Starter Kit also includes business resources like catalogs, brochures, order forms, and postcards.
- The Starter Kit also includes a FREE past Paper Pumpkin kit!
- In addition to the amazing added value to your Starter Kit, when you join Stampin’ Up! you get to be a part of our amazing community of crafters. Plus, you get to enjoy sharing simple and fun crafting experiences with others, early access to products, and exclusive access to training events!!
- New demonstrators who submit their Independent Demonstrator Agreement (IDA) before 4 October or after 31 October will not be eligible for this offer.
- Starter Kit+ promotion begins: 4 October 2022
- Starter Kit+ promotion ends: 31 October 2022 at 11:50 PM MT
You can check out more information about joining our team here and more details about the benefits of being a Demonstrator and find the link to join here (but…WAIT UNTIL THE 4th!!)
Let me know if you have any questions. We’d love to have you join us and get this great deal on your Starter Kit!
Get the Stampin’ Up! Products Used in this Project:


Price: $12.00


Card Cuts Used in This Project:
Flirty Flamingo Cardstock: 4 1/4″ x 11″ (card base, scored and folded at 5 1/2″); Mistletoe Die cut bow
Garden Green Cardstock: 3 7/8″ x 5 1/8″ (x2 – mats for card front and for inner liner); Mistletoe Die cut pine boughs (x6 – 3 small and 3 large)
Soft Sea Foam and Vellum Cardstocks: Mistletoe Die cut sprigs – one each
Basic White Cardstock: 3 7/8″ x 5 1/8″ (inner liner); Mistletoe Die cut stamped sprig; Largest Stylish Shapes circle die cut; Stylish Shapes die cut banner (sentiment)
Painted Christmas DSP: 3 7/8″ x 5 1/8″ (card front); 2 1/4″ x 6″ (envelope flap)
If you need any stamping supplies, I’d be very happy to be your Demonstrator. Just click on the Order Stampin’ Up! Online Now button on the right side of the screen to go directly to my online store or drop me an email if you have any questions. Happy Stamping!
Shop the Clearance Rack here. Earn FREE Stampin’ Up! Products – Join my Punkin Head Peppermint Rewards – My online customer thank you program!
Finn Fan Fix

Wanna know how FAST FAST FAST an Aussie is?!?
Well….I can’t speak to other people’s Aussies. But – MINE is so fast…
He can beat us back to the house carrying his bottle.
And have time to settle down – perfectly position the aforementioned bottle and then….give us “the look”.

That look. The side-eye. The furry eyeball. The one that says…sheesh. You guys is SLOWWW.
And then he laughs at us. 🤷♀️
TTFN
M


 #20 Demonstrator in Sales in the US 2023-2024
 #13 Demonstrator in Leadership in the US 2023-2024
 #21 Demonstrator in Team Building in the US 2023-2024


 KarensCardCorner
 Stamp with Amy K
 Stampin With Shirley G
 Tarabeth Stamps
 TL's Bright Spot
Such a pretty card! Love the layering and the fun colors for Christmas! Yeah, Finn is a busy guy…he has placed to be and things to do and you’re slowing him down. 😉
We’re just the anchors in his schedule! 🙂
Such a lovely card, Mary! And you used some of my favorite Christmas DSP!
Finn would have a blast running around with our two fur babies! Love the side looks he gives…hilarious!
Can you even imagine how much fun that would be?!? Maybe one day!! Thanks, Carol! 🙂
Oh how I love Flirty Flamingo, and it looks just perfect on this card!
It’s such a pretty Pink! Thanks, Judi! 🙂
Oh so perfect for the holidays! The details on your card are wonderful! Glad you shared this at FMS!
Thanks much, Linda – appreciate you stopping by!! 🙂