

Well – good morning, it’s Friday again! House cleaning day (whoo-hoo!) and Day 1 of OnStage! Last night was fun and we saw a lot of Top Performers recognized for their achievements this year! 🙂
And speaking of…I want to send a HUGE THANK YOU out to ALL of you!! I was tickled sideways to find myself at #34 in the Overall Demonstrator ranking in the US for the 2021-2022 Stampin’ Up! year!! I owe ALL of that to my amazing customers and Critters-N-Creatin’ Krew Team! THANK YOU THANK YOU THANK YOU!! 🙏🏻🥰🙏🏻🥰🙏🏻🥰🙏🏻

If you were able to join me yesterday afternoon for my YouTube video, I appreciate you spending part of your day with me! If not – but you’d like to watch the replay and see how to make this fun fold (with a hidden bonus!) – here’s ’tis!

I know. I know. HOW many times will I use the Whimsical Trees bundle and pretty Whimsy & Wonder Specialty DSP this week?!? I’m sorry (not sorry!). I just love it – and when I saw the sketch that I used…it was too perfect! Just to mix it up a little, I DID use the Christmas Season stamp set for the sentiments – and it’s a fun fold. AND a gift card holder. So…totally different! Take a look-see:

And here’s that sketch I was talking about – from the SugarPea Mix It Up challenge for November!


So – I saw the idea of using a Joy Fold card to make a Gift Card Holder somewhere on Facebook. I carefully saved the post so I could give credit where credit is due but…it’s been disappeared! 🙁 Just know I wasn’t nearly clever enough to come up with this by my ownself!
I started with a 4 1/4″ x 8 1/2″ piece of Misty Moonlight cardstock that I scored at 3″ on the long side to make the large card base. A 3 5/8″ x 8 1/2″ piece of Blushing Bride cardstock, scored at 4 1/4″ on the long side, created the small card base.
I matted some of the snowflake paper from Whimsy & Wonder Specialty DSP on Mint Macaron and adhered them to the front small panel and the large back panel of the large Misty Moonlight card base.

I cut a piece of Whimsy & Wonder Specialty DSP – in silver-foil stripes – and adhered it to the inside of the small card base using Liquid Glue. I cut a smaller piece and used the scalloped oval in the Double Oval Punch to cut a half-circle out of one long edge.
I used a thin line of Liquid Glue – right at the very edge! – to adhere that piece to the small card base to create the gift card holder. Note: I only put glue on the two short sides and the non-punched long side.

I matted a piece of Misty Moonlight Whimsy & Wonder Specialty DSP on Mint Macaron to create the card front for the small card base.
On some Mint Macaron paper from the DSP pack, I stamped the tree image from Whimsical Trees in Mint Macaron. Using a second stamp in the set, I added Misty Moonlight lights to each of the trees and cut them with the matching die in the bundled Christmas Trees Die set. I also cut the cool “open” tree die from the same Mint Macaron DSP.

I used Liquid Glue to adhere the three trees to the small card front. Then I fussy cut a bunch of Christmas gifts from the Whimsy & Wonder Specialty DSP. These are “piled” under the trees with Liquid Glue.
I tied a small silver bow from a piece of Simply Elegant Trim and adhered it with a Glue Dot.
On a piece of Basic White cardstock, I stamped the Christmas Season sentiment in Misty Moonlight ink and fussy cut it – roughly following the shape of the words.

I used my Mint Macaron Stampin’ Write Marker to edge the sentiment, then used double-stacked Stampin’ Dimensionals to adhere the sentiment to the small card front.
I added a few Champagne Rhinestone Basic Jewels and then adhered the card front to the front of the small card base. Note: the small card base opens OPPOSITE a “normal” card, so make sure you’ve got it oriented correctly! 😉
For the inside of the small card base, I stamped the second Christmas Season sentiment in Misty Moonlight on a Basic White panel. In the corner, I added the Whimsical Trees images in Mint Macaron and Misty Moonlight – then I added a medium Champagne Rhinestone Basic Jewel by the sentiment.

I matted the panel on Mint Macaron and then adhered it inside the small card base.
Using Liquid Glue, I adhered the small card to the back panel of the larger card base – and the card was done!

My Basic White Medium Envelope got the Whimsical Trees images on the front…

…and more of the Whimsy & Wonder Specialty DSP on the envelope flap.

Et Voila! I can’t overstate how much I love love love the entire Whimsy & Wonder Suite! The colors in the Whimsy & Wonder Specialty DSP are so much fun for the holidays and the images and die cuts in the Whimsical Trees and bundled Christmas Trees die set are perfect. I borrowed a couple of the sweet Christmas Season sentiments to just slightly change up my message. And…yes. How cool is it to use a Joy Fold card as a Gift Card Holder?!? 🙂

I hope you like!
If you’d like to recreate this card, all the products and card cuts you’ll need are down below!
TTFN
M

Connect with me! https://campsite.bio/stampsnlingers
I’ve created a printable PDF with written instructions and a list of the products used to create this project. You can download, print and/or save it by clicking this image:


HOST CODE FOR 1 NOV – 15 NOV: G26BVVKZ
Use this host code when you order $50 or greater and receive a free gift (AND the Monthly Card Tutorial) from me! If your order is over $150, please do not use this code, but you’ll still get the free gift. The free gift is your choice of any item valued up to $10.00 in any active Catalog! That includes some of the Host Exclusive stamp sets! See my Customer Rewards page for full details.
Note: Make sure that you can see my name on the final checkout page listed as your Demonstrator when you order so that you know that you’re ordering with me and you’ll get my rewards!
You’ll also be getting a link to my ZOOM The Craftroom (an exclusive TWICE-A-WEEK online event for my customers) and the monthly Online Tutorial. The November Tutorial features the Frosted Gingerbread Bundle!


Stampin’ Up! Seasonal Sale is COMING!
16 – 18 November 2021

Here’s the deets:
- The sale will run for three days only.
- The discount includes 10% off cardstock, 15% off ink pads (excluding ink pad bundles and third-party pads), and 20% off dies.
- The discount applies to products featured in the 2021–2022 Annual Catalog only. Products from the July–December 2021 Mini Catalog are not included.
- Sale begins on 6 November 2021 at 12:00 AM (MT) and ends on 18 November 2021 at 11:50 PM (MT)

Here’s a handy list of everything on sale – and their sale prices. Click the picture to open a printable list and start making YOUR list so you’ll be ready to go on the 16th!


Check Out This Joining Special!
4 – 30 November 2021!


The Start with Savings Starter Kit promotion is a super opportunity to purchase your Starter Kit at a great deal! Instead of the standard $99 Starter Kit—which is already a steal of a deal—you can pick up a completely custom Starter Kit for only $75!!! What an absolutely unbeatable bargain for a box with a value of $125!
There’s no better time than November for you to join as a demonstrator! From 4 – 30 November, you’ll be able to purchase your Starter Kit with big savings!
PROMOTION DETAILS:
- Promotion Period: 4 – 30 November 2021
- When a new demonstrator orders their custom Starter Kit, they will be able to redeem $125 of qualifying products for only $75 (normally $99).
- New demonstrators who submit their Independent Demonstrator Agreement (IDA) before 4 November or after 30 November will not be eligible for this promotion. Starter Kit orders must be placed between 4 November and 30 November to receive the discount.
- Joining Deadline: November 30, 2021; 11:50 PM (MT)
I would LOVE to have you join my awesome Critters-N-Creatin Krew (CNCK) team!


WHY be a Demonstrator?
- Get 20%–25% off all Stampin’ Up! products. That’s on….EVERYTHING!
- While there’s no requirement to sell, there is the opportunity to do so! You can earn additional income based on your sales and recruiting–just how much extra income is up to you.
- Set your own schedule and put in as much or as little or even….NONE at ALL… time as you’d like.
- Get support through online training resources, events, and a demonstrator-only online community with thousands of project ideas.
- Access to regular promotions, giving you an opportunity to contact customers.
- Opportunity to earn incentive trips.
- Get early looks at new products – and the chance to add them to your tool chest before anyone else!
- Chance to learn creative tips and techniques, share ideas, and come into contact with new friends who love papercrafting as much as you do!
There’s NO commitment and NO penalty if you decide that being a Demonstrator isn’t right for you. Why not give it a try? The CNCK has a fun Facebook page where we chat a lot and share our projects (you can even win fun prizes!). And – we gather up via Zoom once a month, too, for folks that want to do that! Have I mentioned we’re a pretty fun group of folks? No?? Well – we totally are – and we’d love to have you join us!
Got questions about joining? Drop me a note at stamps-n-lingers@comcast.net! I’d be happy to chat with you more about it! You can also get more deets about being a Demonstrator here and then head here to get started and pick up that great deal on the Starter Kit!
Get the Stampin’ Up! Products Used in this Project:

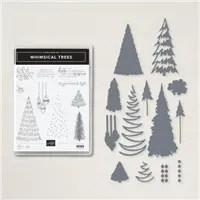


Price: $15.00


Card Cuts Used in This Project:
Misty Moonlight Cardstock: 4 1/4″ x 8 1/2″ (large card base, scored and folded at 3″);
Blushing Bride Cardstock: 3 5/8″ x 8 1/2″ (small card base, scored and folded at 4 1/4″)
Mint Macron Cardstock: 2 7/8″ x 4 1/8″ (mat for smaller DSP panel on large card base); 4 1/8″ x 5 3/8: (mat for large DSP panel on back of large card base); 3 5/8″ x 4 1/8″ (x2 – mats for front and inside of small card base)
Basic White Cardstock: 3 1/2″ x 4″ (inner liner of small card base); Christmas Season fussy cut sentiment
Whimsy & Wonder Specialty DSP: 2 3/4″ x 4″ (smaller DSP panel on large card base); 4″ x 5 1/4″ (large DSP panel on back of large card base);3 1/2″ x 4″ (front of small card base); 3 3/4″ x 4 1/4″ (silver-striped panel behind card holder); 2″ x 3 3/4″ (card holder); Christmas Trees die cut trees and fussy cut gifts on front; 3″ x 6″ (envelope flap)
If you need any stamping supplies, I’d be very happy to be your Demonstrator. Just click on the Order Stampin’ Up! Online Now button on the right side of the screen to go directly to my online store or drop me an email if you have any questions. Happy Stamping!
Shop the Clearance Rack here. Earn FREE Stampin’ Up! Products – Join my Punkin Head Peppermint Rewards – My online customer thank you program!
Finn Fan Fix


So…no one tell ME this is a spoiled dog.
No way would I believe that. 😉

The still shot might make you think otherwise, but watch the video. Pretty sure you’ll totally agree…no spoiled dog to see here.. 🤷♀️🤷♀️🤷♀️
TTFN
M