
Good morning, y’all! It’s Thursday – which means it’s time for another Happy Inkin’ Thursday Blog Hop. We’ve got a color challenge to work with and I’m excited to see what everyone brings to the table. I just know you’re going to see a ton of awesome-ness on the hop today!
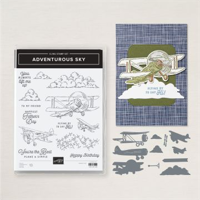
The colors in our challenge sent me right to the drawer holding my new and wunnermus Take to the Sky DSP! And, naturally – I had to use the coordinating Adventurous Sky bundle – and…a few Industrial Trinkets! Take a look-see!

How’d that be for a great card for a guy?!? 🙂
Here’s our colors – JIC you couldn’t figure them out…

I did a quick video on how to make this one – and posted it on Instagram this morning. You can see it on YouTube right here!
I started by adhering a panel of the Take to the Sky DSP onto the front of my Boho Blue card base using Liquid Glue.

I matted a piece of Mossy Meadow Take to the Sky DSP to a Copper Clay mat and adhered it to the card front with Liquid Glue.
Using the largest cloud die in the Adventurous Sky set, I cut out two Basic White clouds. Then I used my Paper Trimmer and Paper Snips to cut out one of the tags in the DSP pack. I used the poky tool from the Take Your Pick Tool to punch a hole in the top of the tag.

I added some Boho Blue 2023-2025 Jute Twine at the top of the tag and then adhered it to the card front with Stampin’ Dimensionals – then slid one cloud underneath and adhered one on top – both with Liquid Glue!
I used the dies from the Adventurous Sky set to cut out a fuselage from the riveted-panel-design in the Take to the Sky DSP , Night of Navy wing and a Smoky Slate propeller. They’re adhered together with Liquid Glue – then I popped the assembled plane onto the card front with a little Liquid Glue and a few Dimensionals.

I stamped the Adventurous Sky sentiment in Mossy Meadow ink and cut it out with the small Perennial Postage die. I adhered it with Liquid Glue.
Using Glue Dots – I added some new Industrial Trinkets and the card front was done!

On the inside, I stamped the small Adventurous Sky biplane in Smoky Slate ink in the corner of a Basic White panel. Then I colored it VERY lightly using a Night of Navy Watercolor Pencil.

I used Liquid Glue to adhere the panel to a Copper Clay mat and into the Boho Blue card base and the card was done!
My Basic White Medium Envelope got the Adventurous Sky biplane in Smoky Slate – and Night of Navy Watercolor Pencil – on the front…

…and more Take to the Sky DSP on the envelope flap.

Et Voila! Well – I guess it’s pretty obvs that I LOVE this Take to the Sky suite – I can’t seem to leave it on the shelf! The DSP! The Adventurous Sky bundle. Even the Industrial Trinkets are too cool for school! Need a masculine card? We got you! 🙂

I hope you like!
If you’d like to recreate this project, all the products and card cuts you’ll need are down below! And, as I mentioned above, I posted a short video out on Instagram this morning on how to make this card. If you’d like to see it, click here!
I’ve also created a printable PDF with written instructions and a list of the products used to create this project. You can download, print and/or save it by clicking this image:

Missed any tutorials? You can check out my past projects right here!
Now that you’ve seen my card, take a minute to hop thru all our projects today. If you click on the Next Blog button, you’ll go right to Jaimie’s page. And you can just click on the names below to go direct to all the blogs!

Mary Deatherage – This is me! 😎
Have fun on the Hop!!
TTFN
M

Connect with me! https://campsite.bio/stampsnlingers
HOST CODE FOR 23 APR – 15 MAY: JH3SKUP9
Use this host code when you order $50 or greater and receive a free gift (AND the Monthly Card Tutorial) from me! If your order is over $150, please do not use this code, but you’ll still get the free gift. The free gift is your choice of any item valued up to $10.00 in any active Catalog! That includes some of the Host Exclusive stamp sets! See my Customer Rewards page for full details.
Note: Make sure that you can see my name on the final checkout page listed as your Demonstrator when you order so that you know that you’re ordering with me and you’ll get my rewards!
You’ll also be getting a link to my ZOOM The Craftroom (an exclusive TWICE-A-WEEK online event for my customers) and the monthly Online Tutorial. The April Tutorial features the beautiful Notes of Nature Bundle!


Thursday After Lunch Bunch CANCELLED


WANT TO JOIN US?!
If you’d like to join our team, we’d love to have you! You can become a demonstrator for just $99! We welcome all types of Demonstrators from those only purchasing to get the discount for themselves to those who want to run a business and those anywhere in between! Look at those faces – you KNOW we have a lot of fun! 🙂

When you purchase the Starter Kit for $99 + taxes (if applicable), the kit ships for FREE and you get to pick $125 in Stampin’ Up! merchandise.
BUT – this month – there’s even MORE reason to join!!
![]()
Because when you join during the month of May – in addition to all the USUAL goodness – you’ll ALSO get…
– 2024–2026 In Color Classic Stampin’ Pad Bundle ($40.50)
– 2024–2026 In Color 8-1/2″ x 11″ Cardstock ($11.50)
– 2024–2026 In Color 6″ x 6″ Designer Series Paper ($12.50)
– 2024–2026 In Color Stampin’ Write Markers ($17.50)

Head over to my Join My Team page here to see all the benefits of being a Demonstrator! I’d love to have you on my team and help you get all the discounts, and early goodies, and…ALL THE THINGS! 🙂
If you have any questions about joining, please drop me a note at stamps-n-lingers@comcast.net, I’d love to chat with you!
You can also see additional information on my Stampin’ Up! site here!

Click here to purchase your Starter Kit and Get Started!
Get the Stampin’ Up! Products Used in this Project:


Card Cuts Used in This Project:
Boho Blue Cardstock: 4 1/4″ x 11″ (card base – scored and folded at 5 1/2″)
Copper Clay Cardstock: 3 1/8″ x 4 1/8″ (mat for DSP panel on front); 4″ x 5 1/4″ (mat for inner liner)
Smoky Slate Cardstock: Adventurous Sky die cut propeller
Night of Navy Cardstock: Adventurous Sky die cut wings
Basic White Cardstock: Perennial Postage die cut (sentiment); 3 7/8″ x 5 1/8″ (inner liner); Adventurous Sky die cut clouds (x2)
Take to the Sky DSP: 4 1/4″ x 5 1/2″ (card front panel); 3″ x 4″ (DSP panel on front); Fussy cut tag; Adventurous Sky die cut fuselage; 2 1/2″ x 6″ (envelope flap)
If you need any stamping supplies, I’d be very happy to be your Demonstrator. Just click on the Order Stampin’ Up! Online Now button on the right side of the screen to go directly to my online store or drop me an email if you have any questions. Happy Stamping!
Shop the Clearance Rack here. Earn FREE Stampin’ Up! Products – Join my Punkin Head Peppermint Rewards – My online customer thank you program!
Finn Fan Fix 
No FFF’s on Blog Hop Days!
TTFN
M


 #20 Demonstrator in Sales in the US 2023-2024
 #13 Demonstrator in Leadership in the US 2023-2024
 #21 Demonstrator in Team Building in the US 2023-2024


 KarensCardCorner
 Stamp with Amy K
 Stampin With Shirley G
 Tarabeth Stamps
 TL's Bright Spot
Mary, you never cease to amaze me with your creativity.
Awww – thank you so much! 🙂
Love this card Mary. Great design and I love how you made the plane with the DSP
It was just MADE for making into a fuselage! Thanks! 🙂
Seems like this suite is right up your alley! I love the airplane! TFS
Right!? I love it, too! Thanks! 🙂
What great use of that DSP on the body of the airplane!!!
Thanks – it was a perfect choice for a fuselage! 🙂
I really love all of your layering here. Fantastic card, Mary.
Thank you, Nel! 🙂
Awesome card Mary! Love the tag and the cool airplane die cuts! Perfect! 🙂
Thanks – it’s such a cool bundle! 🙂
Fun card, Mary! I love how you cut out the body of the plane from the DSP! It looks really cool!
Thanks, Carol! 🙂
Wonderful card! Love that die cut plane! 😊
Thank you, Akiko! 🙂
Awesome card Mary. I agree with everyone else, that it was very creative to use the DSP for the plane.
Thanks very much, Kylie!! Appreciate the kind words! 🙂