Good morning, y’all and HAPPY HAPPY HAWWWMP DAY!
It’s ALSO PRE-ORDER Day for us Demonstrators (betcha wish YOU could pre-order, too!) Whoo-hoo! I’m so excited to get my mitts on the new Sept – Dec 2023 Mini Catalog goodies and REALLY excited to start using them and sharing them with you! I’ll also be ordering catalogs, so…if you’re thinking you’re getting one from me – I’ll be doing my best to get them out the door quick as I can! 😎😎😎. If you’re not sure if you’re on my list – give me a shout!
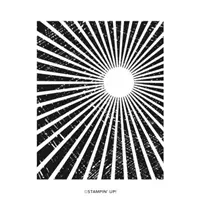
My card today is a two-fer. If you get my newsletter, then you saw the card using the Rays of Light stamp and a bunch of Stampin’ Write Markers. I was so intrigued with that – that I made one for myself. But then…I did a little something different with it and actually got TWO cards out of one stamped panel! Take a look-see:

I’ll show you the second card in a bit!
For the layout, I played along with the Just Us Girls CASE the Design Team Member challenge. I CASEd Nancy’s split-front layout with the circle sentiment element! 🙂

I also grabbed some elements from the Festive Friday Inspo List. I used Brown, Gold, Acetate, Masculine and Bubbles. 🙂

I started with the Rays of Light stamp that I set rubber-side-up on my table. Using 11 different Stampin’ Write Markers (this is the Marker-to-Stamp coloring technique!) – I colored each ray a different color. I pre-determined the order that I’d color and I just kept repeating that order all the way around.
Left-to-Right: Blueberry Bushel, Azure Afternoon, Balmy Blue, Shaded Spruce, Granny Apple Green, Pumpkin Pie, Crushed Curry, Lemon Lolly, Real Red, Calypso Coral and Flirty Flamingo.

When all the rays were colored, I “huffed” all over the stamp. Note: you know when you “huff” on a window to fog it up so you can draw a face in it?

THAT is the same “huffing” you want to do here. And be sure you huff ALL the spots, too!
With the huffing done – I set my Thick Basic White panel on top of the stamp and then rubbed all over the panel to transfer the image. Success!

At that point, I cut the panel into two pieces. One is 3 1/4″ x 4″ and the remaining 2″ x 4″ piece was perfect for a second card! Score!! 🙂
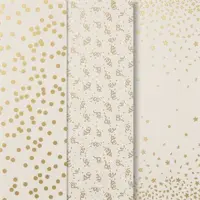
I cut a piece of Gold Celebrations Specialty DSP and – using tiny dabs of Liquid Glue just where the printed dots were – I adhered it to an identically-sized piece of Early Espresso cardstock.

Using Liquid Glue, I adhered the 3 1/4″ x 4″ piece of the stamped panel to the top of the layered card front. Then I adhered it to the front of my Shaded Spruce card base using Stampin’ Dimensionals.
I used the second-to-smallest Stylish Shapes circle die to cut out an Early Espresso circle – which I adhered with Liquid Glue.

I cut a Shaded Spruce banner with a Stylish Shapes die and adhered it over the circle with Liquid Glue.
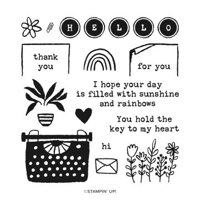
On a piece of Lemon Lolly cardstock, I stamped a Just My Type sentiment in Early Espresso. I cut it with the next-to-smallest Stylish Shapes circle and adhered it with Stampin’ Dimensionals and that was it for the card front!

On the inside, I stamped a second Just My Type sentiment in Early Espresso on a Basic White panel. Above it, I stamped the little rainbow in Early Espresso – then I colored it with a few of the Stampin’ Write Markers I’d used on the front.

I used Liquid Glue to adhere the panel to an Early Espresso mat and then into the Shaded Spruce card base and the card was done.
My Basic White Medium Envelope got the Just My Type rainbow on the front…

…and again on the envelope flap.

The second card was made in the same way using the 2″ x 4″ remaining stamped panel – but I reversed the mats and card base colors. So…an Early Espresso card base and Shaded Spruce mats! The sentiments and inside rainbows were stamped in Shaded Spruce.


I love that I got two cards with one pretty stamped panel! And either one would be great for a guy, don’t you think??

Et Voila! Rays of Light – colored with Stampin’ Write Markers! Genius, Stampin’ Up! – thank you for the inspiration!! And the Just My Type stamp set – was a perfect pairing with it’s sweet sentiments and cute rainbow! 😎

I hope you like!
If you’d like to recreate this card, all the products and card cuts you’ll need are down below!
I’ve also created a printable PDF with written instructions and a list of the products used to create this project. You can download, print and/or save it by clicking this image:

Missed any tutorials? You can check out my past projects right here!
TTFN
M

Connect with me! https://campsite.bio/stampsnlingers
HOST CODE FOR 1 AUG – 15 AUG: CJ3VEP9W
Use this host code when you order $50 or greater and receive a free gift (AND the Monthly Card Tutorial) from me! If your order is over $150, please do not use this code, but you’ll still get the free gift. The free gift is your choice of any item valued up to $10.00 in any active Catalog! That includes some of the Host Exclusive stamp sets! See my Customer Rewards page for full details.
Note: Make sure that you can see my name on the final checkout page listed as your Demonstrator when you order so that you know that you’re ordering with me and you’ll get my rewards!
You’ll also be getting a link to my ZOOM The Craftroom (an exclusive TWICE-A-WEEK online event for my customers) and the monthly Online Tutorial. The August Tutorial features the beautiful Timeless Arrangements Bundle!


ALL THE KIT-AND-KABOODLE!

’Tis the season to start your holiday crafting! It’s so simple with this all-inclusive kit. Adhere the die cuts and embellishments, then tie the tag to a gift with a twine bow. You’ll have handmade tags in minutes!

What’s in the Box!
– Enough supplies to create 15 gift tags—3 each of 5 designs
– Printed tags, printed die cuts and stickers, adhesive, and embellishments
– Includes printed sentiments in English, French, German, and Dutch
– Finished tag size range: 1-1/2″ x 2″ to 2-1/2″ x 3″
– Coordinating colors: Basic Black, Flirty Flamingo, Garden Green, Lost Lagoon, Pool Party, and Real Red

Like videos?? Check this one out to see how it all comes together!
Get the Festive Tags kit and ALL our great kits at the Kits Collection in the online store.
BUT WAIT! THERE’S MORE!

You can save up to 30% on amazing kits from the Kits Collection by Stampin’ Up! What are you waiting for? Start shopping, crafting, and selling! This is a limited time offer you won’t want to miss.
Sales Period: 1–31 August
Last Chance to Order: 31 August 2023 at 11:59 p.m. (MT)
– The sale only applies to the Kits Collection by Stampin’ Up! (it does not include Paper Pumpkin kits).
– There is no limit to how many kits may be purchased.
– The kits will be up to 30% off as indicated on the website.
– No discount code necessary—the discount will be applied automatically.
And you can use your Bonus Days Coupons, too!
Get the Festive Tags kit and ALL our great kits at the Kits Collection in the online store.
TIME TO CASH IN THOSE COUPONS!!

Redemption Period: 1–31 August 2023
Last Day to Redeem: 31 August 2023 at 11:59 p.m. (MT)
- There’s no limit to the number of coupon codes you can redeem on an order during the redemption period. If using multiple codes, they must be separated by a space.
- Coupons may be redeemed one time only.
- Coupon codes may be redeemed for any product (excluding Starter Kits, demonstrator supply items, and Paper Pumpkin month-to-month subscriptions).
- New prepaid Paper Pumpkin codes may be discounted using Bonus Days coupon codes.

Get the Stampin’ Up! Products Used in this Project:


Card Cuts Used in This Project:
Shaded Spruce or Early Espresso Cardstock: 4 1/4″ x 11″ (card base – scored at folded at 5 1/2″)
Early Espresso or Shaded Spruce Cardstock: 4″ x 5 1/4″ (card front); Second-to-Smallest Stylish Shapes circle die (mat for sentiment); Stylish Shapes banner die (behind sentiment); 4″ x 5 1/4″ (mat for inner liner)
Gold Celebrations Specialty DSP: 4″ x 5 1/4″ (card front)
Lemon Lolly Cardstock: Next-to-Smallest Stylish Shapes circle die (sentiment)
Thick Basic White Cardstock: 4″ x 5 1/4″ (Rays of Light stamped card front – note, one card gets 2″ x 4″ and the other gets 3 1/4″ x 4″)
Basic White Cardstock: 3 7/8″ x 5 1/8″ (inner liner)
If you need any stamping supplies, I’d be very happy to be your Demonstrator. Just click on the Order Stampin’ Up! Online Now button on the right side of the screen to go directly to my online store or drop me an email if you have any questions. Happy Stamping!
Shop the Clearance Rack here. Earn FREE Stampin’ Up! Products – Join my Punkin Head Peppermint Rewards – My online customer thank you program!
Finn Fan Fix 
We went to the Tractor Supply and the Bank yesterday. BOTH are “cookie” spots for the Man.
At the bank – he makes a very conscious effort to be seen.
Openthewindowopenthewindowopenthewindow!!

Okay – good. NOW she can see me! I’m here! Dog in Back!

Did she send it? Did she??

She DID! I SEE IT!

FINALLY!

Nice teller-lady sent….two. Something about….one for later?

Later?! What’s the later stuff?? WHO decides WHEN later is??

Questions? 🤦♀️
TTFN
M


 #20 Demonstrator in Sales in the US 2023-2024
 #13 Demonstrator in Leadership in the US 2023-2024
 #21 Demonstrator in Team Building in the US 2023-2024


 KarensCardCorner
 Stamp with Amy K
 Stampin With Shirley G
 Tarabeth Stamps
 TL's Bright Spot
Cute cards! Fun way to use that stamp set! Poor Finn…he so rarely gets a cookie so I can see why it’s such a big deal when he gets one (or two). 😉
It IS good that the bank and the store give him cookies. Otherwise – he’d be VERY pitiful! :). Thanks, Amy! :)_
Very pretty card with your rainbow colors—and so creative to get two from one coloring/huffing/stamping! Love your layering for the sentiment too! Impressive! TFS Impressed too that Finn gets treats at the bank! Bet he votes for putting all his fan money in there!
Yes – it’s his fave bank. He is a VERY loyal customer!! Thank you so much, Susan! 🙂
Very pretty, but not too pretty for a guy. Great that you could get 2 cards from one stamp.
Oh, the anticipation! Oh, the wait! Your captions are perfect for the pics. I can almost hear him talking.
It is SOO hard to wait! LOL. Thanks, Julie! 🙂
Dogs don’t know later…they are now creatures. Funny Finn Fan Club today.
Yup – gimme now! Thanks, my friend! 🙂
Love, love this card!! Soooo pretty……actually card{s}!!
Love that Finn-y got bank cookies too!! oh, I could just feel his anticipation in those pictures…..!!
He always does – unless there’s a “dumb teller”. His words. Thanks, Faith! 🙂
Cookies are GOOD!!! The bouvs got them at the Coffee Shack drive through, back in the day. We both miss it.
I bet! 🙂
What a fun celebratory card with your colors and rays!!! And to continue the celebration on the inside too is fabulous! Thanks for joining us this week at Just Us Girls!
Thanks very much, Carol! 🙂
I love this! It reminds me of our Jasmine we took her through McDonalds drive thru for a plain hamburger once and after that the bank drive thru cookies were such a disappointment! Thanks for the smile!
LOL – I can’t even imagine the looks you got when the drive thru was NOT McDonalds!! :). Thanks, Marge! 🙂
Love this Mary – such a great way to use the Ray of Light stamp and even better to split and get two-for-one too! Thanks for sharing with us over at Festive Friday!
Thank you, Joanne! Enjoyed the challenge! 🙂
I love that bright, colorful rainbow with the polka dots! Fabulous card, Mary. So glad you shared it with us at Festive Friday this week
Jaydee
Thanks so much, Jaydee! Appreciate you coming by! 🙂