
Good morning, y’all! It’s Thursday – which means it’s time for another Happy Inkin’ Thursday Blog Hop. We’ve got a sketch challenge to work with and I’m excited to see what everyone brings to the table. I just know you’re going to see a ton of awesome-ness on the hop today!
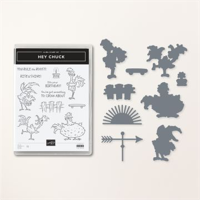
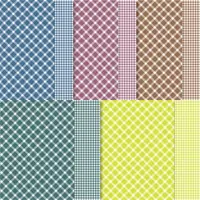
I decided that it was time to get Chuck out again – from the Hey Chuck stamp set and bundled dies – and…I saw a challenge that included “Fun Fold” and “Gingham” so…out came one of my faves – the Book Fold Corner Easel Card – and some Glorious Gingham 6″ x 6″ DSP. Take a look-see:

The layout for the card front is from our blog hop sketch:

And here’s the Tic-Tac-Toe Challenge that drove some of my elements! I went up the one diagonal (Gingham – square – Birthday). And…I MEANT to emboss the sentiment and then forgot. 🤷♀️

And the Creative Creases challenge is always all about the fun folds! 🙂

I started with a Copper Clay card base – 4 1/4″ x 11″ – that I scored and folded at 5 1/2″ and 6 3/4″ on the long side. Then I scored the 4 1/4″ x 4 1/4″ portion on the diagonal.

I folded the 5 1/2” score line as a “mountain” and at the 6 3/4” score in the opposite direction. Topographically speaking, that would be a “valley” fold! The diagonal fold is a “mountain”.

Using Liquid Glue between the 5 1/2” and 6 3/4” score lines, I adhered the front of the card base to the back – just in that 1 1/4” area. This made the “book” or “side” fold.

I matted a piece of Pretty Peacock Glorious Gingham DSP on Lemon Lolly for the card front – and a smaller strip on Lemon Lolly for the small side panel. That one I went ahead and adhered to the “book” panel with Liquid Glue.
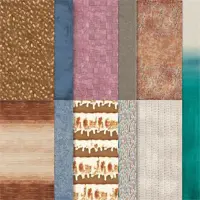
I matted a piece of Copper Clay Earthen Elegance DSP on Lemon Lolly and adhered it to the card front with Liquid Glue.

I cut the third-from-largest Stylish Shapes circle die from a piece of Blueberry Bushel Glorious Gingham DSP and adhered it with Liquid Glue.
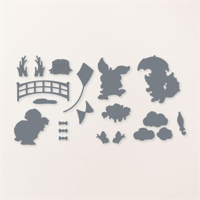
Using the cloud die from the Playing in the Rain die set, I cut out three clouds from Basic White cardstock. I colored two of them with my Balmy Blue Stampin’ Blends – and then adhered them with Liquid Glue.

I cut out a Lemon Lolly sunburst and a Copper Clay weathervane using the Hey Chuck die set – and adhered them with Liquid Glue.
On a piece of Basic White, I stamped Chuck in Copper Clay. Then I colored his body and wings with my Pecan Pie Stampin’ Blends; eyelids, beak and feathers with the Lemon Lolly Blends – and his shorts with a Flirty Flamingo and an Azure Afternoon Blend.

I cut him out with the Hey Chuck die (if you were on my Zoom last week – I DID find it!) and then popped him onto the card front with Stampin’ Dimensionals.
I stamped the Hey Chuck sentiment in Blueberry Bushel on Basic White and cut it out with a Stylish Shapes banner die – then adhered it with Stampin’ Dimensionals.
At that point, I put Liquid Glue on the lower triangle of the card front – the easel – and then adhered the card front to it.

I added some Pretty Peacock sequins from the Adhesive-backed Sequins Trio and the card front was done.
On the inside, I stamped a second Hey Chuck sentiment in Blueberry Bushel on a Basic White panel. I matted it on Lemon Lolly and then adhered it inside the card with Liquid Glue.

For the easel stop – I stamped the Hey Chuck fence and birthday cake images in Copper Clay on Basic White. Then I colored the fence with my Pecan Pie Stampin’ Blends and the cake with Flirty Flamingo, Azure Afternoon (candle) and Lemon Lolly (flame) Blends.
I used their Hey Chuck dies to cut them out and then used Stampin’ Dimensionals to adhere the fence die cut to the inside of the card – placing it so that my easel stood up how I wanted it to when the card was open! Then I popped the cake die cut over the top with another Dimensional and…the card was done!
My Basic White Medium Envelope got the stamped and colored fence on the front…

…and more Glorious Gingham 6″ x 6″ DSP on the envelope flap.

Et Voila! Okay – seriously. How cute is that little chicken?! If the Hey Chuck stamp set, and adorable farm-themed die cuts, can’t make someone smile – even on their birthday 😎 – then…I don’t know what will! Add some aptly named Glorious Gingham – and a super cool fun fold and…BOOM Chaka-la-ka!

I hope you like!
If you’d like to recreate this card, all the products and card cuts you’ll need are down below!
And…I’ve also created a printable PDF with written instructions and a list of the products used to create this project. You can download, print and/or save it by clicking this image:

Missed any tutorials? You can check out my past projects right here!
Now that you’ve seen my card, take a minute to hop thru all our projects today. If you click on the Next Blog button, you’ll go right to Jaimie’s page. And you can just click on the names below to go direct to all the blogs!

Mary Deatherage – This is me! 😎
Have fun on the Hop!!
TTFN
M

Connect with me! https://campsite.bio/stampsnlingers
HOST CODE FOR 16 JUL – 31 JUL: DUK29WMX
Use this host code when you order $50 or greater and receive a free gift (AND the Monthly Card Tutorial) from me! If your order is over $150, please do not use this code, but you’ll still get the free gift. The free gift is your choice of any item valued up to $10.00 in any active Catalog! That includes some of the Host Exclusive stamp sets! See my Customer Rewards page for full details.
Note: Make sure that you can see my name on the final checkout page listed as your Demonstrator when you order so that you know that you’re ordering with me and you’ll get my rewards!
You’ll also be getting a link to my ZOOM The Craftroom (an exclusive TWICE-A-WEEK online event for my customers) and the monthly Online Tutorial. The July Tutorial features the beautiful Earthen Textures Bundle!


Thursday After Lunch Bunch

I’m planning to go live today on my Stamps-N-Lingers YouTube Channel with a new project for you – whoo-hoo!! We’ll start at our normal time of 1pm Eastern. Come on over and see what I’m up to today! Look forward to seeing you then!


For those of you living in Alabama, Arkansas, Florida, Massachusetts, Mississippi, Missouri, New Jersey, New Mexico, Ohio, South Carolina, Tennessee, Texas, and West Virginia…you’ve got sales tax holidays in the next few weeks! HINT: ALAMABAians – take a quick look – YOUR weekend is THIS weekend! And Florida – you’re right behind them! 🙂
And – even better – it turns out that SOME items in our Stampin’ Up! Catalogs qualify for the sales tax holidays! The list of sales tax holidays by state and items in that state that qualify are listed below (click on the image to open up a full-size printable document):

Just a caveat: you must place your order with Stampin’ Up! DURING the tax holiday period in order to receive these items tax-free (which is midnight on the first day to midnight on the last day of the tax holiday). Also, keep in mind this is a STATE sales tax holiday; the state statute may not apply to county, city, and special jurisdiction taxes.
If you live in one of those states, whoo-hoo for you! Have fun shopping tax free during your holiday!

Here’s the Deets!
Earning Period: 6–31 July 2023
Ordering Deadline to Earn: 31 July 2023 at 11:59 p.m. (MT)
- Earn a $5 coupon for every $50 spent (before shipping and tax).
- All coupon codes will be emailed right after a qualifying purchase has been made. Customers can shop, purchase, and earn coupons as a guest if they provide a valid email at checkout. However, customers are encouraged to create an account on our online store.
- If a participant earns multiple codes from a single order, they will receive one email with multiple codes. If they earn multiple codes from multiple orders, they will receive separate emails for each code earned.
- All order types qualify for this promotion. Phone and email orders still require an email address.
- Orders started before the promotion begins will not count toward earning coupon codes. For example, if you add items to your cart before 6 July and wait to purchase until that date or later, then those items will not qualify towards earning coupons. You must add items to your cart and complete your purchase during the earning period.
- There’s no limit to the number of coupon codes you can earn per order or throughout the duration of the earning period.
And – we’ve got some cool spots to look for new goodies and new “deals”! Check these out!
INTERESTED IN JOINING US??
If you’d like to join our team, we’d love to have you! You can become a demonstrator for just $99! We welcome all types of Demonstrators from those only purchasing to get the discount for themselves to those who want to run a business and those anywhere in between! Look at those faces – you KNOW we have a lot of fun! 🙂

When you purchase the Starter Kit for $99 + taxes (if applicable), the kit ships for FREE and you get to pick $125 in Stampin’ Up! merchandise. Yay!!
Head over to my Stampin’ Up! Promotions page here to see the benefits of being a Demonstrator and to sign up now! I would love to have you on my team and help you get all the discounts, and early goodies, and…ALL THE THINGS! :).
If you have any questions about joining, please drop me a note at stamps-n-lingers@comcast.net, I’d love to chat with you!
You can also see additional information on my blog here or on my Stampin’ Up! site here!

Click here to purchase your Starter Kit and Get Started!
Get the Stampin’ Up! Products Used in this Project:


Card Cuts Used in This Project:
Copper Clay Cardstock: 4 1/4″ x 11″ (card base, scored and folded at 5 1/2″ and 6 3/4″); Hey Chuck die cut weathervane
Lemon Lolly Cardstock: 4″ x 4″ (x2 – mats for square card front and for inner liner ); 1″ x 4″ (mat for small side panel); 1 7/8″ x 4″ (mat for DSP strip on front); Hey Chuck die cut sunburst
Basic White Cardstock: Stylish Shapes die cut banner (sentiment); 3 7/8″ x 3 7/8″ (inner liner); Hey Chuck stamped and die cut chicken, fence and birthday cake; Playing in the Rain die cut clouds (x3)
Earthen Elegance DSP: 1 3/4″ x 4″ (matted strip on front of card)
Glorious Gingham 6″ x 6″ DSP: 3 7/8″ x 3 7/8″ (square card front); 7/8″ x 3 7/8″ (small side panel); Third-from-Largest Stylish Shapes circle die cut (behind Chuck on front); 2 1/4″ x 6″ (envelope flap)
If you need any stamping supplies, I’d be very happy to be your Demonstrator. Just click on the Order Stampin’ Up! Online Now button on the right side of the screen to go directly to my online store or drop me an email if you have any questions. Happy Stamping!
Shop the Clearance Rack here. Earn FREE Stampin’ Up! Products – Join my Punkin Head Peppermint Rewards – My online customer thank you program!
Finn Fan Fix 
No FFF’s on Blog Hop Days!
TTFN
M


 #20 Demonstrator in Sales in the US 2023-2024
 #13 Demonstrator in Leadership in the US 2023-2024
 #21 Demonstrator in Team Building in the US 2023-2024


 KarensCardCorner
 Stamp with Amy K
 Stampin With Shirley G
 Tarabeth Stamps
 TL's Bright Spot
OMG that’s just too cute Mary 🙂 Perfect background paper for chuck!! Love that fold!!
Thanks so much, Karen! 🙂
That’s way too cute! Love the crazy chicken, his expression is perfect! Great design! 🙂
Thank you, ma’am! 🙂
Love, love these roosters! Awesome card design! I’ll have to give that fun fold a try.
Do – it’s super easy! Thanks, Carol! 🙂
Great card! Pretty colors and love this fun fold!
Thanks, Akiko! 🙂
Chuck looks like he’ ready to rock and roll at the break of day! So glad to see you entered your fun fold at CCC! Great card!!
Thanks, Karen – it’s such a cute set! 🙂
Wow, your Chuckie card is wonderful! The images are so cute! Love that twist on the book fold. I should try this one. Thank you for playing with Creative Creases Challenge, and I hope you can join us again soon. We really appreciate your support!
Debbie, DT
Secrets To Stamping
It’s super easy – and book folds are one of my faves anyway! Thanks so much, Debbie! 🙂
Mary…. Great images for your Easel Fold. I just received the Hey, Chuck bundle and have been thinking of how to use it. Thank you for the great idea. Love this card! Thank you for entering Creative Creases Challenge #61. See you for #62.
Thanks much, Rae – appreciate you stopping by!!
Another great ‘Mary’ card. Love the layers and the fence is the perfect stop for your easel, or whatever. Chuck is one crazy chicken, but I love him paired with the gingham(?) paper, or is it plaid? Whichever, it is a great combination.
Thank you – I thought they went together pretty well! And yes – he’s a crazy dude!! 🙂
Love this fun fold. That is on my ‘to do’ list! And such a great combo of DSP. Love it!
It’s one of my faves, for sure! Thanks, TL! 🙂