Happy Sunday, y’all! Hope you’re having a good weekend so far! Wanted to take just a moment to send out my thoughts and prayers to President Carter and his family. This is a hard time – no matter how expected or how strong your faith is that this is just a waypoint. I am glad they opted for Hospice – it’s such a wonderful organization – for the patient AND their family! Fair winds and following seas, Mr. President. 🙏🏻
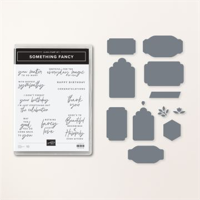
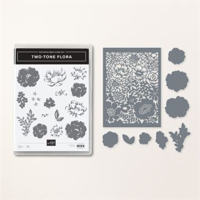
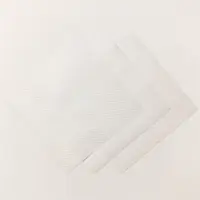
Okay – on to the real reason you meandered over here today! I have a pretty birthday card for you today – it’s got some geometric shapes from the Something Fancy bundle and some sweet florals from the Two-Tone Floral set. And – a sneak peek at one of the three new Basics 3D Embossing Folders (coming on 1 March as an Online Exclusive!). Take a look-see:

The soft palette is from the Global Design Project color challenge this week.

And the layout is from the Tuesday Morning Sketches challenge.

I started by embossing a piece of Highland Heather cardstock in one of the Basics 3D Embossing Folders. Then I used my Whisper White ink pad to “scrape” along the raised areas to soften it a bit. Since the white ink takes a little bit of time to dry, I set it aside and worked on the other elements!
I stamped the small detailed floral image from Two-Tone Floral in Fresh Freesia five times on a piece of Fresh Freesia cardstock – and cut them all out with the hexagon die in the Something Fancy set. While I had the die out, I cut out five hexagons from the leafy design in the Vellum Basics Specialty Paper.

When the embossed panel was dry, I used Liquid Glue to adhere it to a Basic White mat to make the card front.
Then, I used Liquid Glue to adhere the Vellum hexagons – and then adhered the Fresh Freesia die cuts over the top. Note: you want to think ahead on this part – and only use the Liquid Glue on the parts of the Vellum hexagons that won’t show! 🙂
I cut a Basic White tag using the Something Fancy die and adhered it with Liquid Glue.

On a piece of Basic White, I stamped two small flowers and two flower clusters in Blushing Bride. Two-Tone Flora is a two-step stamp set – and I used full-strength Blushing Bride to stamp the detailed portion and stamped-off-once for the fill. I did the same with the small flower cluster. Use the Two-Tone Flora dies to cut out the flowers.
Then I adhered the two small flowers and one cluster to the card front with Liquid Glue.

I stamped the Something Fancy sentiment in Highland Heather on a piece of Basic White cardstock and cut it out with the label die from Something Fancy. Then I popped it onto the card front with Stampin’ Dimensionals.
I used some Dimensionals to adhere the final flower cluster – letting it overlap the sentiment.

I tied a simple bow from two lengths of Linen Thread and adhered it with a Glue Dot. Then I added Rhinestone Basic Jewels – a small one to each flower center in the clusters – and a few on the tag – and the card front was done!
On the inside, I stamped the flower cluster image in two corners of a Basic White panel – using full-strength and stamped-off-once Blushing Bride ink.

I used Liquid Glue to adhere the panel to a Basic White mat and into the Highland Heather card base, popped the card front on with Stampin’ Dimensionals and the card was done!
My Basic White Medium Envelope got the small Two-Tone Flora flower on the front…

…and the Two-Tone Flora flower cluster on the envelope flap.

Et Voila! I think this pretty-in-purple-and-pink birthday card is so sweet, don’t you? The Two-Tone Flora set creates such pretty flowers – but…it needs a sentiment set and the Something Fancy sentiments are lovely. AND – it has the added benefit of the tags and labels in the bundled die set. Our new Online Exclusive products – coming on 1 March – will feature the trio of embossing folders in the Basics 3D Embossing Folder pack – plus many MORE new goodies! So – you’re going to want to be watching for those! 🙂

If you’d like to recreate this card, all the products and card cuts are listed below! And – this is the card I made on yesterday’s YouTube live video! If you’d like to see it – for the first time OR again! – here ’tis!
I’ve also created a printable PDF with written instructions and a list of the products used to create this project. You can download, print and/or save it by clicking this image:

Missed any tutorials? You can check out my past projects right here!
TTFN
M

Connect with me! https://campsite.bio/stampsnlingers
HOST CODE FOR 16 FEB – 28 FEB: UFBG796P
Use this host code when you order $50 or greater and receive a free gift (AND the Monthly Card Tutorial) from me! If your order is over $150, please do not use this code, but you’ll still get the free gift. The free gift is your choice of any item valued up to $10.00 in any active Catalog! That includes some of the Host Exclusive stamp sets! See my Customer Rewards page for full details.
Note: Make sure that you can see my name on the final checkout page listed as your Demonstrator when you order so that you know that you’re ordering with me and you’ll get my rewards!
You’ll also be getting a link to my ZOOM The Craftroom (an exclusive TWICE-A-WEEK online event for my customers) and the monthly Online Tutorial. The February Tutorial features the brand new Dainty Delight Bundle!


Be sure to check out my Retired Products Shop page! Lots of new goodies at very sweet savings! Check it out right here!
Sale-a-Bration 2023 Going on Now!

Sale-a-Bration is the coolest time of year at Stampin’ UP! Check out all the goodness – we’ve got reasons to SHOP – reasons to HOST – and…HUGE reasons to JOIN!!

We’ve also got new items to pick from at the $50 level and $100 level during Sale-a-bration (which ends on 28 Feb)! They’re all items from the current catalog and they’re all available IN ADDITION to the Sale-a-bration exclusives from the Sale-a-bration 2023 Brochure!
Click on this flyer to open a PDF with the list of new Sale-a-bration items available now:

Get all the deets on my Stampin’ Up! Promotions page – or…find out why NOW is the BEST time to join the team!
Here’s a hint…

Get the Stampin’ Up! Products Used in this Project:
Price: $10.00


Cuts Used in This Project:
Highland Heather Cardstock: 4 1/4″ x 11″ (card base, scored and folded at 5 1/2″); 3 3/4″ x 5″ (card front)
Fresh Freesia Cardstock: Something Fancy die cut hexagons (x5)
Vellum Basics Specialty Paper: Something Fancy die cut hexagons (x5)
Basic White Cardstock: 4″ x 5 1/4″ (x2 – mats for card front and for inner liner); 3 7/8″ x 5 1/8″ (inner liner); Something Fancy die cut tag and sentiment label; Two-Tone Flora stamped and die cut flowers
If you need any stamping supplies, I’d be very happy to be your Demonstrator. Just click on the Order Stampin’ Up! Online Now button on the right side of the screen to go directly to my online store or drop me an email if you have any questions. Happy Stamping!
Shop the Clearance Rack here. Earn FREE Stampin’ Up! Products – Join my Punkin Head Peppermint Rewards – My online customer thank you program!
Finn Fan Fix 
We went to Tractor Supply yesterday!
I mean – that’s not all that exciting unless…you’re Finn!

He got some treats – sniffed some sniffs – and…got his heart bruised a little! 🙁
He was settled down – for a second (he sort of was suffering from spring-butt, if you know what I mean!?) – and I heard a strange noise.
No – it wasn’t the soda machine that I heard – although HE did – AND felt the air blowing out of it!

It was HIM!
He was whining!
I looked around and saw two little girls with their mom.
He was trying to get them to come over and pet him! Or get ME to let him up so he could go to THEM!

Their mom didn’t look like she was really open to such an encounter, so…we didn’t go anywhere.
He was pretty sad! 🙁
But – he got about five little bones in the course of our time there AND a lot of petttings from NOT-tiny humans so…I think he’ll be okay.
He does LOVE those tiny humans, though. Like…this one!

Bed-head. The struggle is real! I wish I looked that cute with COMBED hair, let alone bed-head! 🥰🥰🥰🥰
TTFN
M


 #20 Demonstrator in Sales in the US 2023-2024
 #13 Demonstrator in Leadership in the US 2023-2024
 #21 Demonstrator in Team Building in the US 2023-2024


 KarensCardCorner
 Stamp with Amy K
 Stampin With Shirley G
 Tarabeth Stamps
 TL's Bright Spot
LOVE everything in your post today!
Thank you so much, Karen! 🙂
Such a pretty card! Love the soft colors and the hexagon die cuts are fantastic! Poor Finn…he just wants everyone to be able to love him. 😉
Yes – those little girls don’t know what they missed! Thanks, Amy! 🙂
Lovely card, Love those vellum hexagon shapes. Thank you for joining Tuesday Morning Sketches
Thank you very much, Donna! Appreciate you taking time to come by! 🙂
Gorgeous card! Love the hexies and the colors you used. Thank you for joining us at Tuesday Morning Sketches.
Thanks very much, Melissa!! 🙂
So pretty! Love how you made the back panel of hexagons!
Thanks for playing along this week at Tuesday Morning Sketches
Debbie – TMS DT
Debbie’s Dash of This and That
Thanks much, Debbie – appreciate you stopping by!! 🙂