

Well – the week has flown by, hasn’t it?! It’s Friday again and we’re headed into the weekend. AND – this time next week I’ll be putting Critters/Inkin’ Krew Retreat goodies in the car and fixin to head to the airport to pick up Amy and Karen! Whoo-hoo! Our team has such a good time when we’re all able to be in the same place for a weekend. We’ll craft – and talk – and eat – and talk – and eat – and craft. And sleep! I can’t wait!! 🙂
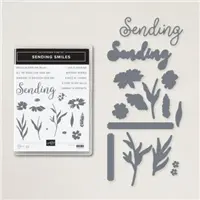
Today’s card is a little different for me – but it’s one that I have fallen completely in love with! It features one of my fave sets ever – the Sending Smiles stamp set and the bundled Sending Dies. AND – the brand new and amaze-balls new Framed Florets Dies (which you can get on 1 Nov!!). Take a look-see:

I know! It DOES have dimensionals but…hardly any bling. No ribbon. No Linen Thread! WHO MADE THIS CARD?!?! 😳😳
The layout for this one come from the Tuesday Morning Sketches challenge.


And the color palette is from The Paper Players color challenge.


I started by using the fun heart-oval die in the new Framed Florets Die set to emboss an oval-of-hearts in a Basic White panel. This die is very very cool – it cuts out like a zillion little hearts from the panel – leaving a cool “negative” die cut oval! 🙂

I adhered the panel to an Orchid Oasis mat (I know it looks blue in the photos but…Orchid Oasis looks purple-y to me. That’s my story and I’m sticking to it! 😎) for the card front.

On another piece of Basic White, I stamped the pretty flower from Sending Smiles in Mango Melody ink.
Then I stamped the leaves image in Granny Apple Green. Finally – I added the small and adorable flower in Orchid Oasis. I did cheat the color challenge a smidge – and added some flower centers in So Saffron ink.

I used the large frame die from Framed Florets to cut out the image. When you do this – you’ll have the pretty frame – AND the pretty oval (it’s got a nice embossed edge on it!) leftover.
I popped the oval into place with Stampin’ Dimensionals.

On yet another piece of Basic White – I stamped the sentiment in Mango Melody and used the shorter label die in the Sending Dies to cut it out. Note: there are a lot of sentiment options in the Sending Smiles set – you could use ANY of them for this card – it’s such a versatile layout! Even the longer sentiments – cut with the longer label die – would be awesome!
I popped the sentiment onto the card front with Stampin’ Dimensionals.

I added a few Brushed Brass Butterflies and the card front was done.
For the inside, I stamped the Sending Smiles flowers and stem on a panel of Basic White cardstock. Tip: when you’re creating this flower image – the large top flower “drives” where the remainder of the image will end up on your panel. So – stamp it first. Then add the stem. Finally – add the small flower! I adhered one final small Brushed Brass Butterfly.

I used Liquid Glue to adhere the panel to an Orchid Oasis mat and into my Thick Basic White card base, popped the card front on with Stampin’ Dimensionals and the card was done!
My Basic White Medium Envelope got the Sending Smiles flowers on the front…

…and a little flowerdy Orchid Oasis paper from the 2022-2024 In Color 6″ x 6″ DSP on the envelope flap.

Et Voila! I don’t know what it is about the flowers in this Sending Smiles stamp set – but they’re some of my favorite of all time!! The coordinating (and bundled – for a 10% saving!) Sending Dies cut out all the images – plus the label dies – PLUS an amazing “shadowed” die cut sentiment!! LOVE! The Framed Florets die set brings some gorgeous oval shapes back into our tool chest – and they’re as pretty as they are useful! Get them on 1 Nov – or join the team right now – and get them in your Starter Kit! 🙂

I hope you like!
If you’d like to recreate this card, all the products and card cuts you’ll need are down below! And this was the card I made yesterday on my Stamps-N-Lingers FB live video! If you’d like to see it – or see it again! – here ’tis on YouTube!

And…I’ve also created a printable PDF with written instructions and a list of the products used to create this project. You can download, print and/or save it by clicking this image:


Missed any tutorials? You can check out my past projects right here!
TTFN
M

Connect with me! https://campsite.bio/stampsnlingers
HOST CODE FOR 1 OCT – 15 OCT: SCFS2B2G
HOST CODE FOR 16 OCT – 31 OCT: J3BYYVX2
Use this host code when you order $50 or greater and receive a free gift (AND the Monthly Card Tutorial) from me! If your order is over $150, please do not use this code, but you’ll still get the free gift. The free gift is your choice of any item valued up to $10.00 in any active Catalog! That includes some of the Host Exclusive stamp sets! See my Customer Rewards page for full details.
Note: Make sure that you can see my name on the final checkout page listed as your Demonstrator when you order so that you know that you’re ordering with me and you’ll get my rewards!
You’ll also be getting a link to my ZOOM The Craftroom (an exclusive TWICE-A-WEEK online event for my customers) and the monthly Online Tutorial. The October Tutorial features the Leaves of Holly Bundle!


Starter Kit PLUS Joining Special
Thru 30 Nov 2022!


October is a fabulous time to join Stampin’ Up! You will get even MORE FREE products in your customizable Starter Kit! Between October 4-31, when you join, you will get $155 worth of products in your Starter Kit for only $99!! That’s an EXTRA $30 in FREE product of your choice!! Plus you’ll get free shipping and all the fun being a part of Stampin’ Up! and our Inkin’ Krew Team!
STARTER KIT+ PROMOTION DATES: 4 – 31 OCTOBER 2022
- When you purchase your Starter Kit, you will be able to redeem $155 of Starter Kit eligible products for just $99!!
- You can select any eligible Stampin’ Up! products up to the stated value of $155.
- Your Starter Kit also includes business resources like catalogs, brochures, order forms, and postcards.
- The Starter Kit also includes a FREE past Paper Pumpkin kit!
- In addition to the amazing added value to your Starter Kit, when you join Stampin’ Up! you get to be a part of our amazing community of crafters. Plus, you get to enjoy sharing simple and fun crafting experiences with others, early access to products, and exclusive access to training events!!
- New demonstrators who submit their Independent Demonstrator Agreement (IDA) before 4 October or after 31 October will not be eligible for this offer.
- Starter Kit+ promotion begins: 4 October 2022
- Starter Kit+ promotion ends: 31 October 2022 at 11:50 PM MT
You can check out more information about joining our team here and more details about the benefits of being a Demonstrator and find the link to join here.
Let me know if you have any questions. We’d love to have you join us and get this great deal on your Starter Kit!
AND – join now and you can add the NEW Fitting Florets products to your Starter Kit!! Click the picture below to see all the new goodies (customers will be able to get these goodies on 1 Nov – demonstrators can get them right now!)


If you’ve been considering joining – now is a great time to jump in! Get the extra $30 in free merchandise in your starter kit AND get this pretty collection as part of your starter kit (or join and get the collection at a 20% discount as a Demonstrator!)! Drop me a note at Stamps-N-Lingers@comcast.net if you have any questions about being a Demonstrator.

Get the Stampin’ Up! Products Used in this Project:


Price: $12.00


Card Cuts Used in This Project:
Thick Basic White Cardstock: 4 1/4″ x 11″ (card base, scored and folded at 5 1/2″)
Orchid Oasis Cardstock: 4″ x 5 1/4″ (x2 – mats for card front and for inner liner)
Basic White Cardstock: 3 7/8″ x 5 1/8″ (x2 – card front and inner liner); Framed Florets die cut oval; Sending Dies die cut label (sentiment)
2022-2024 In Color DSP (in Orchid Oasis): 2 1/4″ x 6″ (envelope flap)
If you need any stamping supplies, I’d be very happy to be your Demonstrator. Just click on the Order Stampin’ Up! Online Now button on the right side of the screen to go directly to my online store or drop me an email if you have any questions. Happy Stamping!
Shop the Clearance Rack here. Earn FREE Stampin’ Up! Products – Join my Punkin Head Peppermint Rewards – My online customer thank you program!
Finn Fan Fix


The other day was Pizza Night – we love pizza night!
Finn loves pizza night.
The first pizza came back in the house a little more…done…than we usually like. But – it’s pizza!
The second pizza…well. It was the victim of a pizz-tastrophe.
It started to slide on the peel – and Wayne tried to save it but…nope.
It hit the ground. And – like every piece of buttered toast or peanut butter bread – it hit top-down. 😔😔😔😔
Wayne snatched the crust up (well within the time-honored 5 second rule) but…the toppings were…🥹🥹🥹
We took the crust in – added just a little more cheese and the few remaining pepperonis and dried tomatoes and re-fired that booger. We figured at 800d it would probably kill off any lingering cooties.
In the meantime – Finn saw a need.

Cheese and pizza sauce juice brings pests and he wasn’t having any part of it!
He was diligent – checking all the nooks. All the crannies. JIC.

I’m the man for the job, Mom – just leave it to me!

Silver lining? We determined that sourdough pizza crust DESERVES to be lightly sauced – lightly cheese’d – and VERY minimally topped. The nearly naked crust was DELICIOUS!! We have a new way to love our pizza!!
TTFN
M