Happy Tuesday, y’all! Hope your week is going well!!
So – I was really surprised and honored to be asked to be a Guest Designer for the month of October for the Stamp Ink Paper Challenge Blog! We’ve got a Card Maker’s Choice challenge this week and I used the Stampin’ Up! Ready for Christmas stamp set and matching Christmas Staircase Thinlits to create my card share. Take a look-see:

Here’s the challenge badge for the Stamp Ink Paper 119. Stop by the challenge blog to see what the other Design Team members have created and to play along too!

I also played along over at the Tic-Tac-Toe Challenge. I went across the top row, and used “Sparkle” for the Open Space!

I started with a piece of Cherry Cobbler card stock for the card front. The design – that I think looks like old-fashioned wallpaper! – was made with some Embossing Paste, Dazzling Diamonds Stampin’ Glitter and the Party Pattern Decorative Masks. I laid the stencil over the card stock and secured it with some sticky notes. Hint: do this on some sort of craft sheet. Or prepare to throw out whatever surface you do this on! 🙂
I scooped out a small blob of Embossing Paste onto a craft sheet and, using the Palette Knives, mixed in some Dazzling Diamonds Stampin’ Glitter. How much Glitter? I don’t know! Just did it until it was sparkly enough to suit me! Then I smeared it onto the card front with the Palette Knife. I pulled off the mask and set the card front aside to dry.

Next up, I cut the staircase from the Christmas Staircase Thinlits from a piece of Wood Textures DSP. Once the Embossing Paste was good and dry, I adhered the stairs to the card front with Liquid Glue. Using the pine garland image in Ready for Christmas, I stamped it in Garden Green on Garden Green card stock and cut it with its matching die. Then I adhered that onto the staircase.
I cut a couple of pine sprigs in Garden Green and a couple of bows in Cherry Cobbler and adhered them on the top rail with Liquid Glue.

To make the tree, I stamped the tree image in Garden Green onto Garden Green card stock and cut it with the matching die from Christmas Staircase. Then I cut 9 Garden Green boughs. Using my Fine-Tip Glue Pen, I swiped glue onto each bough and then sprinkled them with Dazzling Diamonds Stampin’ Glitter. When they’d dried, I adhered them with Liquid Glue to my Christmas tree shape – starting at the bottom of the tree.
I pulled apart a length of Jute Twine to make three thinner strands. One of those strands I wrapped around the tree – just like I would do with garland on a real tree – and secured the ends in the back with scotch tape. I did the same with some 1/4″ Copper Trim that I pulled apart slightly to make a wider ribbon.

I cut a few Copper Foil bows with the die from the Christmas Staircase Thinlits, and adhered them with Liquid Glue.
For the sentiment, I individually inked the words “Merry” and “Christmas”, from the phrase in the Ready for Christmas set, in Cherry Cobbler and stamped them on Whisper White. Then I snipped them out – edged them with my Garden Green Stampin’ Write Marker and adhered them with Liquid Glue.
The tree topper is a Copper Foil star, two pinecones – heat embossed in Copper Stampin’ Emboss Powder on Gold Foil, and a bow tied with a piece of the Jute Twine that I’d pulled apart. I Fast Fuse’d the whole thing to a Garden Green mat and that was it for the card front.

On the inside, I used the pine sprig die from the Christmas Staircase Thinlits and cut five of them up the side of a Whisper White panel.

I Fast Fuse’d the panel onto a Garden Green mat and into my Whisper White card base, popped the card front on with Stampin’ Dimensionals and the card was done!
For my Whisper White Medium Envelope, I used the negative cut outs from making the pine sprigs for the front of the card and sponged the front with them in Garden Green…

…and then I used the Pattern Party mask again to sponge the envelope flap with Cherry Cobbler ink.

Et Voila! Not near as difficult as the length of the description might lead you to believe – promise! I love the sparkle that the Dazzling Diamonds gave to the Embossing Paste – and I think the little scene made from the Ready for Christmas bundle looks like an old-fashioned Christmas setting, don’t you? Hope you like!
TTFN
Mary
HOST CODE FOR 28 SEPTEMBER – 15 OCTOBER: KZGTEBYK
Use this host code when you order and receive a free gift from me! But, if your order is over $150, please don’t use this code (you’ll miss out on your own Stampin’ Rewards if you use it) but you’ll still get the free gift. The free gift is your choice of any item valued up to $10.00 from the 2017-2018 Annual Catalog! And – you can even select one of the Host-exclusive sets! See my Rewards page for more details.
Free Shipping and Double Peppermint Points this week only!!


Deal #1: Free Shipping on orders over $50!
For all orders of $50 or greater (before taxes and shipping) placed through me from now through Sunday, 8 Oct, I’m offering free shipping. Here’s how you can order and receive your free shipping rebate:
- Place your order directly through my online store, and provide me with your PayPal account e-mail and I’ll send you your rebate via PayPal
- Send me your order via email, I’ll deduct the shipping costs and send you an invoice through PayPal.
I’m not doing checks this time around – since I’m not at home. If you just can’t do PayPal – give me a holler. We’ll see what we can work out!
Deal #2: Double Peppermints on orders over $50!
Peppermints are the reward “currency” in my Customer Rewards program (the Punkin’ Heads!). You gather up peppermints when you order thru me – usually you get one peppermint for every $25 in product (before shipping and tax) that you buy. Remember, when you collect 16 peppermints, you’ll get a free $40 gift from me! So – with this Double Peppermint special, you’ll earn four Peppermints for each $50 that you order!🙂
Remember – these are good for just one week!
When you place your order online, don’t forget to add the host code below (if your order is under $150) to get your free gift! If your order is over $150, please don’t use this code (you’ll miss out on your own Stampin’ Rewards if you use it) but you’ll still get the free gift. 🙂 Now – it turns out I’m not the only one offering some free goodies this month! Stampin’ Up! is, too! Read on!!
World Card Making Day Special Promotion!!
1 – 10 October 17

We didn’t come up with World Card Making Day, but we’re thrilled that it’s a thing! It’s a day dedicated to doing what you love most—making handmade cards! It celebrates the creativity and personal connection handmade cards create between loved ones, and it’s a great time to make their own cards to send to your family and friends.
This year the world celebrates the day on October 7, but one day wasn’t enough for us. For ten days (October 1–10), we can get 15% off Notecards & Envelopes and select stamp sets. Also, when you buy Fast Fuse Adhesive, you’ll get two refills for FREE! So….let’s celebrate the best hobby of all—cardmaking!
Check Out All the Great Deals! Click to Open a Human-Readable Flyer!

Designer Series Paper Sale!
Starting Today and Running All Month Long!

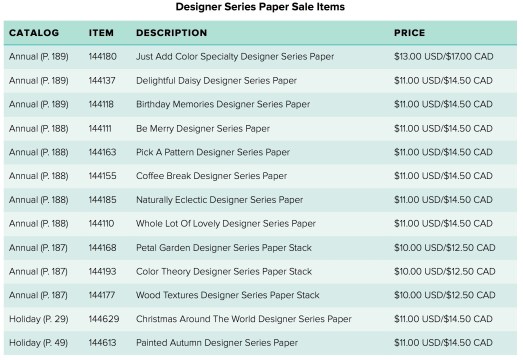
Let’s admit it: we all just love gorgeous Designer Series Paper! By popular demand, we are bringing back an incredible offer on Designer Series Paper. We’ll be able to buy three packages of select Designer Series Paper and get one FREE during October! This sale includes Designer Series Paper from both the annual and holiday catalogs. And we’re even including select Specialty and Designer Series Paper Stacks on sale!
So take advantage of this excellent opportunity and gather up lots of pretty paper! Take a look-see at what’ll be up for grabs!! Click the picture to open a handy – and colorful! – flyer!
PRODUCTS USED IN TODAY’S PROJECT:


CARD CUTS USED IN TODAY’S PROJECT:
Whisper White Card Stock: 4 1/4″ x 11″ (card front, scored and folded at 5 1/2″); 3 7/8″ x 5 1/8″ (inner liner)
Garden Green Card Stock: 4″ x 5 1/4″ (mats for card front and for inner liner); Christmas Staircase pine sprig die cuts and pine bough die cuts
Cherry Cobbler Card Stock: 3 7/8″ x 5 1/8″ (card front); Christmas Staircase bows
Copper and Gold Foil: Christmas Staircase bows and pine cones
If you need any stamping supplies, I’d be very happy to be your Demonstrator. Just click on the Order Stampin’ Up! Online Now button on the right side of the screen to go directly to my online store or drop me an email if you have any questions. Happy Stamping!
Shop the Clearance Rack here. Earn FREE Stampin’ Up! Products – Join my Punkin Head Peppermint Rewards – My online customer thank you program!
Finn-Fan Fix

TTFN
M


 #20 Demonstrator in Sales in the US 2023-2024
 #13 Demonstrator in Leadership in the US 2023-2024
 #21 Demonstrator in Team Building in the US 2023-2024


 KarensCardCorner
 Stamp with Amy K
 Stampin With Shirley G
 Tarabeth Stamps
 TL's Bright Spot