![]()
Good morning everyone! Welcome to the first Fun Folds Blog Hop for Stampin’ Up! Demonstrators for 2024! We’ve got a talented line-up and…I think you’re going to like what you see! This is a once-a-month hop and…all our cards will be fun folds!! How cool is that?!?
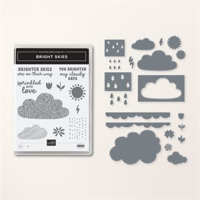
I recently saw a cool fun fold, from Canadian Demonstrator Rosemary Coleman, using the Bright Skies bundle and the FREE Sunny Days DSP (which is one of my fave DSPs of….ever!). It intrigued me so…I made my own! Take a look-see:

Now – the layout hails from this week’s MFT Weekly Sketch Challenge (when the card is closed all the way – you can see the sketch. Really!).

It all starts with a 4 1/4″ x 11″ piece of Basic White cardstock, scored at 2 3/4″ and 5 1/2″ on the long side. The 2 3/4″ fold is folded as a mountain and the second score line as a valley – creating a “z”.
The Z-fold mechanism starts with a 1 3/8″ x 11″ piece of Basic White cardstock and a 1 1/4″ x 11″ piece of the Sunny Days DSP. I used the Pool Party stiped design. This paper is one of the products that you can select for FREE with a $50 (before shipping & tax) during Sale-a-Bration and it is wonderful!

I adhered the DSP strip to the Basic White strip with Liquid Glue, aligning one long side of the DSP with one long side of the cardstock. Tip: that leaves a little white border at the top.
I scored the strip at 5 1/2″ and again at 8 1/4″. Then, using one of the border/edge dies from the Bright Skies die set, ran it thru the Stampin’ Cut and Emboss Machine twice to cut a scalloped edge.


With that done, I folded the 5 1/2″ score line as a mountain and the 8 1/4″ score as a valley.
I used Liquid Glue to adhere a flower-dy panel of the Sunny Days DSP to the middle panel of the card base.

I used the medium and large cloud dies in the Bright Skies set to cut a few cloud shapes from the Shaded Spruce Sunny Days flower-y paper. With my Paper Trimmer, I cut straight bottoms and some straight ends – and then used Liquid Glue to adhere them to the bottom of the front panel – and to the bottom of the large back panel.

I stamped the sentiment from Bright Skies in Poppy Parade on the front panel – just above the mound of flowers.

Then I used the stem/leaves image in the set to stamp some flower “bases” in Shaded Spruce on the large back panel.
I added some Crushed Curry and Poppy Parade flowers from the set.

At that point, I adhered the left end of the Z-mechanism to the top of the small front panel with Liquid Glue. Then I adhered the short other end to the end of the large back panel with Liquid Glue.

I used cloud dies from Bright Skies to cut out some clouds from the Sunny Days DSP and then adhered them to the Z-mechanism near the top (since that’s where clouds SHOULD be!) with Liquid Glue.

I stamped the sun in Crushed Curry and cut it out with the coordinating die in the set. I tucked it into the clouds with Liquid Glue.

For the back panel, I cut out two Basic White clouds and one from the sunny paper in the Sunny Days DSP – and used Liquid Glue to adhere them to the back panel.
I used two dies from Bright Skies to cut out a Shaded Spruce stem and a Crushed Curry flower. I adhered the stem onto the front panel with Liquid Glue and popped the flower on with a Stampin’ Dimensional.
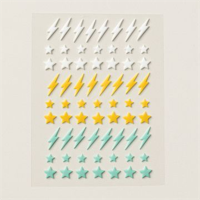
I added Rhinestone Basic Jewels to the center of all the Crushed Curry flowers, a few white Adhesive-backed Lightning & Stars embellishments to the large cloud on the front, and the card front was done!

On the back, I stamped the sentiment from Biggest Wish (yes. Yes, I DID use this great set AGAIN!) in Poppy Parade ink on a Basic White panel. I added some Bright Skies flowers across the bottom of the panel and a Crushed Curry sun in the corner!

I used Liquid Glue to adhere the panel to a Shaded Spruce mat and onto the back of the card base and the card was done!
My Basic White Medium Envelope got some Bright Skies flowers on the front…

…and a little more of the gorgeous Sunny Days DSP on the envelope flap.

Et Voila! Okay – this Z-fold fun fold card is seriously…FUN! I love the happy little “scene” I was able to put together thanks to the great Bright Skies stamp set – and the bundled DIES! They cut out clouds RIGHT from the Sunny Days DSP – which has become one of my fave DSPS – SO many fun designs in ONE free pack of paper!! Wow! And – obviously the Biggest Wish set is on my radar this week – as it deserves! It’s a great set – SO versatile and handy for all your projects!

I hope you like!
If you’d like to recreate this card, all the products and card cuts you’ll need are down below!
I’ve also created a printable PDF with written instructions and a list of the products used to create this project. You can download, print and/or save it by clicking this image:

Missed any tutorials? You can check out my past projects right here!
Now that you’ve seen my card, take a minute to hop thru all our projects today – you can just click on the names below to go direct to all the blogs!
Mary Deatherage – This is Me! 😎
Have fun on the hop!
TTFN
M

Connect with me! https://campsite.bio/stampsnlingers
HOST CODE FOR 16 JAN – 31 JAN: NV72DGEQ
Use this host code when you order $50 or greater and receive a free gift (AND the Monthly Card Tutorial) from me! If your order is over $150, please do not use this code, but you’ll still get the free gift. The free gift is your choice of any item valued up to $10.00 in any active Catalog! That includes some of the Host Exclusive stamp sets! See my Customer Rewards page for full details.
Note: Make sure that you can see my name on the final checkout page listed as your Demonstrator when you order so that you know that you’re ordering with me and you’ll get my rewards!
You’ll also be getting a link to my ZOOM The Craftroom (an exclusive TWICE-A-WEEK online event for my customers) and the monthly Online Tutorial. The January Tutorial features the beautiful Stippled Roses Bundle!


INTERESTED IN JOINING US??
If you’d like to join my team, I’d love to have you! You can become a demonstrator for just $99! We welcome all types of Demonstrators from those only purchasing to get the discount for themselves to those who want to run a business and those anywhere in between! Look at those faces – you KNOW we have a lot of fun! 🙂

When you purchase the Starter Kit for $99 + taxes (if applicable), the kit ships for FREE and you get to pick $125 in Stampin’ Up! merchandise.
BUT wait! Sale-A-Bration has started and – we’ve got one HECKUVA good Joining Special from now thru 29 Feb (it’s Leap Year – so we get one extra day!)

You’ve got TWO great Options!
Option 1: Pay $99+tax for your Starter Kit – Get FREE SHIPPING on the kit – Select $125 in Stampin’ Up! product of your choice. THEN – pick the brand NEW Glass Mat Studio! You’ll get the 14″ x 17″ Glass Mat; the Waterproof, slip-free, heat resistant Silicone Mat – with its 4 palette squares for custom-color mixing or holding Stampin’ Spots; and a durable, re-usable, lint-free cleaning cloth!!

Don’t want a Glass Mat? Well – then…there’s…
Option 2: Pay $99+tax for your Starter Kit – Get FREE SHIPPING on the kit – Select $125 in Stampin’ Up! product of your choice. THEN pick $30 MORE free Stampin’ Up! product of your choice!

TWO great Options – one HUGE end result! You’ll be a Stampin’ Up! Demonstrator – with ALL the cool perks and bennies that go along with that!
Head over to my Join My Team page here to see all those benefits of being a Demonstrator! I’d love to have you on my team and help you get all the discounts, and early goodies, and…ALL THE THINGS! 🙂
If you have any questions about joining, please drop me a note at stamps-n-lingers@comcast.net, I’d love to chat with you!
You can also see additional information on my Stampin’ Up! site here!

Click here to purchase your Starter Kit and Get Started!
Get the Stampin’ Up! Products Used in this Project:


Card Cuts Used in This Project:
Basic White Cardstock: 4 1/4″ x 11″ (card base – scored and folded at 2 3/4″ and 5 1/2″); 1 3/8″ x 11″ (z-fold mechanism – scored and folded at 5 1/2″ and 8 1/4″); 4″ x 5 1/4″ (back of card); Bright Skies die cut clouds (x2); Stamped and die cut Bright Skies sun
Shaded Spruce Cardstock: 4 1/8″ x 5 3/8″ (mat for back of card); Bright Skies Die cut stem
Crushed Curry Cardstock: Bright Skies die cut flower
Sunny Days DSP: 1 1/4″ x 11″ (z-fold mechanism – scored and folded at 5 1/2″ and 8 1/4″); 2 5/8″ x 4 1/8″ (center panel); Die cut clouds in sky (x4); Die cut clouds as flower mounds (x3); Die cut cloud on back panel; 2 1/4″ x 6″ (envelope flap)
If you need any stamping supplies, I’d be very happy to be your Demonstrator. Just click on the Order Stampin’ Up! Online Now button on the right side of the screen to go directly to my online store or drop me an email if you have any questions. Happy Stamping!
Shop the Clearance Rack here. Earn FREE Stampin’ Up! Products – Join my Punkin Head Peppermint Rewards – My online customer thank you program!
Finn Fan Fix 
No FFF’s on Blog Hop Days!
TTFN
M


 #20 Demonstrator in Sales in the US 2023-2024
 #13 Demonstrator in Leadership in the US 2023-2024
 #21 Demonstrator in Team Building in the US 2023-2024


 KarensCardCorner
 Stamp with Amy K
 Stampin With Shirley G
 Tarabeth Stamps
 TL's Bright Spot
Such a fun card! The fancy fold design is perfect with the cute spring images! 🙂
Thank you, ma’am! 🙂
Mary, this is such an awesome card!!! It would surely cheer up anyone who received it. Love it!
Thank you so much, Gerri! 🙂
Wow, I love Double Z Fold cards but what I love about yours is that the double is on the top! This card is so sweet and cheery. I don’t have any of these products yet, but hoping I can order again next month. (I have a sick kitty that took my craft money this month) Thanks for joining the hop this month!
Thank you so much, Debbie! I am so sorry you have a sick kitty – but…sounds like our priorities are aligned. Hope he gets better SOON! 🙂
Mary, what a fun card. The colors and design are so bright and cheery, it makes me want Spring!
Thanks so much, Kathi – bring on Spring! 🙂
Such a cheery, happy card. It will brighten anyone’s day. May have to give it a try.😊💖
It’s a fun bundle – and I LOVE this paper! Thanks! 🙂
I love the way you used the z-fold piece at the top. I see the sketch in the closed card, and you really nailed it while thinking outside of the box. Fabulous card!
Thanks so much, Sue – appreciate you stopping by! 🙂
Mary, now you’ve done it! You’ve enticed and inspired me to put this bundle on my “A” list. Super cute and creative. Love it!!!!
Rae
It’s an ADORABLE suite, for sure! Thanks! 🙂