

Good CHILLY Sunday morning! Yep – the weathermen were right this time – and it’s been below freezing since about…7 pm on Friday evening! Yesterday morning – while still snuggled under the covers – I asked Siri what the outside temp was. He replied…17 degrees. Just cuz…why not – I asked about the wind shill.
5 degrees.
Nope. Turn over time!
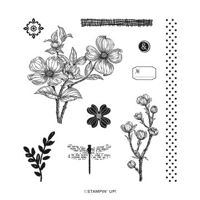
My card today – which I made last night on YouTube, if you’d like to check it out – is a bit of wishful thinking for Spring! It showcases the gorgeous Detailed Dogwood stamp set (which is FREE right now during Sale-a-Bration!) and the Biggest Wish set from the current Annual Catalog. Take a look-see:

The layout was inspired by the Global Design Project CASE the Designer challenge this week.


And the color palette – which I LOVE! – is from the Cupcake Inspirations challenge.

I started by cutting out the third-from-largest Deckled Rectangles die from the center of a 3 7/8″ x 5 1/8″ piece of cardstock (the color doesn’t matter – it’s just a mask!).
I secured a Basic White panel to my work surface with sticky notes and then secured the mask over top.

Using a Blending Brush, I added Daffodil Delight ink to card front. I left it a little blotchy – which adds some texture!
Then, using the small flower and the leaves image from the Detailed Dogwood stamp set, I added those images all over in stamped-off-once Daffodil Delight ink.

Y’all – the Detailed Dogwood stamp set is really gorgeous – and you can get it for FREE with a $100 qualifying purchase (before shipping & tax) while Sale-A-Bration 2024 is going on thru 29 Feb!

Next up, I used the little square fluer-de-do stamp (it’s the one in the top left corner in the picture above) and added it a few times in stamped-off-once Crushed Curry.
With that done, I removed the mask and stamped the big focal image from Detailed Dogwood in Smoky Slate ink.

Using a Blender Pen and my Smoky Slate ink pad, I lightly added ink to the shading marks on the image.
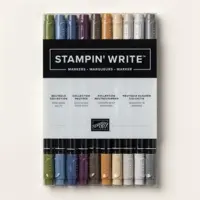
I added some doodles as a frame using the bullet-end of my Smoky Slate Stampin’ Write Marker.

I stamped the sentiment – from the Biggest Wish stamp set – in Basic Gray ink.
Then I added some Lemon Lolly Adhesive-backed Solid Gems, matted the panel on Basic Gray and the card front was done!
On the inside, I stamped the big Detailed Dogwood image in Basic Gray ink in the corner of a Basic White panel.

I used Liquid Glue to adhere the panel to a Basic Gray mat and into my Thick Basic White card base, popped the card front on with Stampin’ Dimensionals and the card was done!
My Basic White Medium Envelope got the Detailed Dogwood floral on the front in Basic Gray…

…and again on the envelope flap.

Et Voila! Super simple and clean and so so pretty! All thanks to the stunning – and FREE! – Detailed Dogwood stamp set (Dogwoods are one of my fave things – we have them all over here!) and a cool masking technique using the Deckled Rectangles dies. Since the stamp set doesn’t have any sentiments – you might want to pull out the Biggest Wish all-sentiment set to help out!

I hope you like!
If you’d like to recreate this project, all the products and card cuts you’ll need are down below! And – this is the card I made on my Saturday Evening YouTube live! If you’d like to see it – for the first time or again – here ’tis!

I’ve also created a printable PDF with written instructions and a list of the products used to create this card. You can download, print and/or save it by clicking this image:


Missed any tutorials? You can check out my past projects right here!
TTFN
M

Connect with me! https://campsite.bio/stampsnlingers
HOST CODE FOR 16 JAN – 31 JAN: NV72DGEQ
Use this host code when you order $50 or greater and receive a free gift (AND the Monthly Card Tutorial) from me! If your order is over $150, please do not use this code, but you’ll still get the free gift. The free gift is your choice of any item valued up to $10.00 in any active Catalog! That includes some of the Host Exclusive stamp sets! See my Customer Rewards page for full details.
Note: Make sure that you can see my name on the final checkout page listed as your Demonstrator when you order so that you know that you’re ordering with me and you’ll get my rewards!
You’ll also be getting a link to my ZOOM The Craftroom (an exclusive TWICE-A-WEEK online event for my customers) and the monthly Online Tutorial. The January Tutorial features the beautiful Stippled Roses Bundle!


It’s Sale-A-Bration Time!

We ALL look forward to Sale-A-Bration each year and this year is no exception! And – since it coincides with the release of the wonderful new January – April 2024 Mini Catalog, there’s no doubt at all that THIS is the time to SHOP, HOST and JOIN!
Get all the deets at my Stampin’ Up! Promotions page right here!
Get the Stampin’ Up! Products This Project:


Card Cuts Used in the This Project:
Thick Basic White Cardstock: 4 1/4″ x 11″ (card base, scored and folded at 5 1/2″)
Basic Gray Cardstock: 4″ x 5 1/4″ (x2 – mats for card front and for inner liner)
Basic White Cardstock: 3 7/8″ x 5 1/8″ (x2 – card front and inner liner)
If you need any stamping supplies, I’d be very happy to be your Demonstrator. Just click on the Order Stampin’ Up! Online Now button on the right side of the screen to go directly to my online store or drop me an email if you have any questions. Happy Stamping!
Shop the Clearance Rack here. Earn FREE Stampin’ Up! Products – Join my Punkin Head Peppermint Rewards – My online customer thank you program!
Finn Fan Fix 

Finn had some company on Friday.
Miss Sonya’s granddaughter came with and…Finn was in heaven!

He loves kids.

A smart dog can body-block a human even when they’re sitting all the way down!

This face says it all!

TTFN
M