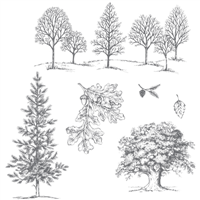
I seem to be on a woodsy-themed kick this week! It’s just that the Lovely as a Tree set is so nice to work with – especially the pine tree and the little pine cone bough, which appear to be my go-to sets. And the sentiments and flowers in Cottage Greetings complemented the Lovely as a Tree perfectly on this card.
My friend’s birthday is next week. I’ve known her since we were both riding staff counselors at Girl Scout camp sometime back in the Dark Ages. We were in college in CO and spent two summers working in the mountains with horses and kids. We had more fun than I can possibly tell you. And we became the very closest of friends. We don’t get to see each other a lot these days, nor do we talk on the phone much. But, when we have a chance to be in the same spot – it’s like we were never apart. Do you folks have friends like that? The friends that just….are. No work or effort required. Being friends is just as easy as breathing? I surely hope that you do!
So, anyway – she’s a Colorado mountain girl, and I wanted to make a card that honored her love of the Rockies. My head-picture was of a mountain meadow at twilight – just like the one where our camp horses were pastured at night…..take a look-see:

If that doesn’t say mountain pasture at twilight (okay, it really doesn’t, does it?!?) hang on and wait until you see the inside. I think I hit it there!
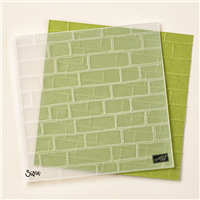
My card front started with a piece of Very Vanilla card stock that I ran through the Big Shot in the brand new Brick Wall TIEF. I lightly sponged Sahara Sand all over the wall to bring out the brick pattern. Then I sponged around the top and half way down the side edges with Night of Navy and the bottom with Mossy Meadow. I stamped randomly over the wall with the teensy pine cone bough from Lovely as a Tree, in Mossy Meadow ink. I SNAILd that to a Mossy Meadow Mat and then SNAILd the whole thing to my Night of Navy card base..

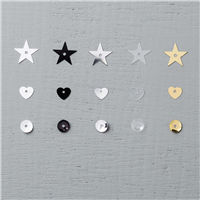
The sentiment oval is cut with the 5th-from-the-center die in the Ovals Collection Framelits. I stamped the sentiment from the Cottage Greetings set, in Night of Navy. Then, using my handy-dandy sticky notes, I masked off the sentiment and stamped a couple of the Lovely as a Tree pines over the top of it. To finish the art piece, I took my sponge that I’d used for the Night of Navy on the brick wall – now almost dry – and burnished the oval everywhere except over the sentiment itself. I SNAILd the oval to a Night of Navy oval (6th-from-the-center) and then adhered it to the card front with Dimensionals. A couple of stars from the Metallics Sequin Assortment and a tiny pearl finished the front.
Then I went to work on the inside – and that’s where the mountain meadow at twilight came to life!
I started by making a tunnel card. I cut an 8 1/2″ x 11″ piece of vanilla card stock (not SU! – much lighter weight) in half lengthwise. Then, I used the Brick Wall TIEF again, embossing both ends of the “tunnel” piece. My Tutorials page shows good pictures of how to make this work and gives detailed instructions for making the “tunnel” insert. This is how the piece looked after I finished embossing it and scoring my tunnel fold lines:

Then I cut the center oval out (using the 5th-from-the-center oval – and this cutout was what I used for the front sentiment!) and began to decorate the tunnel. First off, I sponged my wall in the Sahara Sand again. Then, I used the Lovely as a Tree pine, in Mossy Meadow, and flowers scattered about from the Cottage Greetings set – all in Mossy Meadow. I colored the flowers with my Stampin’ Write Markers in Rose Red, Tempting Turquoise and Daffodil Delight.

As you can see, I clustered them near to the oval “window”. And, I decided to add some Mossy Meadow sponging around the bottom corners of the wall – to age it and make it feel more organic.
That got the tunnel piece done, so I moved to the sentiment liner. Now, if you go to the Tutorials page, you’ll see that this piece could easily be your actual card base, but because the card stock I used was so lightweight, I decided to make a complete “insert” and then glue the entire thing into my Night of Navy card base that I’ve already shown you. Otherwise, it was going to be too flimsy and, frankly, kind of “see thru”! For the sentiment portion, I started by doing some sponging with Mossy Meadow and Night of Navy. This is where I was laying the foundation for the “twilight” portion of the card. I just sponged until I was happy with it!

I laid my window piece over the top of the sentiment piece, just to I could be sure I was keeping everything within the window, then I stamped the Cottage Greetings sentiment in Night of Navy. I added some more trees and flowers in Mossy Meadow, again from Cottage Greetings and also some Summer Silhouettes images, colored in the same way as on the wall. To finish, I adhered some Metallic Assortment sequin stars, with Multi-Purpose Liquid Glue, around in the sky (cause that’s what happens at twilight – the stars come out!).

Finally, I glued the window piece to the sentiment piece, as shown in the Tutorial. And then it was ready to stick into the card base, which I did with SNAIL.

I embellished a Very Vanilla Medium Envelope with some more Lovely as a Tree pine boughs, and that completed the ensemble!

It’s winging it’s way to Colorado now, so I hope that it makes it for her birthday on Friday. And that she likes it as much as I liked making it. I have to say, these kinds of cards – woodsy and organic – really speak to me! Hope they do for you as well!
TTFN
Mary
WEEKLY DEALS FOR 14 Jul – 20 Jul 15!! Click here to see the Weekly Deals from Stampin’ Up! in my online store. The Weekly Deals are only while supplies last and only available at these great prices through 20 Jul!


Built for Free Using: My Stampin Blog

STAMPIN’ UP PRODUCTS USED IN TODAY’S PROJECT:


Built for Free Using: My Stampin Blog
Card Cuts Used in Today’s Project:
Night of Navy Card Stock: 5 1/2″ x 8 1/2″ (card base – scored and folded at 4 1/4″); oval mat
Vanilla Card Stock: 5 1/2″ x 8 1/2 (2 – for the tunnel insert); 3 7/8″ x 5″ (card front – Brick Wall TIEF); art oval
Mossy Meadow Card Stock: 4 1/8″ x 5 3/8″ (front mat)
Shop the Clearance Rack here.
Earn FREE Stampin’ Up! Products – Join my Punkin Head Peppermint Rewards – My online customer thank you program!
BACKORDER LIST AS OF 16 Jul 15
20 July
138443: Cherry on Top Designer Series Paper
21 July
138376: All Boxed Up Kit
22 July
138295: Tree Builder Punch (second shipment)
138378: Tin of Cards Project Kit (second shipment)
27 July
138395: Expressions Natural Elements
138422: Tip Top Taupe 1″ Dotted Lace Trim
138425: Watermelon Wonder 1″ Dotted Lace Trim
31 July
135862: Gift Bag Punch Board
138401: Gold Metallic Thread
138402: Silver Metallic Thread
1 August
138288: Brick Wall Textured Impressions Embossing Folder (second shipment)
7 August
138377: Cottage Greetings Card Kit (third shipment)
10 August
113475: Big Shot Standard Cutting Pads (second shipment)
15 August
138286: Boho Chic Textured Impressions Embossing Folder (second shipment)


 #20 Demonstrator in Sales in the US 2023-2024
 #13 Demonstrator in Leadership in the US 2023-2024
 #21 Demonstrator in Team Building in the US 2023-2024


 KarensCardCorner
 Stamp with Amy K
 Stampin With Shirley G
 Tarabeth Stamps
 TL's Bright Spot
Wow!!! This is stunning Mary! The inside is fantastic, love the colors and the stamping. Perfect!!
Thanks! 😊
Mary, this is awesome! Thanks for sharing your techniques!
You’re very welcome, Kathy! Thanks! 😊