![]()
Good morning everyone! Welcome to this month’s Fun Fold Blog Hop for Stampin’ Up! Demonstrators! We’ve got a talented line-up and…I think you’re going to like what you see! This is a once-a-month hop and…all our cards will be fun folds!! How cool is that?!?
I wanted to showcase another new, coming soon!, goody for you today and I used one of my fave go-to fun folds to do it! This faux side-step gives a great focal area for the paper-pieced floral and sentiment from the new Fragrant Layers bundle – atop a bit of Lovely Blossoms DSP – both coming on 6 January as new Online Exclusives. Take a look-see:

I started with a 5 1/2″ x 8″ piece of Secret Sea cardstock that, using my Paper Trimmer, I scored along the long side at 3″, 6″ and 7″. I folded the scored lines as a mountain (3″), valley (6″) and mountain (7″). This is the main card base.

I cut a 2 7/8″ x 5 3/8″ piece of striped Lovely Blossoms DSP and adhered it to the front of the main card base with Liquid Glue. I also cut a 7/8″ x 5 3/8″ piece and adhered it to the narrow front panel with Liquid Glue.
Then I scored a 3″ x 6″ piece of Secret Sea cardstock at 4 1/4″ – and folded it as a mountain. That’s the side-step panel.

I adhered a 2 7/8″ x 4 1/8″ piece of Lovely Blossoms DSP to the larger side of the side step panel.
To make the paper pieced floral from the Fragrant Layers die set, I cut the rectangle die from the center of a 2 5/8″ x 3 5/8″ piece of Cloud Cover cardstock. I poked out all the pieces and KEPT THEM in a little dish.

Using Liquid Glue, I adhered the whole die cut to the DSP-side of the side step panel.
I used the same die again to cut out the floral from a piece of Azure Afternoon cardstock, a piece of Pretty in Pink cardstock and a piece of Soft Sea Foam cardstock. I kept ALL THE NEGATIVE pieces – in little bowls. Or – in a little stack on your desk. Whatever works for you – just KEEP THEM!

Using little dabs of Liquid Glue – I adhered the negative pieces back into the Cloud Cover die cut – large flowers in Azure Afternoon, small flowers in Pretty in Pink and the leaves in Soft Sea Foam.
Then I used the Cloud Cover negative pieces to “fill in” around the flowers and leaves!

I used Liquid Glue on the bottom 1″ of the side-step panel and adhered it to the narrow bottom strip – aligning the bottoms.

Then I closed the card base and used more Liquid Glue to adhere the smaller portion of the panel to the back of the main card base – thus creating the side-step panel.

I used the dies in the set to cut out a bunch of Basic White little flowers and…one of each of the leaves dies in Soft Sea Foam.
On a piece of Basic White cardstock, I stamped the Fragrant Layers sentiment in Azure Afternoon ink and cut it out with the large label die in the set. I cut the label again from a piece of Pretty in Pink cardstock – all I needed there was the frame.

I used Liquid Glue to adhere the sentiment and the frame to a 5/8″ x 3 3/8″ piece of Basic White cardstock – and trimmed up the ends with scissors.
I adhered the three-leaf leaf die cut to the side-step panel with Liquid Glue. Then I tied a bow from two lengths of white Baker’s Twine from the Black & White & Gold Baker’s Twine and adhered it with a little Liquid Glue.
I popped the sentiment over the bow with double-stacked Stampin’ Dimensionals – only on the LEFT end of the sentiment.

I adhered the remaining die cut leaves – and two of the little white flowers to the sentiment with Liquid Glue and popped two more white flowers onto the large flower centers with pieces of Stampin’ Dimensional.
I added gems from the Strawberry Slush & Pretty in Pink Gems – and the card front was done!
For the back, I stamped the large floral from Fragrant Layers in Tuxedo Black Memento Ink in the corner of a 2 7/8″ x 5 3/8″ piece of Basic White cardstock. I stamped the flower fill image in Azure Afternoon and the little leaves fill images in Soft Sea Foam ink.

I used Liquid Glue to adhere the panel to the back of the card base – and the card was done!
My Basic White Medium Envelope got the Fragrant Layers image on the front…

…and more of the Lovely Blossoms DSP on the envelope flap.

Et Voila! I do love faux side-step cards – the card itself is so stinkin’ easy that you can spend all your creative brain-waves on decorating! And – in this case, your time making a beautiful, paper-pieced floral image from the die cuts in the Fragrant Layers die set! Add a sentiment – from the set – and…there you go! A little bump from pretty paper – like the Lovely Blossoms DSP – is all you need!

I hope you like!
If you’d like to recreate this project, all the products and card cuts you’ll need are down below!
I’ve also created a printable PDF with written instructions and a list of the products used to create this project. You can download, print and/or save it by clicking this image:

Missed any tutorials? You can check out my past projects right here!
Now that you’ve seen my card, take a minute to hop thru all our projects today – you can just click on the names below to go direct to all the blogs!
Mary Deatherage – This is Me! 😎
Have fun on the hop!
TTFN
M

Connect with me! https://campsite.bio/stampsnlingers
No Host Code Needed!
Earn 10% of your retail amount on all orders of $20 or greater! And you’ll be earning Punkin’ Head Peppermints – one peppermint for each $25 you spend thru my Online Store! When you gather up 16 Peppermint Points – you’ll be able to select a $40 gift right from me!
You’ll also be getting a link to my ZOOM The Craftroom (an exclusive TWICE-A-WEEK online event for my customers) and the monthly Online Tutorial – featuring the Pop-Up Petals Bundle for December orders.
See my Customer Rewards page for full details.


STAMP-N-STORAGE AFTER CHRISTMAS SALE GOING ON NOW!

- Sale Dates: December 25th – January 2nd
- Promotion: 20% OFF storewide
- FREE SHIPPING* on orders of $150+ within the 48 domestic U.S. *Free Shipping excludes the Craft Island, Stamp Case Tower, Desk Storage Tower, and Die Cutting & Embossing Station.
Happy shopping – organizing – and SAVING!

If you’d like more info about the SNS products I use in my craftroom – check that out right here!
Happy Storaging and Saving!

Get the Stampin’ Up! Products Used in this Project: You’ll also need the Fragrant Layers Bundle and Lovely Blossoms DSP when they’re available


Card Cuts Used in This Project:
Secret Sea Cardstock: 5 1/2″ x 8″ (card base, scored and folded at 3″, 6″ and 7″); 3″ x 6″ (side-step panel, scored and folded at 4 1/4″)
Cloud Cover Cardstock: 2 5/8″ x 3 5/8″ (Fragrant Layers die cut on front)
Azure Afternoon Cardstock: Fragrant Layers die cut flower petal pieces
Pretty in Pink Cardstock: Fragrant Layers die cut floral pieces; Fragrant Layers die cut label frame
Soft Sea Foam Cardstock: Fragrant Layers die cut leaf pieces; Fragrant Layers die cut leaves
Basic White Cardstock: Fragrant Layers die cut label (sentiment); 5/8″ x 3 3/8″ (behind sentiment); Fragrant Layers die cut small flowers on front; 2 7/8″ x 5 3/8″ (back of main card base)
Lovely Blossoms DSP: 4 1/8″ x 2 7/8″ (on front of side step); 2 7/8″ x 5 3/8″ (on front of main card base); 7/8″ x 5 3/8″ (on narrow front panel of main card base); 2 1/4″ x 6″ (envelope flap)
If you need any stamping supplies, I’d be very happy to be your Demonstrator. Just click on the Order Stampin’ Up! Online Now button on the right side of the screen to go directly to my online store or drop me an email if you have any questions. Happy Stamping!
Shop the Clearance Rack here. Earn FREE Stampin’ Up! Products – Join my Punkin Head Peppermint Rewards – My online customer thank you program!
Finn Fan Fix

No FFF on Blog Hop Days!
TTFN
M


 #20 Demonstrator in Sales in the US 2023-2024
 #13 Demonstrator in Leadership in the US 2023-2024
 #21 Demonstrator in Team Building in the US 2023-2024


 KarensCardCorner
 Stamp with Amy K
 Stampin With Shirley G
 Tarabeth Stamps
 TL's Bright Spot
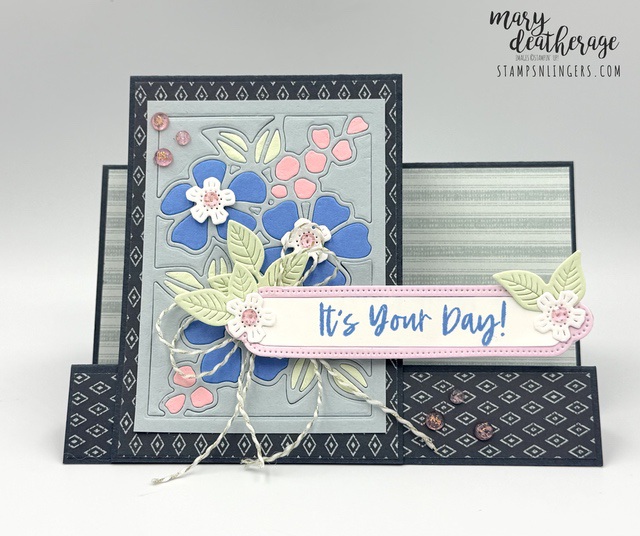
Oh my goodness, what a pretty card! Love the inlaid floral die cuts, perfect! 🙂
Thank you – this bundle is just made for paper piecing! 🙂
Beautiful card! Well done!
Thanks so much! 🙂
Wow, Mary! Your floral die cuts are beautiful and showcased perfectly with that fold. Thank you for joining the blog hop this month. Happy New Year!
Thank you so much, Debbie! It’s one of my fave folds! Happy New Year to you, too, my friend! 🙂