

Good morning, y’all – did you remember to set your clocks back?! I ALMOST forgot but…one of my friends posted on FB (thanks, Karen!) and so…I remembered to do it before I went to bed! We’re now officially on go-to-work-in-the-dark-come-home-in-the-dark time. Bleh.
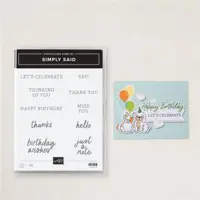
The Nests of Winter DSP is one GOOD thing about winter – and it’s what I used to make today’s cards! Yes – CARDS! I saw a set like these from Mary Knabe – and wanted to try them for myself! I did need thank you and birthday cards, so… I pulled out the ever-so-wonderful Simply Said Mix & Match stamp set for those. Take a look-see:

With one pack of the Nests of Winter DSP, you can make 16 of these cards. Plus – four MORE in a different design – that I’ll show you in a few days! 🙂
I started by placing one decorated edge of the DSP at the 5 1/8″ mark on my Paper Trimmer. I made that first cut and then rotated the remaining piece 180 degrees – to cut again at 5 1/8″.
I set the middle strip of DSP aside for another set of cards and then cut each of the two 5 1/8″ x 12″ pieces into 3″ wide strips.

I used Liquid Glue to adhere each of the 3″ x 5 1/8″ pieces of DSP on a 3 1/8″ x 5 1/4″ piece of Cherry Cobbler cardstock.

I folded the 5 1/2″ x 7 7/8″ Gray Granite card bases at 4 1/4″. Folding them so that the shorter portion become the front of the card, I then tore a narrow (like…about…1/8″?) strip off the short edge.

Using Liquid Glue, I adhered a matted card front to the front of each of the card bases.

I picked the sentiments I wanted to use from the Simply Said Mix & Match stamp set and stamped them in Cherry Cobbler ink on pieces of Basic White and then cut them out.

For the “hello” sentiment I cut them with a Stylish Shapes banner die and I used the second-from-largest Stylish Shapes circle die for the “Birthday Wishes” sentiment.

I tied simple bows from Linen Thread and used a dab of Liquid Glue to adhere them to the card fronts. Note: as you look at the cards, you can see that I used the same sentiment shapes – but moved the sentiment around on the card fronts! 🙂 Adhere the bow so that it will sit just under the sentiment. 🙂

I adhered the sentiments over the bows with Stampin’ Dimensionals.

Each card got some new Drusy Adhesive-backed Embellishments (I LOVE them!) in either clear or champagne and the card fronts were done!
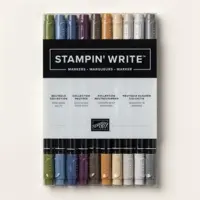
I did all the insides, the same – stamping the pussywillow image from Nests of Winter a couple of times in Gray Granite on a Basic White panel. I colored the images with the Light Petal Pink Stampin’ Blend (for the pussywillows) and the stems with the Gray Granite Stampin’ Write Marker.

I adhered the panels to the inside of the cards with Liquid Glue and the cards were done.
I added the pussywillows to the front of each of my envelopes – and added Nests of Winter DSP on the envelope flaps and the set was complete!

Et Voila! See how gorgeous that one design is in the Nests of Winter DSP!? Sixteen cards – just two sheets of the paper. And you’ll still have 10 sheets left over for even more projects! Y’all – if you don’t have the Simply Said Mix & Match stamp set…please PLEASE get it right away! So simple and yet…SO handy to have on hand! It’ll be your sentiment go-to, I promise! 🙂

I hope you like! 🙂
If you’d like to recreate these cards, all the products and card cuts you’ll need are down below! And – this is the card I made on yesterday’s Saturday Nite Live YouTube video. If you’d like to see it – for the first time or again – here ’tis!

I also created a printable PDF with written instructions and a list of the products used to create this project. You can download, print and/or save it by clicking this image:


Missed any tutorials? You can check out my past projects right here!
TTFN
M

Connect with me! https://campsite.bio/stampsnlingers

HOST CODE FOR 1 NOV – 15 NOV: 6KYVPF24
Use this host code when you order $50 or greater and receive a free gift (AND the Monthly Card Tutorial) from me! If your order is over $150, please do not use this code, but you’ll still get the free gift. The free gift is your choice of any item valued up to $10.00 in any active Catalog! That includes some of the Host Exclusive stamp sets! See my Customer Rewards page for full details.
Note: Make sure that you can see my name on the final checkout page listed as your Demonstrator when you order so that you know that you’re ordering with me and you’ll get my rewards!
You’ll also be getting a link to my ZOOM The Craftroom (an exclusive TWICE-A-WEEK online event for my customers) and the monthly Online Tutorial – featuring the Peaceful Season Bundle for November orders.


Get the Stampin’ Up! Products Used in this Project:


Card Cuts Used in This Project (for each card):
Gray Granite Cardstock: 5 1/2″ x 7 7/8″ (card base, scored and folded at 4 1/4″)
Cherry Cobbler Cardstock: 3 1/8″ x 5 1/4″ (mat for DSP panel on front)
Basic White Cardstock: Stylish Shapes banner or second-from-largest circle die (sentiment); 4″ x 5 1/4″ (inner liner)
Nests of Winter DSP: 3″ x 5 1/8″ (front DSP panel); 2 1/4″ x 6″ (envelope flap)
PIf you need any stamping supplies, I’d be very happy to be your Demonstrator. Just click on the Order Stampin’ Up! Online Now button on the right side of the screen to go directly to my online store or drop me an email if you have any questions. Happy Stamping!
Shop the Clearance Rack here. Earn FREE Stampin’ Up! Products – Join my Punkin Head Peppermint Rewards – My online customer thank you program!
Finn Fan Fix 

He was looking so handsome and distinguished in his bed – I just had to take his picture.
He WANTED to scratch his ear but I said…Finny – let me take your picture first.

So he did.
He understands the assignment.
TTFN
M