Good morning on half-way-thru-the-weekend day!! Are you getting back in the swing of the work schedule – where Sunday means…getting ready to go back to work on Monday? It’s always hard getting past the modified work hours and days of the holidays, isn’t it? Yes – even for us retirees!
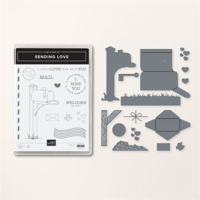
My card today feautres another totes-adorbs new bundle – called Sending Love. It’s very cute AND sports a wonderful die cut mailbox (WITH flag!) and a little envelope and…well, a lot of other fun little details. I combined it with some FREE new paper – the Most Adored Specialty DSP – to make a fun welcome card. Take a look-see:

The layout for this one was inspired by this week’s Global Design Project sketch challenge.

And I also pulled some elements from the Inspo List at the Festive Friday challenge. Like…Gold, Red, Enamel Dots, Layers, and Envelopes!

I started by adhering a piece of pretty plaid paper from the Most Adored Specialty DSP to the front of a Flirty Flamingo card base using Liquid Glue.
Y’all – like all the papers in the Sale-A-Bration flyer (there are FIVE beautiful packs!) – this is the SAME extact quality paper as the packs in the catalogs.

But – you can get it for FREE with a $50+ purchase (before shipping & tax) thru the end of Sale-A-Bration! And – this week – you’re going to get Double Peppermints from me, too! Whoo-hoo!
Using a Blending Brush, I colored a smaller Basic White panel all over with Balmy Blue ink to make “sky”.

In the corner – I stamped the Sending Love sentiment in Garden Green, matted the panel on Granny Apple Green cardstock and adhered it to the card front with Stampin’ Dimensionals.
I cut out several pieces using the Sending Love die set:
– A Basic Black mailbox, which I then folded on the score lines that the die adds as it cuts! – and used Liquid Glue to adhere it into a 3-D mailbox.
– An envelope from a gold-foil-heart-strewn piece of Most Adored Specialty DSP – which I folded and secured with a little Liquid Glue.
– A Real Red flag.
– Four Real Red and four Flirty Flamingo hearts.
– A Real Red ribbon/bow.
– Some Garden Green grass (this is the “mounded” grass die cut).
– A Granny Apple Green grass from a narrow strip of cardstock.
– An Early Espresso post.
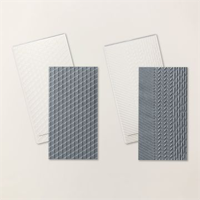
I embossed the folded mailbox in one of the folders from the Geometric Patterns Embossing Folder. That added the metallic “corrugations”.

Using Liquid Glue, I adhered the Garden Green grass near the bottom of the panel, then added the Granny Apple Green grass – aligning the edges with the edges of the Granny Apple Green mat.
Then I adhered the post – tucking it “into” the grass – with Liquid Glue.

I adhered a small Flirty Flamingo die cut heart to the flag with Liquid Glue and then adhered the flag to the mail box with more Liquid Glue. A single Brushed Metallic Adhesive-backed Dot looks like “hardware”!
Using Liquid Glue, I adhered the mailbox to the card front. I adhered the die cut bow to the envelope with Liquid Glue then tucked it into the mailbox with a couple of Black Stampin’ Dimensionals to secure it. Then I added a double-stack of Black Stampin’ Dimensionals under the mailbox flap to hold it up.

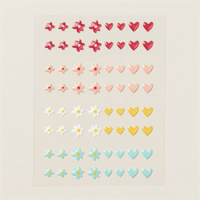
I adhered more of the die cut hearts with Liquid Glue and some Adhesive-backed Hearts and Flowers at the base of the post and the card front was done!
On the inside, I stamped the cancellation image from Sending Love in the corner of a Basic White panel in stamped-off-once Flirty Flamingo. Over the top, I stamped the smallest circle image in Garden Green ink.

I used Liquid Glue to adhere the panel to a Granny Apple Green mat and into the Flirty Flamingo card base and the card was done!
My Basic White Medium Envelope got the postmark and cancellation from Sending Love on the front…

…and more plaid Most Adored Specialty DSP on the envelope flap.

Et Voila! Plaid – cute envelopes – “real” mailboxes! This card is just brimming with cuteness and fun! All thanks to the Sending Love bundle – available now! – and the Most Adored Specialty DSP – available now and for FREE!! Gotta love FREE!

If you’d like to recreate this project, all the products and card cuts you’ll need are down below! And – this is the card I made yesterday on my Saturday Nite Live YouTube video! If you’d like to see it – for the first time or again! – here ’tis!
I’ve also created a printable PDF with written instructions and a list of the products used to create this card. You can download, print and/or save it by clicking this image:

Missed any tutorials? You can check out my past projects right here!
And – not for nuthin’ – the Sending Love bundle is $54 – which AUTOMATICALLY qualifies you for a $50-level Sale-A-Bration goody (like…the Most Adored Specialty DSP, maybe?!) AND DOUBLE PEPPERMINTS from me thru the 11th! Winner Winner Chicken Dinner!
TTFN
M

Connect with me! https://campsite.bio/stampsnlingers
HOST CODE FOR 1 JAN – 15 JAN: KXY4ATJV
Use this host code when you order $50 or greater and receive a free gift (AND the Monthly Card Tutorial) from me! If your order is over $150, please do not use this code, but you’ll still get the free gift. The free gift is your choice of any item valued up to $10.00 in any active Catalog! That includes some of the Host Exclusive stamp sets! See my Customer Rewards page for full details.
Note: Make sure that you can see my name on the final checkout page listed as your Demonstrator when you order so that you know that you’re ordering with me and you’ll get my rewards!
You’ll also be getting a link to my ZOOM The Craftroom (an exclusive TWICE-A-WEEK online event for my customers) and the monthly Online Tutorial. The January Tutorial features the beautiful Stippled Roses Bundle!


Stamps-N-Lingers Ordering Special!

Here’s the deets!
1. All orders of $50 or greater (before shipping and taxes) placed through my online store between today (4 Jan 2024) and the end of the day on 11 Jan 2024 will earn DOUBLE PEPPERMINT REWARD POINTS!! And – you’ll be earning FREE Sale-A-Bration goodies, too! Can you say…Winner Winner Chicken-Fried-Steak Dinner?!? 😎
2. Don’t forget to add the Host Code below (KXY4ATJV) if your order is under $150 to get your free thank you gift (orders over $150 automatically get the free thank you gift!).
3. For more information about my Punkin Head Peppermint Reward points (my buyer reward program), click here.
Happy Shopping, Saving and Peppermint-Gathering!
Head on over to my Online Store to get started!
It’s Sale-A-Bration Time!

We ALL look forward to Sale-A-Bration each year and this is no exception! And – since it coincides with the release of the wonderful new January – April 2024 Mini Catalog, there’s no doubt at all that THIS is the time to SHOP, HOST and JOIN!
Get all the deets at my Stampin’ Up! Promotions page right here!
Get the Stampin’ Up! Products This Project:


Card Cuts Used in the This Project:
Flirty Flamingo Cardstock: 4 1/4″ x 11″ (card base, cored and folded at 5 1/2″); Sending Love die cut hearts,
Granny Apple Cardstock: 3 3/8″ x 4 1/2″ (mat for front panel); 4″ x 5 1/4″ (mat for inner liner); 5/8″ x 3 1/8″ (Sending Love die cut grass)
Early Espresso Cardstock: Sending Love die cut post
Basic Black Cardstock: Sending Love die cut mailbox
Real Red Cardstock: Sending Love die cut flag, hearts, bow on package
Garden Green Cardstock: Sending Love die cut grass
Basic White Cardstock: 3 1/4″ x 4 3/8″ (front panel); 3 7/8″ x 5 1/8″ (inner liner)
Most Adored Specialty DSP: 4 1/4″ x 5 1/2″ (card front panel); 2 1/4″ x 6″ (envelope flap)
If you need any stamping supplies, I’d be very happy to be your Demonstrator. Just click on the Order Stampin’ Up! Online Now button on the right side of the screen to go directly to my online store or drop me an email if you have any questions. Happy Stamping!
Shop the Clearance Rack here. Earn FREE Stampin’ Up! Products – Join my Punkin Head Peppermint Rewards – My online customer thank you program!
Finn Fan Fix 
I thought Finn might like to check out his portrait.
Not sure what he’s thinking.

But – he did think it warranted a closer look!

TTFN
M


 #20 Demonstrator in Sales in the US 2023-2024
 #13 Demonstrator in Leadership in the US 2023-2024
 #21 Demonstrator in Team Building in the US 2023-2024


 KarensCardCorner
 Stamp with Amy K
 Stampin With Shirley G
 Tarabeth Stamps
 TL's Bright Spot
Such a cute card! Can’t believe that I missed your live last night…guess I wasn’t paying attention to the time! Finn’s thinking that looks like another dog…but it sure doesn’t smell like one! 😉
No – he doesn’t smell at all. Which is not really a BAD thing… LOL! Thanks, Amy! 🙂
Or a sniff? 😂
Yep! 🙂
Mary…I really enjoyed your card video from last night. I love mailboxes too and that card is pretty darn cute. Thanks for sharing your talent and for your friendship. Hugs, Charlotte
Thank you so much, my friend! 🙂
Mary, I love that you used this set for our challenge. When I first visited the US back in the 80s I was amazed by the post boxes at the bottom of driveways and how some people used to decorate them. To me they came to symbolize the US almost as much as the US flag. So thank you for bringing back that memory. I love your wonderfully adorned envelope. Your card captures so many fabulous words from our INSPO list. Thank you for sharing it with us
Jaydee
I love when people decorate their boxes – it’s so fun! Thanks for the kind words, Jaydee!! 🙂
Absolutely adorable, Mary! Love the plaid background and darling mailbox with flowers. Thanks for joining us at Festive Friday Challenge 🙂
Thanks so much, Beth! I appreciate you stopping by! 🙂
Such an adorable card. I love that little heart on the flag. Thanks for join us in the Festive Friday Challenge.
Thanks so much, Diane – appreciate you stopping by!! 🙂
What a cute mailbox. I love this card and shows how versatile you can be with the Festive Friday Inspo list. Thank you for linking up to the Challenge.
Thanks much, Helen – appreciate you stopping by!!
Congratulations! Your fabulous creation was selected as a Festive Fave over at the Festive Friday Challenge. Please hop over to the challenge blog to grab your winner’s badge for your blog. Thanks so much for joining us and I hope you will play along again soon!
Oh – how fun! Thank you all so much!! 🙂