MIKEMIKEMIKEMIKEMIKEMIKE!! Guess what day it is?!? It’s HAWWWWWMP DAY! We’re cresting the hill and headed into the weekend once again! At the rate that January is whizzing by…it’ll be time to put the TREE up again in a heartbeat!
I jest.
Or…do I?? 😳😳😳
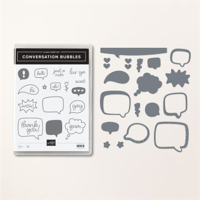
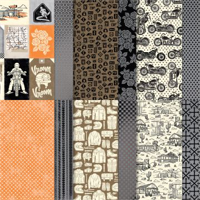
But – not today, people. Not today! Today, we’ve got a fun card – that could easily work as a masculine card if you needed one – using the new Conversation Bubbles bundle and some Ready to Ride DSP! Take a look-see:

The layout is from the sketch over at the Saturday Sketch challenge.

I started by adhering a piece of predominantly Pumpkin Pie paper from the new Ready to Ride DSP onto the front of a Pumpkin Pie card base using Liquid Glue.
I matted a piece of Basic White on Soft Suede and adhered it an an angle.

Then I pulled out the Conversation Bubble die set and proceeded to cut out a bunch-o-bubbles! The graphic shows the four dies that I used, circled in red and green – I cut 2 of each one and kept all the cuts.

I used Liquid Glue first to adhere two of the solid bubbles in the top left and bottom right corners of the angled panel. Then I used more Liquid Glue to adhere various of the bubbles outlines to the panel. Tip: use little dabs of glue, but be sure that the whole die cut is stuck down flat – that helps to get the tone-on-tone embossed look!

I stamped a Conversation Bubbles sentiment in Soft Suede on a piece of Basic White and cut it out with the largest of the Conversation Bubbles dies (it’s the one circled in red above). I used the same die to cut out a Pumpkin Pie frame.
I laid the sentiment upside down on my workspace, then set the Pumpkin Pie frame upside down over it (so that the sentiment was inside the frame – all of it upside down) and then used Stampin’ Dimensionals to adhere the two pieces together (so…put several dimensionals on the back with them “straddling” the edges of the two dies. Yes. Yes I SHOULD have taken a picture – I’m so sorry. Check the short video at the end!).

I used the Dimensionals to adhere the sentiment to the card front.
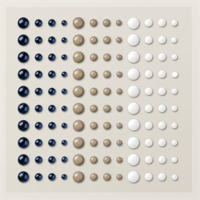
Then I added some Night of Navy Enamel Dot Essentials to the sentiment – and the card front was done.

On the inside, I stamped a Basic White panel with a Soft Suede bubble outline and added a Soft Suede sentiment inside. Then I added more of the Night of Navy Enamel Dot Essentials.

I used Liquid Glue to adhere the panel to a Soft Suede mat and then into the Pumpkin Pie card base and the card was done.
My Basic White Medium Envelope got another cute sentiment from Conversation Bubbles in Soft Suede on the front…

…and a little more of the Ready to Ride DSP on the envelope flap.

Et Voila! What a fun bundle this is! The Conversations Bubbles bundle might be one you overlooked but…I am really liking the possibilities with it, aren’t you? And the Ready to Ride DSP is for MORE than the motorcycle themed designs – be sure to check it out and see how you can use it on your projects! 🙂

I hope you like!
If you’d like to recreate this card, all the products and card cuts are listed below! And – I did up a quick video on how to make this one – check it out right here!
I’ve also created a printable PDF with written instructions and a list of the products used to create this project. You can download, print and/or save it by clicking this image:

Missed any tutorials? You can check out my past projects right here!
TTFN
M

Connect with me! https://campsite.bio/stampsnlingers
HOST CODE FOR 16 JAN – 31 JAN: 9HSSTWEC
Use this host code when you order $50 or greater and receive a free gift (AND the Monthly Card Tutorial) from me! If your order is over $150, please do not use this code, but you’ll still get the free gift. The free gift is your choice of any item valued up to $10.00 in any active Catalog! That includes some of the Host Exclusive stamp sets! See my Customer Rewards page for full details.
Note: Make sure that you can see my name on the final checkout page listed as your Demonstrator when you order so that you know that you’re ordering with me and you’ll get my rewards!
You’ll also be getting a link to my ZOOM The Craftroom (an exclusive TWICE-A-WEEK online event for my customers) and the monthly Online Tutorial. The January Tutorial features the brand new Country Bouquet Bundle!


Sale-a-Bration 2023 Going on Now!

Sale-a-Bration is the coolest time of year at Stampin’ UP! Check out all the goodness – we’ve got reasons to SHOP – reasons to HOST – and…HUGE reasons to JOIN!!
Get all the deets on my Stampin’ Up! Promotions page – or…find out why NOW is the BEST time to join the team!
Here’s a hint…

Get the Stampin’ Up! Products Used in this Project:
Price: $15.00


Card Cuts Used in This Project:
Pumpkin Pie Cardstock: 4 1/4″ x 11″ (card base, scored and folded at 5 1/2″); Conversation Bubbles die cut (frame for sentiment)
Soft Suede Cardstock: 3 1/8″ x 4 5/8″ (mat for center panel); 4″ x 5 1/4″ (mat for inner liner)
Basic White Cardstock: 3″ x 4 1/2″ (center panel); Conversation Bubbles die cut (sentiment and multiple bubbles to adhere to the panel); 3 7/8″ x 5 1/8″ (inner liner)
Ready to Ride DSP: 4 1/4″ x 5 1/2″ (front panel on card); 2 1/4″ x 6″ (envelope flap)
If you need any stamping supplies, I’d be very happy to be your Demonstrator. Just click on the Order Stampin’ Up! Online Now button on the right side of the screen to go directly to my online store or drop me an email if you have any questions. Happy Stamping!
Shop the Clearance Rack here. Earn FREE Stampin’ Up! Products – Join my Punkin Head Peppermint Rewards – My online customer thank you program!
Finn Fan Fix 
Can we talk??

TTFN
M


 #20 Demonstrator in Sales in the US 2023-2024
 #13 Demonstrator in Leadership in the US 2023-2024
 #21 Demonstrator in Team Building in the US 2023-2024


 KarensCardCorner
 Stamp with Amy K
 Stampin With Shirley G
 Tarabeth Stamps
 TL's Bright Spot
Such a cute card! Love the fun conversation bubbles, perfect way to use that set! And yeah, Finn does have some deep thoughts for you. 😉
These discussions CAN get pretty deep, that’s for sure! 🙂 Thanks, Amy! 🙂
Cute use of those dies. I get the tree part…just sitting in my lounge chair reading your post, time is flying by quickly.
Right? I blink and half the year is gone! 🤷♀️ Thanks, Karen! 🙂
Thinking I may just leave the tree up…
LOL!!
Wow. Brilliant and creative design with the speech bubbles!!! Love your card. Thank you so much for sharing at Sketch Saturday.
Thanks much! I appreciate you stopping by!!
That’s a very clever way to use the conversation bubble dies. I love it.
Thank you, Claire! 🙂
I always enjoy seeing everyone’s interpretation of a sketch! The conversation bubbles are so clever! Thanks for playing along with us for the Saturday Sketch Challenge!
Thank you, Ro! Appreciate you stopping by! 🙂
I love how you have used these dies…I had convinced myself I not to buy them, but now I just might change my mind! Definitely could be a masculine card…I always need more ideas for those! Thanks for playing along with us at Sketch Saturday.
They ARE fun, for sure! Thank you so much, Judith! 🙂