‘Sup, y’all!? Having a good weekend? As I predicted, ours has been all about the rat-killing. Is that a term you know? It sort of means…getting all the things done that are just a smidge annoying but…have to get done anyway! Even Finn did some.
Not really. Dogs (certainly the ones whose last names are “Deatherage”!) have a pretty rat-free life! He napped. He sniffed. He licked bowls. Pretty much your average Finn day! 🙂
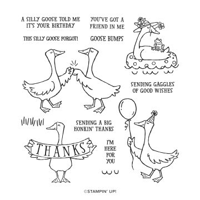
As a polar opposite to the rat killing – I have a super cute and FUN card for you today! It features the new Silly Goose stamp set – some wunnermus Dandy Designs DSP – and a cool fun fold! Take a look-see:

The Spring-y color palette is from the Global Design Project color challenge this week!

I started with a 5 1/2″ x 11″ piece of Basic White cardstock that I scored at 1 1/4″, 5 1/2″ and 9 1/4″ along the long side of the panel. I folded the 1 1/4″ score as a “mountain”, the 5 1/2″ as a “mountain” and the 9 1/4″ as a “valley”.

On a piece of Basic White cardstock, I stamped one of the Silly Goose sentiments in Balmy Blue. Then I adhered it to a So Saffron mat and to the “front” panel of the card. TIP: before you adhere the matted panel to the card base, fold the card as it’s meant to be folded – and be sure you’re going for the correct panel! 😉

For the inside sentiment, I stamped the uber-cute Silly Goose image of the wing-bumping geese in Basic Gray ink. Then I colored them with my Light Smoky Slate and Dark So Saffron Stampin’ Blends. I added some Granny Apple Green grass and…a sentiment nestled right in between them! Which was easy to do because I elected to buy this set as a Photopolymer set!

Did you know that there are FIVE sets in the Jan – Jun 2023 Mini that you can pick EITHER Cling OR Photopolymer!? Yep. True Story! Silly Goose, Around the Bend, Fragrant Flowers, Happy Labels and Lighting the Way! I got them ALL in photopolymer but I LOVE that we get the choice!!
I matted the panel on So Saffron cardstock and adhered it to the inside panel of the card base.

Then it was just a matter of picking my DSP patterns from the cool Dandy Designs DSP (this is a FREE pack of DSP awesomeness with a $100+ purchase during Sale-A-Bration!) and matting them on So Saffron cardstock!
I used Liquid Glue to adhere the matted panels to the front and back of each of the narrower panels, and to the inside of the card – next to the sentiment panel.

With all the matted sentiment and DSP panels in place, I turned to the belly band.
On a piece of Basic White, I stamped the floating Silly Goose with her frog friend in Basic Gray ink. Then I colored the image with my Balmy Blue, So Saffron and Granny Apple Green Stampin’ Blends.

I cut out the image with a Layering Circles die and used Liquid Glue to adhere it to a So Saffron scalloped Layering Circles die cut mat.
The belly band itself is another design from the Dandy Designs DSP pack, cut 1″ x 12″ and wrapped around the folded card. I used Liquid Glue to adhere the ends together. Tip: you want this to be sort of snug but not really. Like Goldilocks…Juuuuust right! You need to be able to get the band on and off the card, but…it shouldn’t slip right off every time you blink, either!

I adhered my matted circle to the belly band with Liquid Glue. I left the extra DSP in place and used my Paper Snips to cut a banner end in it! Just something a little different!

I added some Balmy Blue and gold Pastel Adhesive-backed Sequins and the card was done!
My Basic White Medium Envelope got the fist-bumping geese – along with a too cute sentiment – on the front…

…and a little more Dandy Designs DSP on the envelope flap.

Et Voila! So…I got this Silly Goose stamp set cuz I thought it was kinda cute. Now? I am completely in love with it – it is WAY more cute than I even realized! It’s got great sentiments for your cards to friends who maybe just need a little…goose bump? 😉 And the Dandy Designs DSP – it makes me want to make this crd like….10 more times – each with a different color combo to show off the amazing – FREE! – paper!

I hope you like!
If you’d like to recreate this card, all the products and card cuts are listed below! And – this is the card I made yesterday on my YouTube live video. If you’d like to take a look – for the first time or again! – here’s the link!
I’ve also created a printable PDF with written instructions and a list of the products used to create this project. You can download, print and/or save it by clicking this image:

Missed any tutorials? You can check out my past projects right here!
TTFN
M

Connect with me! https://campsite.bio/stampsnlingers
HOST CODE FOR 16 JAN – 31 JAN: 9HSSTWEC
Use this host code when you order $50 or greater and receive a free gift (AND the Monthly Card Tutorial) from me! If your order is over $150, please do not use this code, but you’ll still get the free gift. The free gift is your choice of any item valued up to $10.00 in any active Catalog! That includes some of the Host Exclusive stamp sets! See my Customer Rewards page for full details.
Note: Make sure that you can see my name on the final checkout page listed as your Demonstrator when you order so that you know that you’re ordering with me and you’ll get my rewards!
You’ll also be getting a link to my ZOOM The Craftroom (an exclusive TWICE-A-WEEK online event for my customers) and the monthly Online Tutorial. The Janury Tutorial features the brand new Country Bouquet Bundle!


Sale-a-Bration 2023 Going on Now!

Sale-a-Bration is the coolest time of year at Stampin’ UP! Check out all the goodness – we’ve got reasons to SHOP – reasons to HOST – and…HUGE reasons to JOIN!!
Get all the deets on my Stampin’ Up! Promotions page – or…find out why NOW is the BEST time to join the team!
Here’s a hint…

Get the Stampin’ Up! Products Used in this Project:


Card Cuts Used in This Project:
Basic White Cardstock: 5 1/2″ x 11″ (card base, scored and folded at 1 1/4″, 5 1/2″ and 9 1/2″ on the long side); 3 1/2″ x 5 1/4″ (x2 – front and inside sentiment panels); 2″ Layering Circles die cut (belly band art)
So Saffron Cardstock: 3 5/8″ x 5 3/8″ (x2 – mats for front and inside sentiment panels); 1 1/8″ x 5 3/8″ (x2 – mats for front and inside small DSP panels); 1 5/8″ x 5 3/8″ (x2 – mats for front and inside medium DSP panels); 4 1/8″ x 5 3/8″ (mat for inside DSP panel); 2 1/2″ Layering Circles scalloped die cut (mat for belly band art);
Dandy Designs DSP: 1″ x 5 1/4″ (x2 – front and inside small DSP panels); 1 1/2″ x 5 1/4″ (x2 – front and inside medium DSP panels); 4″ x 5 1/4″ (inside DSP panel); 1″ x 12″ (belly band); 2 1/4″ x 6″ (envelope flap)
If you need any stamping supplies, I’d be very happy to be your Demonstrator. Just click on the Order Stampin’ Up! Online Now button on the right side of the screen to go directly to my online store or drop me an email if you have any questions. Happy Stamping!
Shop the Clearance Rack here. Earn FREE Stampin’ Up! Products – Join my Punkin Head Peppermint Rewards – My online customer thank you program!
Finn Fan Fix 
Last night, I was doing some stuff in the back of the house and Wayne called back that he and Finny were headed out to the barn to feed.
I finished up in a few minutes and headed to the back door and saw….

He loves his Dad but…he IS his Mama’s dog!
TTFN
M


 #20 Demonstrator in Sales in the US 2023-2024
 #13 Demonstrator in Leadership in the US 2023-2024
 #21 Demonstrator in Team Building in the US 2023-2024


 KarensCardCorner
 Stamp with Amy K
 Stampin With Shirley G
 Tarabeth Stamps
 TL's Bright Spot
Such a fun card design! Love the layering and the fancy fold design! Sorry that I missed your live…I need to set an alarm! And Finn is definitely attached at the hip to mom…unless dad has food. 😉
Well – priorities. Hello?! Thanks so much, Amy! 🙂
So so cute! And “rat-killin” has been used in my family for-ev-er 🤣🤣🤣
That DSP pack is awesome, and you can’t beat free….
It’s my FAVORITE price! Thanks so much, Judi! 🙂
You had me at “Goose Bumps”!!! Great fun fold!
Finn is obviously a gentleman and was waiting to walk mom to the barn.
Yes – he’s a good escort, for sure! It’s an adorable set – hope you’ve got it! Thanks, Debra! 🙂