Hello hello! It’s Sunday and I am hoping your weekend is going well. We hit the Farmer’s Market yesterday and got some homemade soup and three chocolate dipped Almond Biscotti that I am trying HARD not to just eateateat!! They are SO stinkin’ good! Oh – and we bought a bag of Arugula – cuz…it IS a FARMER’S market and we tried to be at least a little healthy!
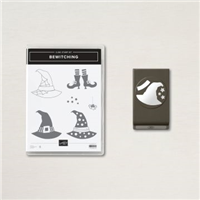
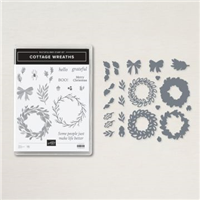
My card today is another Halloween card. I may or may not have said that I was done with Halloween cards but…if I did – I apparently…fibbed. This one combined the Cottage Wreaths bundle (a multi-holiday set) with the Bewitching bundle (a little more…specialized!). Take a look-see;

So – perhaps you noticed that I neglected to take a picture with the Witch Hat Builder Punch in it – but…I DID use it!

The layout for this one is from the current FUSION challenge!

And – the Global Design Project theme challenge is 100% why I ended up doing another Halloween card!! 😉

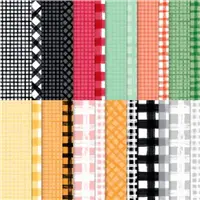
I started by cutting a 1 5/8″ x 4″ piece of Gingham Cottage DSP – that’s a little larger than the final piece that I needed. Using Highland Heather and Basic Black washi tapes from the Glitter Washi Four Pack – and the Stamparatus Deluxe Foam Mat – I created a lattice on the DSP. It’s kind of like the lattice top on a pie – the video shows you how!
When the lattice was done – I used my Paper Trimmer to trim the panel down to 1 1/2″ x 3 7/8″.

On a 4″ x 5 1/4″ piece of Basic Black, I adhered the second Gingham Cottage DSP panel (it’s 3 5/8″ x 3 7/8″) to the bottom of the panel. Then I adhered the washi-latticed panel – eyeballing a “normal” mat reveal all the way around.
I wrapped another piece of Highland Heather washi tape around the “seam”, then used the Paper Trimmer again to trim a little from all four edges to create a 3 7/8″ x 5 1/8″ panel. I adhered the panel to a Basic Black mat to make the card front!

On a piece of Basic White cardstock, I stamped the wreath from Cottage Wreaths in Pumpkin Pie ink. Then I rotated the stamp a bit and stamped it again in Crushed Curry. I stamped the twig wreath image over top in Tuxedo Black Memento Ink.
Using the largest Stylish Shapes circle die, I cut out the wreath and adhered it to the card front with Liquid Glue.

On another piece of Basic White, I stamped the Bewitching witches hat and the sentiment from Cottage Wreaths in Tuxedo Black Memento Ink. Then I stamped the spider (from Bewitching) in Highland Heather.
I used the Witches Hat Builder Punch to cut out the hat and I fussy cut the sentiment and the spider.

I colored the hat with my Pumpkin Pie Stampin’ Blends and popped it onto the card front with Black Stampin’ Dimensionals. Then I adhered the sentiment and the spider with black Dimensionals as well.
I stamped a piece of Highland Heather cardstock with Tuxedo Black Memento Ink stars from the Bewitching set, cut out a hat band with the Witch Hat Builder Punch and popped it in place with Black Dimensionals.

I cut out a couple of Basic Black leaves and a white Glimmer Paper bow using the Country Wreaths dies. I colored the bow with my Highland Heather Stampin’ Blends and adhered it all with Liquid Glue.
Finally – I colored two small white Classic Matte Dots with the Dark Highland Heather Blend and a large dot with the Dark Pumpkin Pie Blend. I adhered the small dots into the “O’s” in “BOO” and the large one to the center of the bow. And – the card was done!
On the inside, I stamped the twig wreath from Cottage Wreaths in Tuxedo Black Memento Ink in the corner of a Basic White panel. Then I added the Highland Heather spider!

I used Liquid Glue to adhere the panel to a Basic Black mat and into my Highland Heather card base, popped the card front on with Black Stampin’ Dimensionals
My Basic White Medium Envelope got the Cottage Wreaths twig wreath and Bewitching spider on the front…

…and more of the Gingham Cottage DSP on the envelope flap.

Et Voila! I have to say I think this is a bit of a fashion-horse witch, don’t you?? Her hat – from the Bewitching set – is a stunner since she added those black leaves and glimmery purple bow from the Country Wreaths Dies! And her hat is the perfect decoration for the Cottage Wreaths wreath she has on her door! And – while it’s in “Halloween Mode” here – the Gingham Cottage DSP gives you paper to cover Thanksgiving, Christmas – really any time of the year!

I hope you like!
If you’d like to recreate this card, all the products and card cuts you’ll need are down below! And – this is the card I made last night on my YouTube video! If you’d like to take a look – for the first time or again – here ’tis!
And…I’ve also created a printable PDF with written instructions and a list of the products used to create this project. You can download, print and/or save it by clicking this image:

Missed any tutorials? You can check out my past projects right here!
TTFN
M

Connect with me! https://campsite.bio/stampsnlingers
HOST CODE FOR 1 OCT – 15 OCT: SCFS2B2G
Use this host code when you order $50 or greater and receive a free gift (AND the Monthly Card Tutorial) from me! If your order is over $150, please do not use this code, but you’ll still get the free gift. The free gift is your choice of any item valued up to $10.00 in any active Catalog! That includes some of the Host Exclusive stamp sets! See my Customer Rewards page for full details.
Note: Make sure that you can see my name on the final checkout page listed as your Demonstrator when you order so that you know that you’re ordering with me and you’ll get my rewards!
You’ll also be getting a link to my ZOOM The Craftroom (an exclusive TWICE-A-WEEK online event for my customers) and the monthly Online Tutorial. The October Tutorial features the Leaves of Holly Bundle!


Starter Kit PLUS Joining Special
Starts on 4 Oct 2022!

October is a fabulous time to join Stampin’ Up! You will get even MORE FREE products in your customizable Starter Kit! Between October 4-31, when you join, you will get $155 worth of products in your Starter Kit for only $99!! That’s an EXTRA $30 in FREE product of your choice!! Plus you’ll get free shipping and all the fun being a part of Stampin’ Up! and our Inkin’ Krew Team!
STARTER KIT+ PROMOTION DATES: 4 – 31 OCTOBER 2022
- When you purchase your Starter Kit, you will be able to redeem $155 of Starter Kit eligible products for just $99!!
- You can select any eligible Stampin’ Up! products up to the stated value of $155.
- Your Starter Kit also includes business resources like catalogs, brochures, order forms, and postcards.
- The Starter Kit also includes a FREE past Paper Pumpkin kit!
- In addition to the amazing added value to your Starter Kit, when you join Stampin’ Up! you get to be a part of our amazing community of crafters. Plus, you get to enjoy sharing simple and fun crafting experiences with others, early access to products, and exclusive access to training events!!
- New demonstrators who submit their Independent Demonstrator Agreement (IDA) before 4 October or after 31 October will not be eligible for this offer.
- Starter Kit+ promotion begins: 4 October 2022
- Starter Kit+ promotion ends: 31 October 2022 at 11:50 PM MT
You can check out more information about joining our team here and more details about the benefits of being a Demonstrator and find the link to join here.
Let me know if you have any questions. We’d love to have you join us and get this great deal on your Starter Kit!
AND – join now and you can add the NEW Fitting Florets products to your Starter Kit!! Click the picture below to see all the new goodies (customers will be able to get these goodies on 1 Nov – demonstrators can get them right now!)

If you’ve been considering joining – now is a great time to jump in! Get the extra $30 in free merchandise in your starter kit AND get this pretty collection as part of your starter kit (or join and get the collection at a 20% discount as a Demonstrator!)! Drop me a note at Stamps-N-Lingers@comcast.net if you have any questions about being a Demonstrator.

STAMP-N-STORAGE FALL SALE
3 Oct – 10 Oct 2022

Sale Details
- 15% OFF Storewide (NOTE: Normal Shipping Charges will apply for orders under $150)
- Starts Monday, 3 Oct,
- Ends Monday, 10 Oct, at 11:59pm CST
- No Code Required! 🤙🤙🤙
See what products I use and get more deets at my post here.
PLEASE NOTE: I do receive a small affiliate fee when you use my Stamp-n-Storage shopping links. But – you’ve seen plenty of pictures of my stamping space – both at home and when I’ve traveled! – and you KNOW that I am a HUGE fan and love their quality products!! I recommend them to everyone!
Get the Stampin’ Up! Products Used in this Project:


Card Cuts Used in This Project:
Highland Heather Cardstock: 4 1/4″ x 5 1/2 (card base); Witch Hat Builder Punched hat band
Basic Black Cardstock: 4″ x 5 1/4″ (x3 – mats for card front and for back liner plus as backer for the DSP card front)
Red & White Glimmer Paper: Country Wreaths die cut bow (in white)
Basic White Cardstock: Largest Stylish Shapes die cut circles; 3 7/8″ x 5 1/8″ (inner liner); Stamped and punched Bewitching hat; fussy cut Bewitching spider and Cottage Wreaths sentiment
Gingham Cottage DSP: 3 5/8″ x 3 7/8″ (bottom panel of card front); 1 5/8″ x 4″ (with Washi strips – cut down to 1 1/2″ x 3 7/8″); 2 1/4″ x 6″ (envelope flap)
If you need any stamping supplies, I’d be very happy to be your Demonstrator. Just click on the Order Stampin’ Up! Online Now button on the right side of the screen to go directly to my online store or drop me an email if you have any questions. Happy Stamping!
Shop the Clearance Rack here. Earn FREE Stampin’ Up! Products – Join my Punkin Head Peppermint Rewards – My online customer thank you program!
Finn Fan Fix

Yesterday we went to the Farmer’s Market – where Finn got LOTS of pettings.
And had to mightily restrain himself from “helping” a bunch of tiny humans with their various cookies and pastries they were eating – RIGHT AT HEAD HEIGHT! 😳😳😳
But he did.
And we were also able to keep all the “friendly” people with their “friendly” dogs away – why does everyone assume that you want your dog to sniff noses and..whatevers…with every Tom, Dick and Fido that is there?? 🤦♀️🤦♀️🤦♀️
Anywho – then we went to Home Depot for some more pettings (and electrical doohickeys for Wayne).
While we were at it – we practiced a little patience and obedience.

He makes it look so easy, doesn’t he? 😉
TTFN
M


 #20 Demonstrator in Sales in the US 2023-2024
 #13 Demonstrator in Leadership in the US 2023-2024
 #21 Demonstrator in Team Building in the US 2023-2024


 KarensCardCorner
 Stamp with Amy K
 Stampin With Shirley G
 Tarabeth Stamps
 TL's Bright Spot
Such a cute card! Love the fun design and the colors are perfect for Halloween! So glad that Finn was a good boy…bet that he had to take a long nap when he got home after restraining himself from the eating and the sniffing! 😉
Yes – all those goodies right at his nose! VERY hard to not just…ever so gently…divest those kids of their goodies!! Thanks, Amy! 🙂
Enjoyed the video last night and really like this cute card. Whoever thought I would say a witches hat is cute? Finn is such a good boy.
Right?! But it IS! Thanks so much, Julie – and yes he really is! 🙂
So cute and perfect for Halloween. Love how you used the washi tape and combined the two great stamp sets. TFS. That practicing patience is harder than Finn makes it look!
Yes it is – not for beginners, for sure! Thanks so much, Susan! 🙂
Hey Mary….it was so fun watching your You Tube video…..darling card! I don’t make Halloween cards, but I really like this little spider…..how can a spider be cute?? Stampin Up can make even a spider look cute!!
As for Finn……well, he is perfect in my book. Of COURSE he got lots of pets and of COURSE he behaved….bet its fun to see people admire him.
We do get a lot of looks and “he’s so handsomes” for sure! Thanks much, Faith – and yes – this is a CUTE SPIDER!! 🙂