

Happy Sunday, y’all! Hope you’re enjoying your weekend! 🙂
If you were able to join me last night for my Facebook live – I appreciate you spending part of your weekend with me! If not – but you’d like to see the replay – here ’tis!

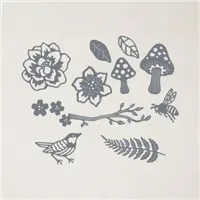
I love a fun fold – and I really love an easel card. And I really REALLY love a side-fold (aka book-fold) card. So…a card that brings all of it together? I’m all over it! This one is a Side-Fold Corner Easel. Yep – that’s a thing! For this one I used a die set that you…MIGHT!…have overlooked in the 2021-2022 Annual Catalog! It’s called the Iconic Die set – and …it’s an a la carte set. Meaning – it’s not associated with a particular suite or stamp set! It’s in there, I promise. Check it out on page 163!

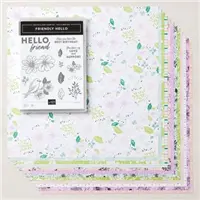
I paired it with the Friendly Hello stamp set – which is one of the cool things you can get for free while Sale-a-Bration lasts. Take a look-see:

The layout for the front of this card was inspired by this week’s Global Design Project sketch challenge.


And I think you can see how I was inspired by the Hand Stamped Sentiments challenge! 🙂


I started with a basic side-fold card. The base is a 4 1/4″ x 11″ piece of Basic Black cardstock, scored at 5 1/2″ and 6 3/4″ on the long side. Then I use my Simply Scored Scoring Tool to score the 4 1/4″ x 4 1/4″ portion on the diagonal.

I folded the 5 1/2” score line as a “mountain” and at the 6 3/4” score in the opposite direction. Topographically speaking, that would be a “valley” fold! The diagonal fold is a “mountain”.😂
Using Liquid Glue between the 5 1/2” and 6 3/4” score lines, I adhered the front of the card base to the back – just in that 1 1/4” area. This made the “book” or “side” fold.

I embossed a small strip of Basic White cardstock in the Brick & Mortar 3D Embossing Folder, then used Liquid Glue to adhere it to a Balmy Blue mat and then to the narrow front panel (the “side-fold” panel).
I cut a 4″x 4″ piece of Balmy Blue and cut it into two triangles – and did the same with a 3 3/4″ x 3 3/4″ piece of the Subtles 6″ x 6″ DSP in Blushing Bride. Then I matted the DSP triangle on the Balmy Blue triangle and adhered it to the “back” of the easel.

For the front of the card, I started by stamping the Friendly Hello sentiment in Misty Moonlight on a square of Basic White cardstock. Reminder: Friendly Hello is a FREE set that you can pick up while Sale-A-Bration is going on with a $100+ purchase. AND – it comes as a bundle with the sweet Friendly Hello DSP!

Then I used a Stitched Rectangle Die as a “guide” to create a “doodle-frame”. I picked the fourth-from-the-smallest of the wider dies and, with the bullet-end of my Basic Black Stampin’ Write Marker, I traced a rectangle around the sentiment. Next, I free-handed two more lines and some ziggy-zags to create a fun frame!

I embossed the panel in the Brick & Mortar 3D Embossing Folder and adhered it to a Balmy Blue mat with Liquid Glue to make the card front.
The rest of the fun decor is from the Iconic Dies.
I cut two “fronds” – one in Balmy Blue and one in Misty Moonlight – and adhered them with Liquid Glue. A medium flower, cut from Blushing Bride cardstock and adhered with Liquid Glue, was next.

Then I cut a solid Misty Moonlight and detailed Balmy Blue leaf and adhered them with Liquid Glue.
There’s a die in the Iconic set that cuts three flowers at once, so I used that to cut some Blushing Bride Subtles 6″ x 6″ DSP flowers. I added a large one with a Stampin’ Dimensional and then a few more – on and around! – with Liquid Glue. I added some Rhinestone Waves Basic Jewels (you can get these on 1 March in the Waves of the Ocean collection).

I cut a Balmy Blue branch and adhered it with Liquid Glue.
To make the bird, I adhered a piece of the Blushing Bride Subtles 6″ x 6″ DSP to a piece of Adhesive Sheet. Then I die cut the bird – with just the body on the part of the DSP that had adhesive behind it. Like this:

I peeled off the back of the Adhesive Sheet and then adhered the bird on a piece of Basic White – with his little legs hanging “off” the cardstock. Then it was an easy fussy cut to cut around just the bird! By not having the legs stuck to the cardstock – I didn’t have to fussy cut them – does that make sense? 🤔 If not, you can fast-scroll to about the 18:30 point on the video and see what I mean!).
I adhered the bird to the card front with some Liquid Glue – then added a few more of the Iconic flowers to the branch.
For the inside, I stamped a second Friendly Hello sentiment in Misty Moonlight on a Basic White panel. Then I added some Friendly Hello flowers in Blushing Bride, berries in Misty Moonlight and “splatters” in Balmy Blue. I adhered the panel to a Balmy Blue mat and inside the Basic Black card base.

I put Liquid Glue on the lower triangle of the card front – the easel – and then adhered the card front to it.
Using Foam Adhesive and a piece of the Blushing Bride Subtles 6″ x 6″ DSP – I cut out a flower for the easel stop. First I adhered a couple more die cut leaves, then peeled the backer off the Foam Adhesive and adhered the flower in place to give my easel somewhere to rest! I added a few more Rhinestones Waves Basic Jewels and the card was done!
My Basic White Medium Envelope got more Friendly Hello flowers, berries and splatters on the front…

…and some more of the Subtles DSP on the envelope flap.

Et Voila! This is SUCH an easy fun fold – I really hope you’ll try one if you haven’t already! And if you HAVE – I hope you’ll try THIS one with the pretty Friendly Hello set and the flying-under-the-radar Iconic Dies!! If you’d like to recreate THIS card, all the products and card cuts are listed below!

And…I’ve also created a printable PDF with written instructions and a list of the products used to create this project. You can download, print and/or save it by clicking this image:


Missed any tutorials? You can check out my past projects right here!
TTFN
M

Connect with me! https://campsite.bio/stampsnlingers
HOST CODE FOR 16 FEB – 28 FEB: 6NB7G7BN
Use this host code when you order $50 or greater and receive a free gift (AND the Monthly Card Tutorial) from me! If your order is over $150, please do not use this code, but you’ll still get the free gift. The free gift is your choice of any item valued up to $10.00 in any active Catalog! That includes some of the Host Exclusive stamp sets! See my Customer Rewards page for full details.
Note: Make sure that you can see my name on the final checkout page listed as your Demonstrator when you order so that you know that you’re ordering with me and you’ll get my rewards!
You’ll also be getting a link to my ZOOM The Craftroom (an exclusive TWICE-A-WEEK online event for my customers) and the monthly Online Tutorial. The February Tutorial features the Paradise Palms Bundle!


NEW “ALL TOGETHER COLLECTION” IS AVAILABLE FOR ORDERING!!


The All Together Collection includes early-release products from the 2022–2023 Annual Catalog—an exciting new range of natural Stampin’ Blends—and exclusive products you can’t get anywhere else!
Come together to create projects inspired by you!
Here’s the deets!
The All Together Collection is available 1 FEBRUARY–2 MAY 2022 (at 11:50 PM MT)
- Qualifying orders are eligible for Stampin’ Rewards. (NOTE: the All Together Collection can’t be selected as a Half-Price Item – sorry!)
- All Together items can be added to a starter kit.
- With the exception of the amazing new Stampin’ Blends – All items in the All Together Collection are available while supplies last and only thru 2 May at 11:50 (MT)
- The new Stampin’ Blends WILL BE OFFERED (WHOO-HOO!!) in the upcoming 2022–2023 Annual Catalog as individual two-packs only!
Check out this PDF Flyer for all the details and pictures of the new products!


Here’s a link to the All Together collection in my Online Store!
Give me a holler if you have any questions about this cool new collection!!
The Clock is Tick-Tocking to the END!!

During the January – February Sale-a-bration event you’ll find amazing reasons to SHOP, HOST and (most importantly!!) JOIN! Check it out!
SHOP!
- There are 7 new products (4 stamp sets and 3 paper packs) that are available as free items to choose from with a Level 1 order (free with an order of $50+)
- There are 2 new items (1 stamp set and paper BUNDLE and and an amazing Sentiment set!) that are available as free choices with a Level 2 order (free with an order of $100+).
HOST!
- There’s also a great new host exclusive stamp set called Calming Camelia that you can pick up for FREE with either a personal order of $300+ or a party with sales totaling $300+!
- Drop me an email at stamps-n-lingers@comcast.net if you’re interested in setting up a personal host code for you and your friends to use – when you collect orders to reach the $300 retail point then you’ll get this cool sentiment-only stamp set for FREE! And that’s on TOP of the free Sale-A-Bration picks you’ll have!
JOIN – HERE’S THE BEST PART OF ALL!
- There is an AWESOME joining promotion happening! If you purchase the Starter Kit between January 4 and February 28, you’ll get to pick a TWO FREE stamp sets with your Starter Kit!! All stamp sets except for host exclusive and Sale-a-bration stamp sets are can be picked as your free sets!!
- When you purchase the Starter Kit for $99 + taxes (if applicable) before the end of Sale-a-bration, the kit ships for FREE and you get to pick $125 in Stampin’ Up! merchandise and you’ll get TWO additional FREE stamp sets with your kit! Yay!! Two free stamp sets in addition to $125 in merchandise for $99, yes please!!
If you have any questions about joining, please drop me a note at stamps-n-lingers@comcast.net, I’d love to chat with you!
You can also see additional information on my blog here: https://stampsnlingers.com/join-my-team/ and on my Stampin’ Up! site here: https://stampsnlingers.stampinup.net/join_now


Get the Stampin’ Up! Products Used in this Project:


Card Cuts Used in This Project:
Basic Black Cardstock: 4 1/4″ x 11″ (card base, scored and folded at 5 1/2″ and 6 3/4″)
Balmy Blue Cardstock: 4 1/8″ x 4 1/8″ (x2 – mats for card front and for inner liner); 4″ x 4″ (cut on the diagonal – mat for back of easel); 1 1/8″ x 4 1/8″ (mat for side-fold panel); Iconic Die cut branch; Iconic Die cut leaves (x2); Iconic Die Cut frond
Misty Moonlight Cardstock: Iconic Die cut leaves (x2); Iconic Die Cut front
Blushing Bride Cardstock: Iconic Die cut flower and bird on front
Basic White Cardstock: 4″ x 4″ (x2 – card front and inner liner); 1″ x 4″ (side fold panel); Behind die cut bird
Subtles 6″ x 6″ DSP (in Blushing Bride): 3 3/4″ x 3 3/4″ (cut on the diagonal – back of easel); Iconic Die Cut small flowers (x 7); Iconic Die Cut Flower (on Foam Adhesive – easel stop); 3″ x 6″ envelope flap
If you need any stamping supplies, I’d be very happy to be your Demonstrator. Just click on the Order Stampin’ Up! Online Now button on the right side of the screen to go directly to my online store or drop me an email if you have any questions. Happy Stamping!
Shop the Clearance Rack here. Earn FREE Stampin’ Up! Products – Join my Punkin Head Peppermint Rewards – My online customer thank you program!
Finn Fan Fix


When it’s too cold for your wussy parents to be doing stuff outside…
But YOU still want to be outside.


Boredboredboredboredbored….

Sigh…..
TTFN
M
P.S. Yes, yes I DID give my window-washer the decade off! 🤦♀️😂