Good morning and welcome to your week! I hope you had a great weekend! We got some things done – not least of which was getting catalogs in the mail. And doing a little rat-killing in my craft room. That’s what we call those pesky little “things to do and fix” – nothing huge, just stuff that needed doing, you know? 🙂
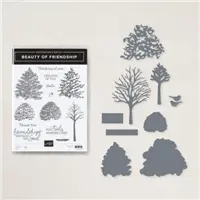
We ALSO had a super fun Amy’s Inkin Krew Team meeting on Sunday! We talked a little business and then three of us presented a project using the Beauty of Friendship bundle and most of us ALSO used the gorgeous Beauty of the Earth DSP. Interestingly – all THREE of us did a fun fold! 😉 I thought I’d share my project with you today! Take a look-see:

The layout for my card was inspired by the sketch over at Freshly Made Sketches this week.

I started out by scoring a 4 1/4” x 11” piece of Old Olive cardstock at 5 1/2” and 6 3/4” on the long side. I folded the 5 1/2” score line as a “valley” – so….you know, ”regular”! – and at the 6 3/4” score in the opposite direction. Topographically speaking, that would be a “mountain” fold! 😂
Using Liquid Glue between the 5 1/2” and 6 3/4” score lines, I adhered the front of the card base to the back – just in that 1 1/4” area. This made the “book” or “side” fold.

I used Liquid Glue to adhere a narrow piece of Beauty of the Earth DSP to a Misty Moonlight mat and then to the narrow front panel. I did the same with a larger square piece and adhered it to the larger side of the card front with Liquid Glue.
Next, I adhered a small Basic White square to a Misty Moonlight mat and then to the card front with Liquid Glue.
I cut a large Beautiful Trees die cut tree from some of the woodgrain paper in the Beauty of the Earth DSP. Since it’s a little too long to comfortably fit on the card front, I trimmed a little off the bottom with Paper Snips, rounding it a little.

I also cut a large solid tree top from Old Olive cardstock. And – from a green piece of the Beauty of the Earth paper, I cut the large detailed tree top.
I did a dry-fit of the tree on the card front to determine the location of each piece – and ensure it didn’t extend past any edges of the card base. Then I stamped the little splatters image from Beauty of Friendship in stamped-off-once Misty Moonlight in the top corners and under the right side of the tree.

I used Liquid Glue to adhere the tree pieces to the card front – starting with the Old Olive “open” tree top shape and then adding the Beauty of the Earth die cut trunk – both with Liquid Glue.
I popped the detailed die cut tree top onto the tree using Stampin’ Dimensionals cut into little pieces.
I stamped the sentiment from Beauty of Friendship in Mossy Meadow on a piece of Basic White and cut it out with the little tag die in the Ornate Frames die set.

I adhered the tag to the card front with Liquid Glue. Next, I used the birds die in the Beautiful Trees die set to cut out a Misty Moonlight bird that I adhered to the sentiment with Liquid Glue.
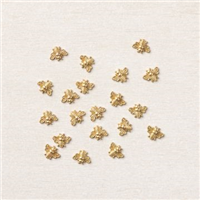
I tied a small white baker’s twine bow (from the Baker’s Twine Essentials Pack) and adhered it to the end of the tag with a scrunched up Glue Dot. Finally, I used Glue Dots to adhere three Bumblebee Trinkets and the card front was done!
For the inside, I stamped the tree trunk from Beauty of Friendship in Early Espresso ink on a Basic White square. I used the more solid small tree top image to stamp in Old Olive and then added the more detailed image in Mossy Meadow. Then I stamped the little splatters image from Beauty of Friendship in stamped-off-once Misty Moonlight.

I used Liquid Glue to adhere the panel to a Misty Moonlight mat and into the card base and the card was done!
My Basic White Medium Envelope got the stamp the tree image on the front – stamped just like I’d done on the inside of the card…

…and more of the Beauty of the Earth DSP on the envelope flap.

Et Voila! It’s so easy to forget about all the great sets and suites in the Annual Catalog while we’re busy playing with a current mini catalog AND looking forward to a NEW catalog in January, so I’m grateful for the reminder! Beauty of Friendship – with its bundled Beautiful Trees dies – is wonderful, with pretty images and sentiments. Add the Beauty of the Earth DSP – which is just gorgeous – and you don’t even NEED to make it a fun fold for it to be awesome. Of course…a fun fold never hurts, am I right?!

I hope you like!
If you’d like to recreate this card, all the products and card cuts you’ll need are down below!
TTFN
M

Connect with me! https://campsite.bio/stampsnlingers
![]()
HOST CODE FOR 1 DEC – 15 DEC: QTE4W7GK
Use this host code when you order $50 or greater and receive a free gift (AND the Monthly Card Tutorial) from me! If your order is over $150, please do not use this code, but you’ll still get the free gift. The free gift is your choice of any item valued up to $10.00 in any active Catalog! That includes some of the Host Exclusive stamp sets! See my Customer Rewards page for full details.
Note: Make sure that you can see my name on the final checkout page listed as your Demonstrator when you order so that you know that you’re ordering with me and you’ll get my rewards!
You’ll also be getting a link to my ZOOM The Craftroom (an exclusive TWICE-A-WEEK online event for my customers) and the monthly Online Tutorial. The December Tutorial features the Plentiful Plants Bundle!


I’ve created a printable PDF with written instructions and a list of the products used to create this project. You can download, print and/or save it by clicking this image:

Missed any tutorials? You can check out my past projects right here!
Interested in Joining Us?
If you’d like to join our team, we’d love to have you! You can become a demonstrator for just $99! We welcome all types of Demonstrators from those only purchasing to get the discount for themselves to those who want to run a business and those anywhere in between!

It just so happens that this is a SUPER good time to join! You can order from the new Jan – Jun 2022 Mini Catalog EARLY with me!!
Jul – Dec 2021 Mini Catalog Last Chance Products Sale Has Started!

You’ve been waiting and now is the Time! The Last Chance Products are available for you to order!! And – don’t miss the newly refreshed Clearance Rack! 🙂
SALES PERIOD:
Starts: 1 December 2021 at 12:00 AM (MT)
Ends: 3 January 2022 at 11:50 PM (MT)
DETAILS:
- Each Last Chance Products promotion typically includes a Retiring List (products that will no longer be available once the catalog retires) and a Carryover List (products that will still be available once the catalog retires).
- The Carryover List will be available online until the 2022–2023 Annual Catalog launches.
- Look for discounts up to 50% on SOME (not all) of the items on the Retiring List.
- All products are available while supplies last, and there are no purchase limits.
- Discounted items can be added to a Starter Kit and redeemed as a 50% off item or with Stampin’ Rewards.
If you like lists – here they all are! Or…click here to go right to the Last Chance Products in my Online Store!
RETIRING LIST (WITH DISCOUNTS!):
See which products will be on their way out once the July–December 2021 Mini Catalog retires.
DOWNLOAD SORTABLE EXCEL SHEET– modified for you, removing non-English sets
DOWNLOAD PDF – this is the full list, including non-English sets
CARRYOVER LIST:
See which products will still be available after the July–December 2021 Mini Catalog retires.
DOWNLOAD SORTABLE EXCEL SHEET – modified for you, removing non-English sets
DOWNLOAD PDF – this is the full list, including non-English sets
Please be sure to note the asterisks, okay? Some of the carryover items will not be available right away – but will be back in the next Mini Catalog next summer!
Clearance Rack Refresh!
What better way to cap off a big Last Chance Sale than to restock the the Clearance Rack with discounted goodies?! That’s just what Stampin’ Up! has done for us! You’re going to want to check them all out before they are gone…cuz Clearance Rack deals are only while supplies last!
Here’s a link right to the Clearance Rack in my Online Store.
Happy Shopping and Saving!
Get the Stampin’ Up! Products Used in this Project:


Price: $11.50


Card Cuts Used in This Project:
Old Olive Cardstock: 4 1/4″ x 11″ (card base, scored and folded at 5 1/2″ and 6 3/4”); Beautiful Trees large solid tree top die cut
Misty Moonlight Cardstock: 4 1/8” x 4 1/8” (x2 – mats for card front and for inner liner); 1 1/8″ x 4 1/8″ (mat for side-fold); 3 1/8” x 3 1/8” (mat for white square on front); Beautiful Trees die cut bird
Basic White Cardstock: 3″ x 3″ (square on front); 4” x 4” (inner liner); Ornate Frames die cut tag (sentiment)
Beauty of the Earth DSP: 4” x 4″ (card front); 7/8” x 4” (side fold panel); Beautiful Trees die cut large “trunk”; Beautiful Trees die cut detailed large tree top; 3″ x 6″ (envelope flap)
If you need any stamping supplies, I’d be very happy to be your Demonstrator. Just click on the Order Stampin’ Up! Online Now button on the right side of the screen to go directly to my online store or drop me an email if you have any questions. Happy Stamping!
Shop the Clearance Rack here. Earn FREE Stampin’ Up! Products – Join my Punkin Head Peppermint Rewards – My online customer thank you program!
Finn Fan Fix

You’re really only as clean…

….as your feet.

TTFN
M


 #20 Demonstrator in Sales in the US 2023-2024
 #13 Demonstrator in Leadership in the US 2023-2024
 #21 Demonstrator in Team Building in the US 2023-2024


 KarensCardCorner
 Stamp with Amy K
 Stampin With Shirley G
 Tarabeth Stamps
 TL's Bright Spot
Such a pretty card! Thanks for sharing it at the meeting yesterday! 🙂
What? See my shiny clean coat mom? I am clean as can be and would never leave dirty prints all over the house…Nothing to see in the paw area. 😉
Nothing to see here – move along! LOL! Thanks, Amy – it was fun! 🙂
Loved your presentation and I need to CASE this one! The little splotches really added to the design. Have a great week and get those feet clean! At least they aren’t covered with burrs!!
True that! For a half-a-minute! Thanks for the kind words, Karen! 🙂
I love everything about this and loved watching you make it yesterday! Love the fun fold, layering, bees, take on the sketch, little tag for the greeting—just a complete card! TFS. Finn’s been busy by the looks of his little paws!
So glad that you enjoyed the meeting, Susan – I thought it was a fun day! 🙂 Yes. Those are busy paws, for sure! 🙂
Fabulous card and such a clever take on the sketch! Thanks so much for joining us at Freshly Made Sketches.
Thanks so much, Karren – appreciate you stopping by! 🙂