Good morning and happy St. Patrick’s Day! Don’t forget to wear some green somewhere so you don’t get pinched. Is that still a thing?? We (I) used to claim that our flight suits were PLENTY green enough to count! Not sure that was a valid argument but…it was one I’d defend all the way up to the pinch!
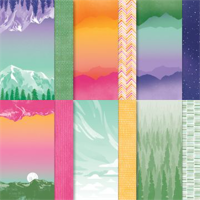
My card today is one that is sort of all over the card-making internet – it’s called a Flying Seagull Fun Fold – I assume cuz it sorta looks like a flying bird when you look at it from the top down. I made two of them using two different mountain-strewn pieces of Enjoy the Journey DSP – and decorated them with a sentiment and die cuts from the coordinating Greatest Journey bundle. Take a look-see:

So – straight up – this isn’t a hard card but it IS one that takes a little thought. I’m thinking that watching the video that I link to at the end of the post will be your best bet. I’ll ‘splain it best as I can but…this one is really easier to SHOW than to TELL!
There are two card bases – each is 4 1/4″ x 8 1/4″ – that I scored at 2 1/4″, 4″ and 6 1/4″. Then I folded the 2 1/4″ fold on each base as a mountain fold and the other two as valley folds.

I folded the 6 1/4″ score line back on itself on both card base pieces – and then “butted” the folds up to each other. Then I added some Liquid Glue to the panels and used that to adhere the 4″ x 4″ Starry Sky pop up panel. Yeah – like I said – check the video! And yes – as you’ll see in the video, I even had some trouble getting my noggin around it – so…take your time. You’ll get it – I promise!

For this card – I wanted to make all the panels work together to create the mountain “scene”…

To accomplish that, I cut a piece of the Enjoy the Journey DSP to 4″ tall and the full 12″ wide.
Using my Paper Trimmer – and starting on the left side of the DSP panel, I cut a 2″ panel, then a 1 1/2″ panel, then a 4″ panel, another 1 1/2″ panel and finally a 2″ panel. By doing it in that order – the scene remained contiguous across the card base. 🙂
I used Liquid Glue to adhere all the panels to their Highland Heather mats. Then I adhered all the smaller panels to the card front with Liquid Glue.

Yep – that’s the card I made in the video. Same exact concept – just a different color palette! That one used Basic Black card base pieces and Coastal Cabana mats versus the Starry Sky and Highland Heather.
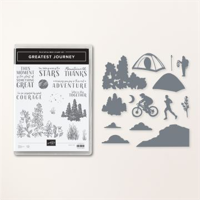
I used the edge die from the Greatest Adventure die set to cut a “mountain top” from a 4″ wide piece of Starry Sky cardstock (or Basic Black, depending on the card). I also cut a hiker – and snipped off the lantern – then adhered him to the top of the mountain with a little Liquid Glue. A die cut hiking pole was next.

I cut out a couple of Basic White clouds and adhered them with Liquid Glue.
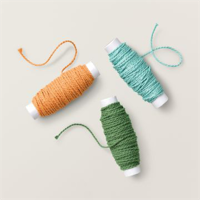
Then I wrapped a piece of Coastal Cabana (or Pumpkin Pie!) twine from the Three Twine Combo Pack twice around the panel and tied a simple knot.

On a piece of Highland Heather (or Coastal Cabana) cardstock, I stamped the Greatest Journey sentiment in Versamark ink, sprinkled it with white Stampin’ Embossing Powder and heat set it with the Heat Tool.
When it was cool, I cut it with the smallest wider die in the Stitched Rectangle die set – then I popped it onto the panel with Stampin’ Dimensionals.

I used Liquid Glue to adhere the completed panel to the pop up panel – and the card front was done!
I decided there NEEDED to be a spot to write a message on the back – so I stamped the Enjoy the Journey trees in Starry Sky (or Garden Green) on a small Basic White panel. I matted it – and a second same-size panel – on their coordinating mats and then adhered them to the back of the card base with Liquid Glue.


I used Liquid Glue to adhere the panels to the center two panels on the back of the card – and the card was done!
My Basic White Medium Envelope got the Greatest Journey trees on the front…


…and a coordinating piece of Enjoy the Journey DSP on the envelope flap.


Et Voila! Okay – sure – this one is a bit of geometry quiz but…look at the result! SO worth it!! 😎 I love this Flying Seagull fold – I happened to see it first on Susan Stanfield’s blog, but…it’s all over the place! I really love it with the full mountain scene from the Enjoy the Journey DSP and Greatest Journey bundle. I can’t even pick a favorite color – I think they’re both pretty awesome! Can you think of someone in your circle of family or friends who might like to receive this one? I sure can! 🙂

I hope you like!
If you’d like to recreate this card, all the products and card cuts you’ll need are down below! And – as mentioned – this is the card I made yesterday on my YouTube live. If you’d like to watch it – for the first time or again! – here’s a link!
And…I’ve also created a printable PDF with written instructions and a list of the products used to create this project. You can download, print and/or save it by clicking this image:

Missed any tutorials? You can check out my past projects right here!
TTFN
M

Connect with me! https://campsite.bio/stampsnlingers
HOST CODE FOR 16 MAR – 31 MAR: AFUZPRSY
Use this host code when you order $50 or greater and receive a free gift (AND the Monthly Card Tutorial) from me! If your order is over $150, please do not use this code, but you’ll still get the free gift. The free gift is your choice of any item valued up to $10.00 in any active Catalog! That includes some of the Host Exclusive stamp sets! See my Customer Rewards page for full details.
Note: Make sure that you can see my name on the final checkout page listed as your Demonstrator when you order so that you know that you’re ordering with me and you’ll get my rewards!
You’ll also be getting a link to my ZOOM The Craftroom (an exclusive TWICE-A-WEEK online event for my customers) and the monthly Online Tutorial. The March Tutorial features the brand new Playing in the Rain Bundle!


Get the Stampin’ Up! Products Used in this Project:


Card Cuts Used in This Project:
Starry Sky or Basic Black Cardstock: 4 1/4″ x 8 1/4″ (x2 – card bases – scored and folded at 2 1/4″, 4″ and 6 1/4″); 4 1/4″ x 4 1/4″ (pop up panel); Greatest Journey die cut hiker, hiking pole and mountain
Highland Heather or Coastal Cabana Cardstock: 2 1/8″ x 4 1/8″ (x4 – mats for wider front panels and mats for back panels); 1 5/8″ x 4 1/8″ (x2 – mat for narrower front panels); 4 1/8″ x 4 1/8″ (mat for pop up panel); small Stitched Rectangle Die (sentiment)
Basic White Cardstock: 2″ x 4″ (x2 – back panels); Greatest Journey die cut clouds (x2)
Enjoy the Journey DSP: 2″ x 4″ (x2 – wider front panels); 1 1/2″ x 4″ (narrower front panels); 4″ x 4″ (pop up panel); 2 1/4″ x 6″ (envelope flap)
If you need any stamping supplies, I’d be very happy to be your Demonstrator. Just click on the Order Stampin’ Up! Online Now button on the right side of the screen to go directly to my online store or drop me an email if you have any questions. Happy Stamping!
Shop the Clearance Rack here. Earn FREE Stampin’ Up! Products – Join my Punkin Head Peppermint Rewards – My online customer thank you program!
Finn Fan Fix 
Finn sends y’all a most Happy St. Patrick’s Day!
He’s not sure who this Patrick fella is, exactly, but…any holiday or cause for a cookie is okay in his book!
Aunty Karen and Coraline (her fur-kid) sent a very yummy (I hear – tasting his cookie would have been wrong so of course I did NOT do that!!) St. Paddy’s day cookie to him!

I got one minute to grab an unmolested photo!

Mom! It’s MINE!!

Best. Picture. Ever!
Thanks, Aunty Karen!!
TTFN
M


 Inky Bee Stampers
 KarensCardCorner
 Stamp with Amy K
 Stamp With Nel
 Stampin With Shirley G
 Tarabeth Stamps
 TL's Bright Spot
Top o’ the Mornin’ !
Lovely mountain scene.
Thanks, Mom! 🙂
Awesome cards. Thank you for the tutorial.
Thank you – glad that you like it – and glad that the tutorial helps! 🙂
Hi Mary…..well, I loved watching you make this card in your ‘live’ yesterday. I bought this suite just for the guy on the bicycle……now I’m so glad I did. You have given me the perfect card and lots of ideas….today is going to be dedicated to copying you.
I’m so glad ‘Aunty Karen’ sends such nice cookies to Finn! He looks so happy….he always knows when mail comes for him, doesn’t he??
Well – he’s kind of gotten to the point that he’s pretty sure EVERY package MIGHT be for him! LOL! Have fun making cards, my friend – thank you so much! 🙂
Wow, haven’t had a chance to watch the video yet, but those cards are spectacular! Such a cool use of that paper!
Thanks very much, Beth Ann! 🙂
Those cards are awesome! Love the layout, perfect for that designer paper!
Hahahahaha!!! That last photo of Finn is a classic!!!
I was so tickled to get that shot! The teeth! Thanks much, Amy! 🙂
super fold, thank you for the PDF and video 🙂
You are most welcome – I’m glad you like it! Thanks! 🙂