Good morning and happy Friday-before-a-three-day weekend! That’s right – Monday is a holiday! Yeah! Hopefully YOU have it off and can do something fun with family and friends!
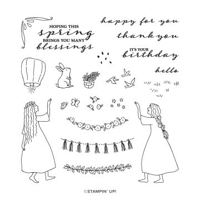
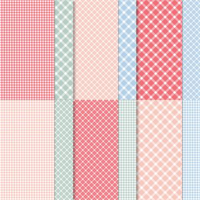
Yesterday I pulled a stamp set off my shelf that you may have missed in the Jan – Apr 2023 Mini Catalog. It’s called Spring Blessings and it is VERY sweet! And it gets even sweeter on a cool Corner Tuck Fun Fold card anchored by the wunnermus Country Gingham 6″ x 6″ DSP. Take a look-see:

The sweet color palette is from the The Paper Players challenge this week.

I started with a 4 1/4″ x 8″ piece of Balmy Blue cardstock that I scored and folded at 2 1/2″ on the long side to make the main card base.
I matted two pieces of Petal Pink Country Gingham DSP on Crumb Cake – one small panel for the side panel on the front – and a larger panel for the back panel on the inside of the card.

I cut a piece of Basic White cardstock and decorated it as follows:
– Stamped the right-facing girl from Spring Blessings in Crumb Cake.
– Colored her dress with the Light Stampin’ Blend.
– Stamped the little flowers on her dress in Crumb Cake.
– Colored her hair with the Light So Saffron Stampin’ Blend.
– Colored her head band with a Balmy Blue Stampin’ Blend.
– Colored her face, hands, arms and feet with the Medium Light Stampin Blend.
– Stamped the lantern image and the birds image twice at the top in Crumb Cake.
– Used small Blending Brushes to add light Balmy Blue in the top portion of the panel and Crumb Cake in the bottom portion.
– Stamped grass in Crumb Cake.
– Colored the lanterns with So Saffron and Petal Pink Stampin’ Blends.
– Colored the birds with the Balmy Blue Stampin’ Blends.

On another piece of Basic White, I stamped the Sweet Blessings flower basket and another lantern in Crumb Cake ink. I colored the basket with the Light Crumb Cake Stampin’ Blend and the lantern with the So Saffron and Petal Pink Stampin’ Blends. Then I fussy cut them both using Paper Snips.
I used Liquid Glue to adhere the panel to a Crumb Cake mat and then to a 3″ x 4 1/4″ piece of Balmy Blue cardstock.

I cut a 2″ x 2″ piece of Balmy Blue Country GIngham 6″ x 6″ DSP and used my Paper Trimmer to cut it into a triangle.
I adhered the triangle in the corner of the card front using Tear & Tape Adhesive. Notel: this little piece will get a lot of “action” – so Tear & Tape is a good choice! Only put the adhesive on the sides – not on the diagonal edge.
I used Liquid Glue on the top – smaller – panel of the main card base and set the art panel in place – ensuring it would tuck into the DSP corner I’d just created.
I adhered my fussy cut basket and lantern with Stampin’ Dimensionals.

I stamped a Spring Blessings sentiment in Crumb Cake on a piece of Basic White cardstock and cut it out with the smallest narrow Stitched Rectangle die. I adhered it with Stampin’ Dimensionals.
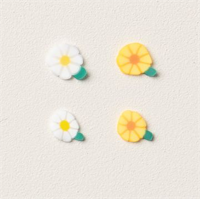
Finally, I used teensy dabs of Liquid Glue to adhere the Loose Daisy Embellishments and the card front was done!
For the inside, I used the fourth-from-largest Stitched Rectangle die to cut out a Basic White panel. I stamped the sentiment and images in Crumb Cake – sponged the top and bottom with Balmy Blue and Crumb Cake, and colored it all with Stampin’ Blends.

I slipped the die cut into the corner pocket and adhered it with Liquid Glue – ensuring it is hidden when the card front is closed – and the card was done.
My Basic White Medium Envelope got some Blending and the Crumb Cake images from Spring Blessings on the front…

…and more of the Country Gingham DSP on the envelope flap.

Et Voila! How sweet are the images and sentiments (I really love the fonts!) in the Spring Blessings set? It’s what I’d call a “scene” set – letting you combine images to create lovely scenes to your heart’s content! I think it pairs beautifully with the Country Gingham DSP! And – this Corner Tuck Fun Fold – which I saw for the first time on a Splitcoast Stampers Tutorial from Dee Slater! – creates a super cool blank slate for you to decorate!

If you’d like to recreate this card, all the products and card cuts are listed below! And – this is the card I made on yesterday’s YouTube live video! If you’d like to see it – for the first time OR again! – here ’tis!
I’ve also created a printable PDF with written instructions and a list of the products used to create this project. You can download, print and/or save it by clicking this image:

Missed any tutorials? You can check out my past projects right here!
TTFN
M

Connect with me! https://campsite.bio/stampsnlingers
HOST CODE FOR 16 FEB – 28 FEB: UFBG796P
Use this host code when you order $50 or greater and receive a free gift (AND the Monthly Card Tutorial) from me! If your order is over $150, please do not use this code, but you’ll still get the free gift. The free gift is your choice of any item valued up to $10.00 in any active Catalog! That includes some of the Host Exclusive stamp sets! See my Customer Rewards page for full details.
Note: Make sure that you can see my name on the final checkout page listed as your Demonstrator when you order so that you know that you’re ordering with me and you’ll get my rewards!
You’ll also be getting a link to my ZOOM The Craftroom (an exclusive TWICE-A-WEEK online event for my customers) and the monthly Online Tutorial. The February Tutorial features the brand new Dainty Delight Bundle!


Be sure to check out my Retired Products Shop page! Lots of new goodies at very sweet savings! Check it out right here!
Sale-a-Bration 2023 Going on Now!

Sale-a-Bration is the coolest time of year at Stampin’ UP! Check out all the goodness – we’ve got reasons to SHOP – reasons to HOST – and…HUGE reasons to JOIN!!

We’ve also got new items to pick from at the $50 level and $100 level during Sale-a-bration (which ends on 28 Feb)! They’re all items from the current catalog and they’re all available IN ADDITION to the Sale-a-bration exclusives from the Sale-a-bration 2023 Brochure!
Click on this flyer to open a PDF with the list of new Sale-a-bration items available now:

Get all the deets on my Stampin’ Up! Promotions page – or…find out why NOW is the BEST time to join the team!
Here’s a hint…

Get the Stampin’ Up! Products Used in this Project:


Cuts Used in This Project:
Balmy Blue Cardstock: 4 1/4″ x 8″ (main card base, scored and folded at 2 1/2″); 3″ x 4 1/4″ (front panel)
Crumb Cake Cardstock: 2 1/4″ x 4″ (mat for small panel on main card base); 4″ x 5 1/4″ (mat for back panel); 2 3/4″ x 4″ (mat for front panel)2 5/8
Basic White Cardstock: 2 5/8″ x 3 7/8″ (front panel); Smallest narrow Stitched Rectangle Die cut (sentiment); Fourth-from-Largest Stitched Rectangle Die cut (inside panel); Stamped and fussy cut Spring Blessings flower basket and lantern
Country Gingham 6″ x 6″ DSP: 2 1/8″ x 3 7/8″ (small panel on main card base); 3 7/8″ x 5 1/8″ (back panel); 2″ x 2″ (cut on the diagonal for the corner); 2 1/4″ x 6″ (envelope flap)
If you need any stamping supplies, I’d be very happy to be your Demonstrator. Just click on the Order Stampin’ Up! Online Now button on the right side of the screen to go directly to my online store or drop me an email if you have any questions. Happy Stamping!
Shop the Clearance Rack here. Earn FREE Stampin’ Up! Products – Join my Punkin Head Peppermint Rewards – My online customer thank you program!
Finn Fan Fix 
I’m a little embarrassed to show you these pictures.
I mean, not so embarrassed that I’m NOT going to show them to you. They’re too cute.
This a big pan, Mom! Gots to hold it ‘tween my arms!

Gettin right in there – holdin it down with my giant hand so it not move…

Check back here…stay put pan!

Okay – all clean, Mom! Whatcha got next??

Please note: this is my awesome Hexclad pan – and it’s dishwasher safe, so… 😉
TTFN
M


 Inky Bee Stampers
 KarensCardCorner
 Stamp with Amy K
 Stamp With Nel
 Stampin With Shirley G
 Tarabeth Stamps
 TL's Bright Spot
I really like this fold. Sorry I missed you live…still have company. My sil got the Hexclad from my daughter for Christmas. He loves it but doesn’t put it in the dishwasher AND they have no critters to lick it clean any longer. Glad Finn enjoyed.
I love mine, too – all the pieces!! 🙂 They don’t go in the dishwasher unless there are…”extenuating” circumstances. Like…this! LOL! Hope you’re having a great visit! 🙂
Such a pretty card! Love the soft colors and your design is perfect! Sorry that I missed your live yesterday, I’ll catch the replay today. 🙂 Yeah…Finn does love to “help” in the kitchen. Good thing that he’s got two paws for holding. 😉
And that they’re HUGE enough to get the job done!! Thanks, Amy! 🙂
This is really, really cute! I love this set but didn’t think I would use it enough to get it, so it’s fun to see how you made this fun fold card with it! Perfectly springy way to use our colors—so happy you played along with the Players this week!
Thanks very much, LeAnne! I appreciate the kind words! 🙂
Cutest card ever, Mary!! And it was very fun watching you make it.
As for Finn and the pan…..I want to know what had been IN the pan….it must have tasted delicious to him!!
I think it was taco meat. He’s quite the gourmet eater! He likes ALL the ethnic foods!! LOL! Thanks so much, Faith! 🙂
Hello, Mary! I love how your card folds and tucks – great idea! The light touch on your coloring is perfect. And then, of course, there’s Finn! Thanks for sharing your creation and your sweet fur baby with us at The Paper Players.
Xoxo, Fran
Thank YOU for coming by and for the kind words, Fran!! 🙂
What a sweet, sweet card, Mary! You have opened my eyes to this stamp set. This is such a lovely and unique design that truly shows off the challenge colors. Thank you for sharing with The Paper Players this week!
Thank you so much, Ann- I appreciate you taking time to come by!! 🙂
Pretty!
Pretty thorough!
Thanks! And yes – no job is worth doing if you’re not going to do it right! 🙂